In this blogpost series I will explain how-to setup and get running with Nutanix Flow Network Security Next-Gen (FNS). In this first part we will deploy and setup the environment and will create some Security Policies. The cluster being used is a single node NX-3060-G7 with the following versions:
- AOS 7.0.0.5;
- AHV 10.0.1;
- Prism Central 2024.3.0.2.
Some handy links to get a head start with FNS:
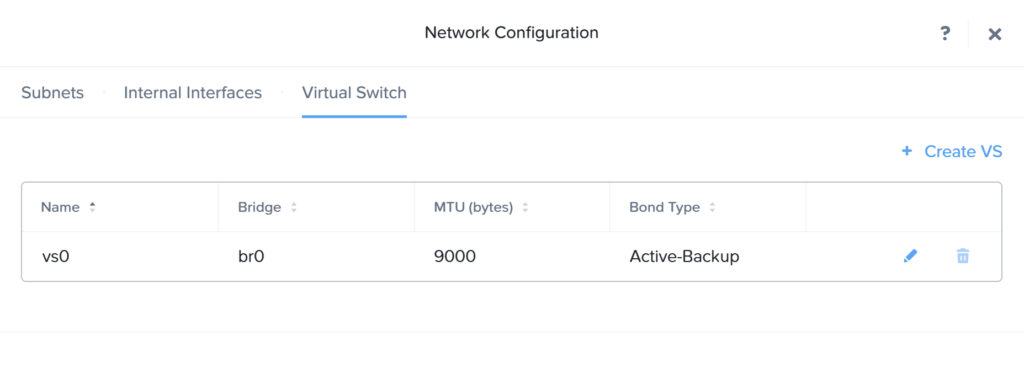
MTU Size:
According the Flow Virtual Networking Guide we need to enable an MTU size of 9000 on the virtual switches and enable the physical switches to support a range between 1500 ~ 9000
Nutanix recommends increasing the MTU to 9000 bytes on the virtual switch vs0 and ensure that the physical networking infrastructure supports higher MTU values (jumbo frame support). Nutanix recommends configuring the MTU value in the range of 1500 ~ 9000 bytes.
So first we need to change the MTU size of the virtual switch(es):
Enabling (and updating) the network controller and microsegmentation:
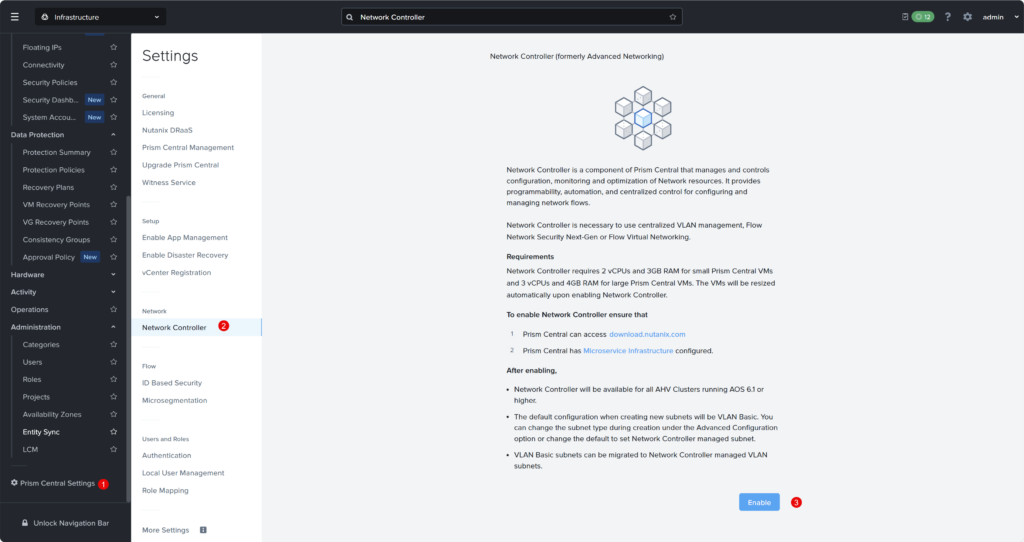
What is the Network Controller?
The Network Controller is the networking component of Prism Central that manages and controls configuration, monitoring and optimization of network resources for Flow Virtual Networking VPCs and VLAN subnets. It provides programmability, automation, and centralized control for configuring and managing network flows.
This blogpost (part 1) will only cover how to enable FNS and to make a simple a simple Security Policy But we are using the latest versions available and so we need to enable the network controller. As this is required to create Network Controller managed VLAN Subnets. Which are required to create Security Policies. In PC open settings –> Network Controller –> Enable. This will take a couple of minutes. (In a XL Prism Central deployment the controller is automatic enabled).
When done PC will show this screen:
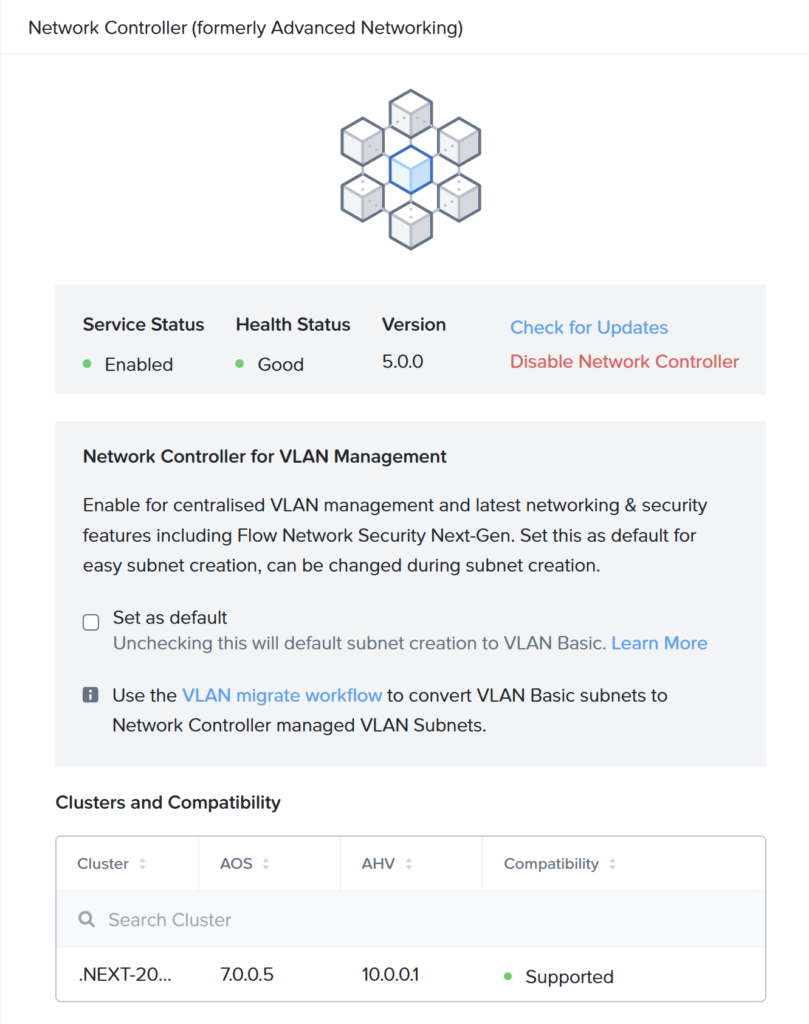
Check the box: “Set as default” to make sure new VLANs are created in the correct versions.
With Microsegmentation we can create an “east-west” firewalling setup. To enable Microsegmentation navigate in the left menu to Microsegmentation.
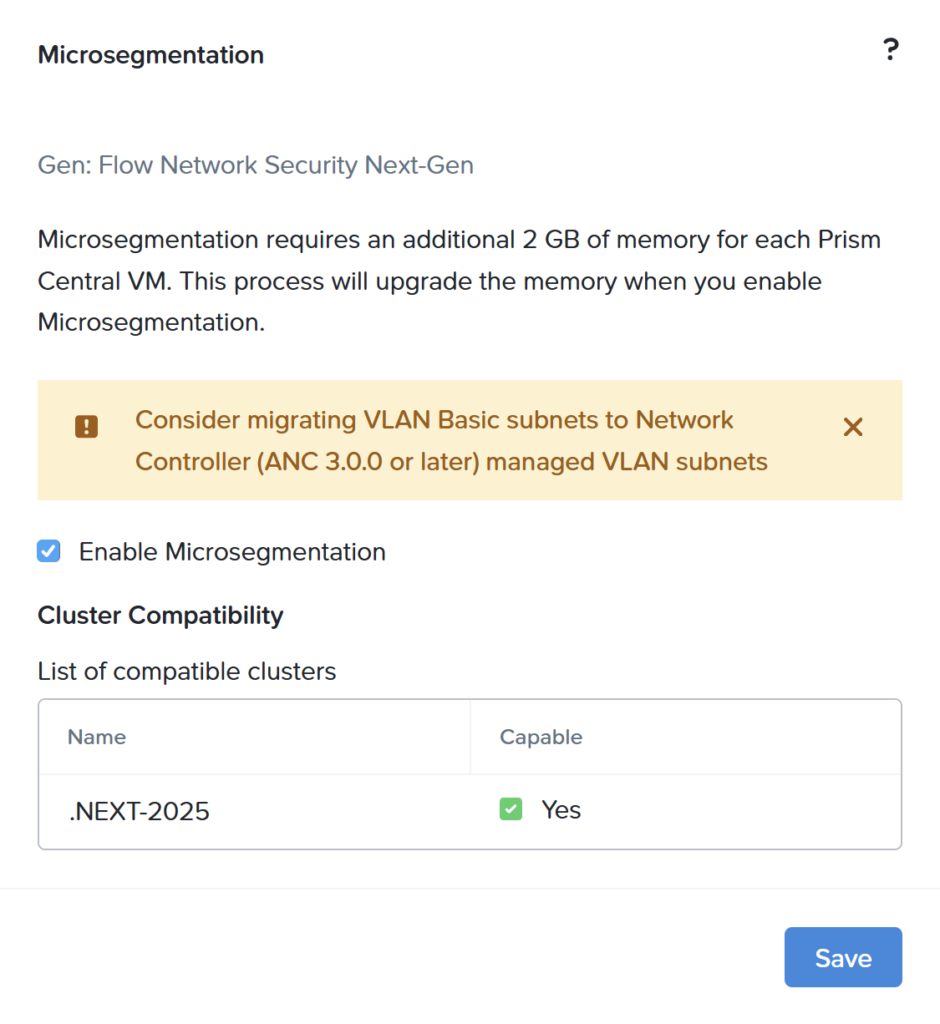
Select the checkbox to enable Microsegmentation and click save. Now all connected (and supported) clusters are ready to use FNS.
Migrate or Create the VLANs:
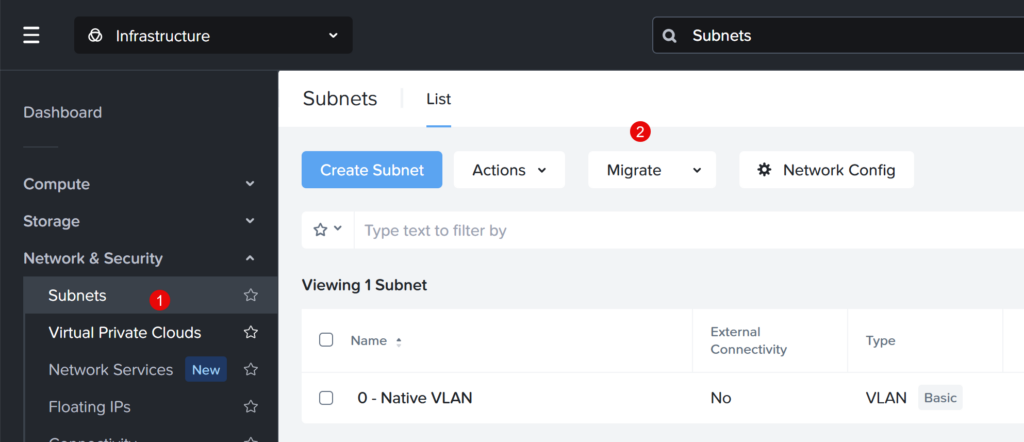
Before we create the first Security Policy we need to make sure the, already present, subnets are managed by the network controller. We can do that via the migration wizard in PC. Navigate to Subnets –> Migrate
Follow the easy wizard to migrate all basic VLANs to Network Controller managed VLANs. In my case I only have one (1) VLAN. So my migrated view looks like this:
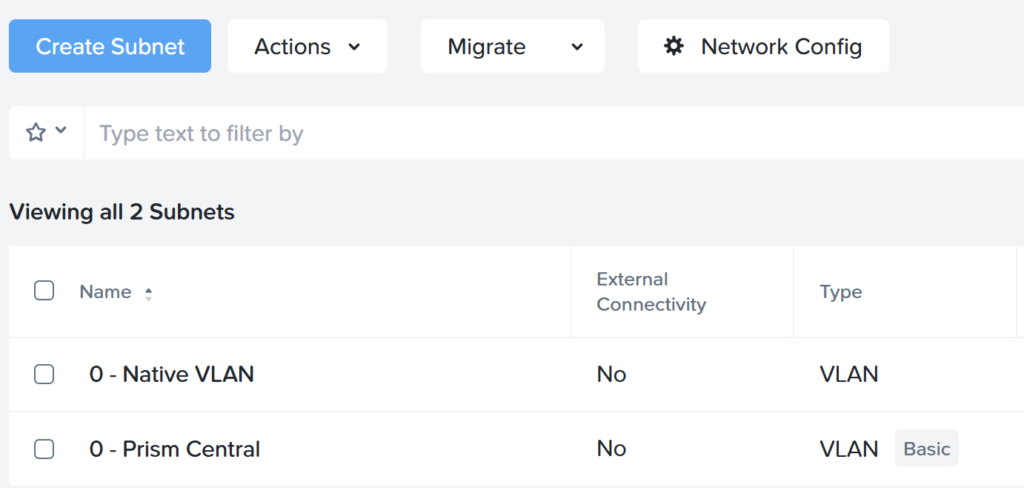
As you can see I renamed the basic vlan to: “0 – Prism Central” this because Prism Central cannot be part of the Network Controller managed VLAN. In production environments (this is my lab ;)) you would place the PC deployment is a separate VLAN and make sure correct firewall rules are in place.
Let’s create a new subnet:
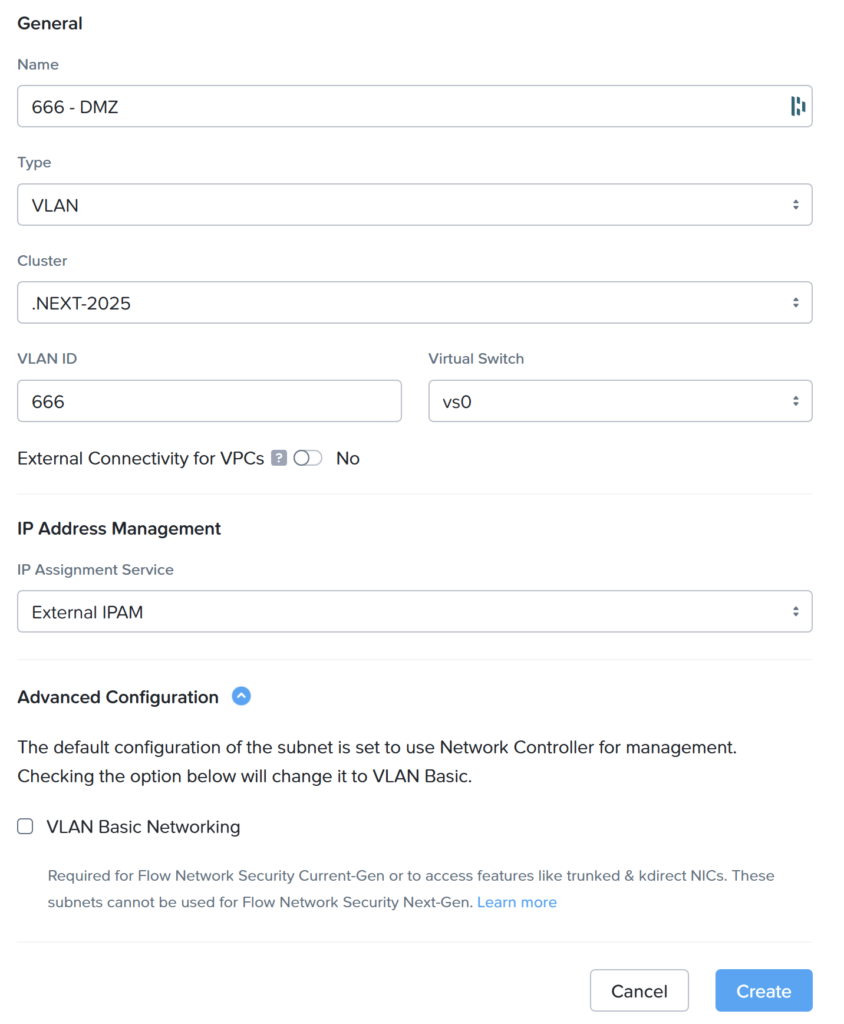
It this example I created the DMZ subnet on VLAN 666 with and External IPAM. Under “Advanced Configuration” you can see it will NOT be created as a Basic VLAN, so it will be managed by the Network Controller.
Create a test VM:
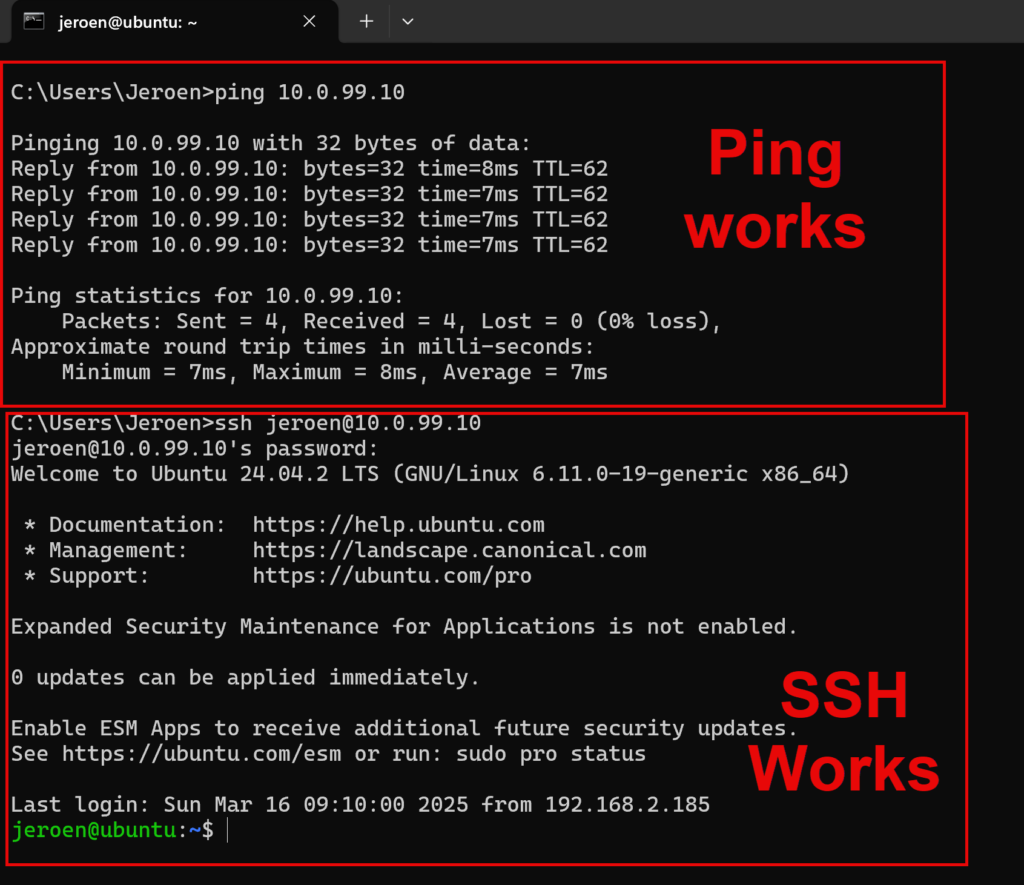
I have test virtual machine running on Ubuntu, which has his network card in the Native VLAN (Network Controller managed) network. There is no firewall configured in the VM so I can send a ping and SSH to it:
Default behaviour (when NO security policies are applied) for a VM will be that everything is allowed (inbound and outbound).
Create the first Security Policy:
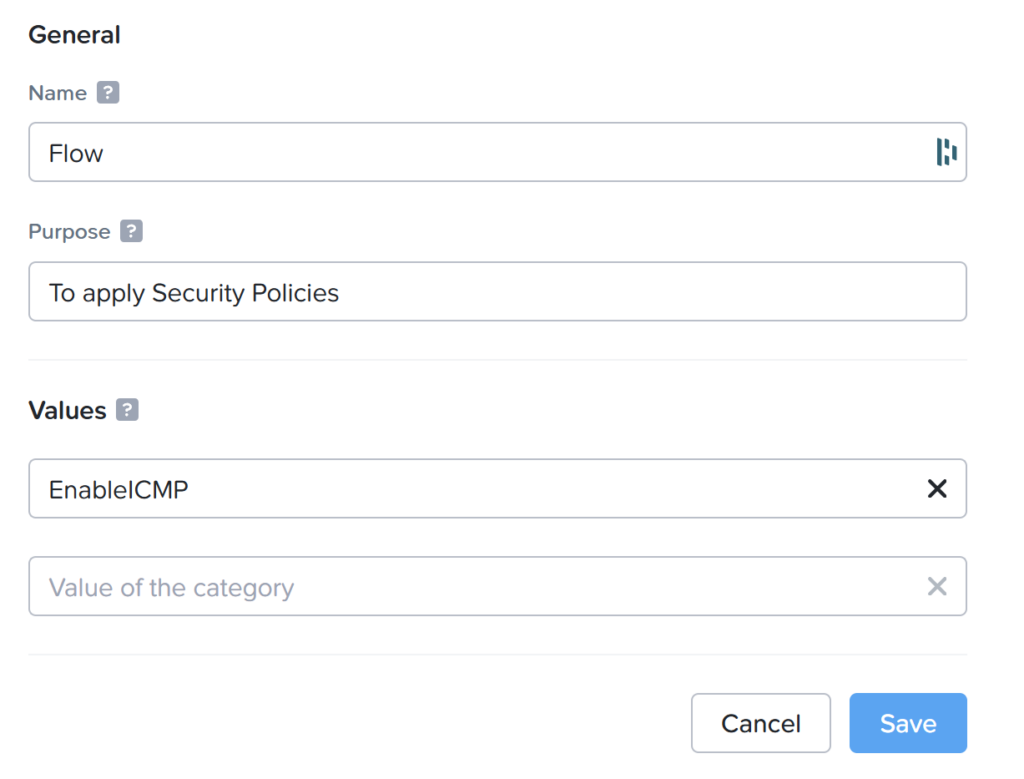
I want to allow to ping my test virtual machine. As you can see at the previous chapter that is already working. But when a security policy is applied all other traffic will be denied. Security Policies are set via categories in PC. Lets make a the following category:
Now navigate to: Network & Security –> Security Policies. Click on “Services” at the top bar and click op: Create Service Group.
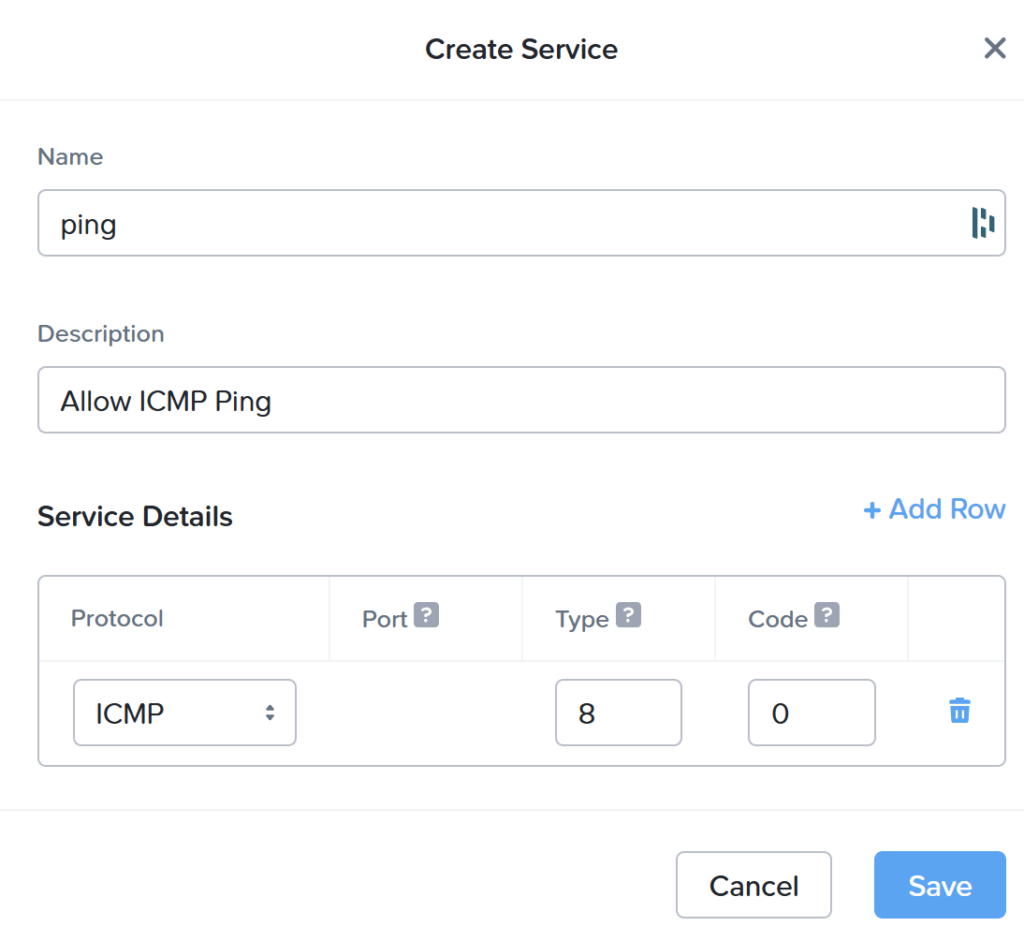
Fill in as shown in the screenshot and click save. This will create a service in which ping is defined. On the Security Policies page click on list at the top and select: Create Security Policy.
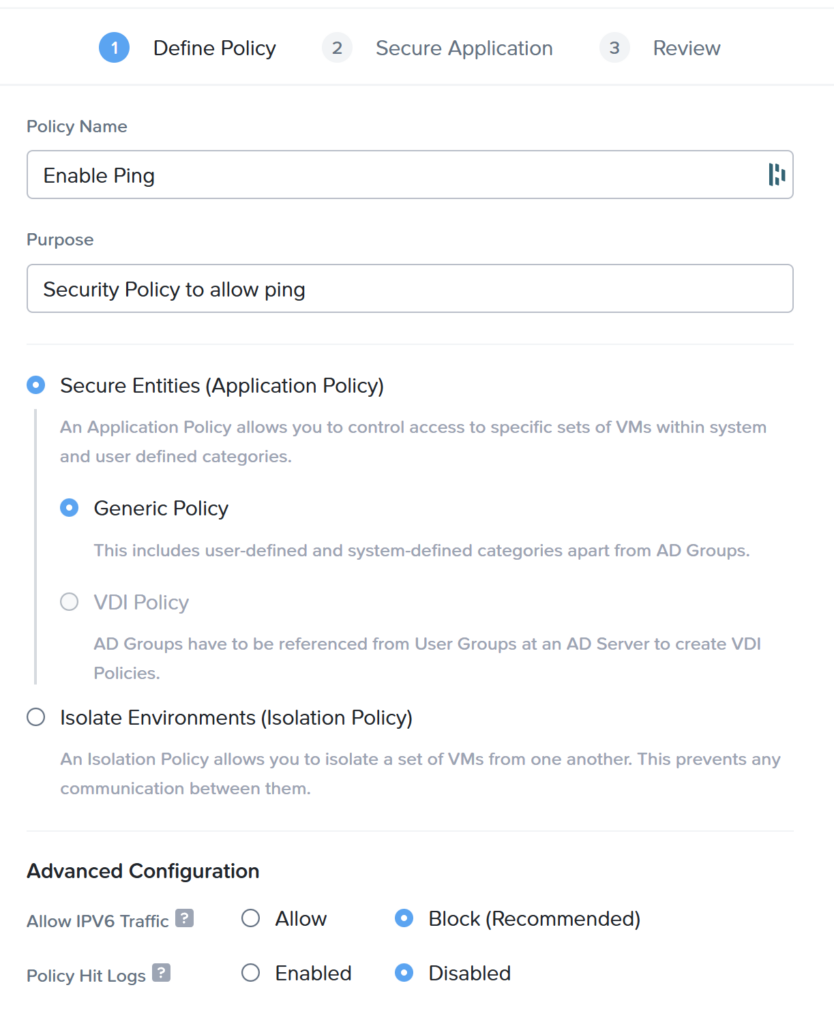
Give the policy a name and description. Make sure that you given it a name which is understandable, even when you have +1000 security policies 😉 Select: Generic Policy and hit next.
- Generic Policy : Use this to secure applications or virtual machines. For example only allow specific port(s) inbound and/or outbound.
- VDI Policy : You can use Active Directory groups to allow specific port(s) inbound and/or outbound.
- Isolate : Make a group of virtual machines which can only communicate with each other.

In the “Secure Application” page we configure the policy.
- Inbounds: You can add source(s) here from which the traffic is allowed;
- Secured Entities: There are the application and/or virtual machines which you want to protect;
- Outbounds: You can add destination(s) here to where outbound (from the Secured Entities) is allowed.
Most of the times I only create inbound rules and allow all outbound. To allow incoming ping request from my complete environment to the category Flow:EnableICMP the policy would look like this:
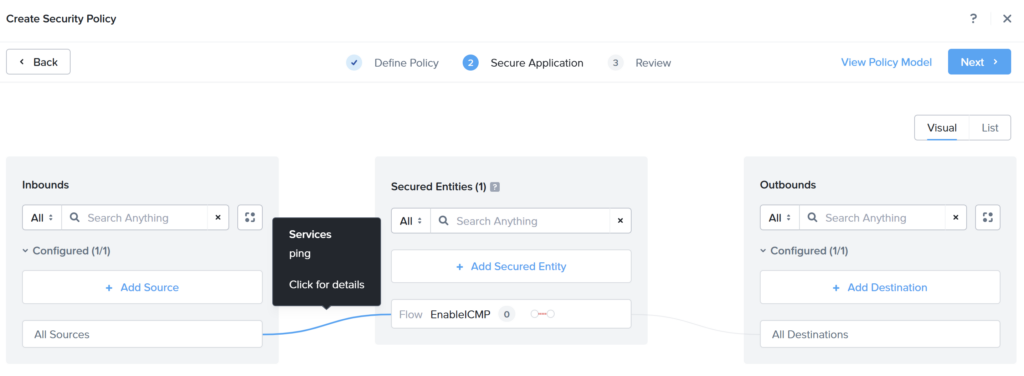
As you can see I configured the following:
- Inbounds: All Sources;
- Secured Entities: Category Flow:EnableICMP (And I disabled: Can VMs in this group talk to each other?);
- Outbounds: All Destinations.
Click Next. The Review screen appears:
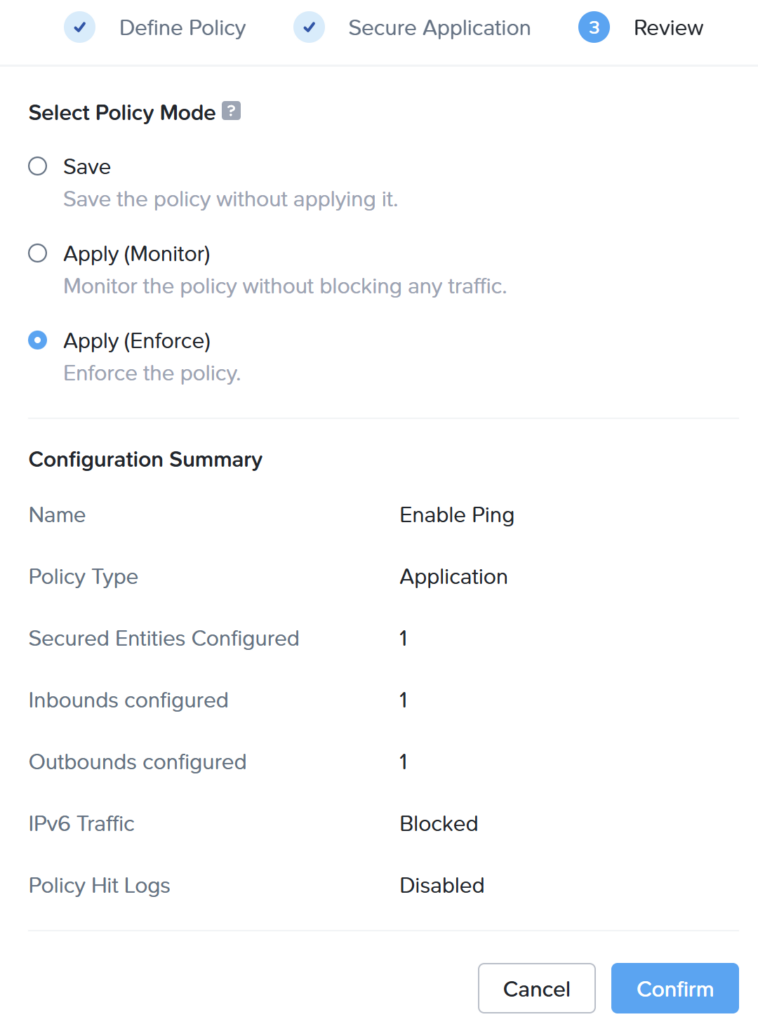
Here you can choose the following options:
- Save: This will save the Security Policy and nothing will happen;
- Apply (monitor): The policy will be applied but only in monitor mode. So you can see (monitor) the traffic, but nothing is blocked;
- Apply (enforce): The policy will be applied and only allowing the configured traffic, all other will be blocked.
For now, select Apply (enforce) and hit Confirm.
Attach the category to the virtual machine. The categories tab would look like this:

Lets test again from my laptop:

As you can see, ping is still working but SSH is blocked. This is because we only allowed ping (icmp) and so all other traffic we be blocked. To allow SSH we have a couple of options:
- Create a new Security Policy allowing SSH to category Flow:EnableSSH
- The Flow:EnableSSH category must be created first
- Update the existing Security Policy allowing SSH to category Flow:EnableSSH
- The Flow:EnableSSH category must be created first
- Rename the Security Policy to match the purpose
I will create a new Security Policy (after creating the Flow:EnableSSH category):
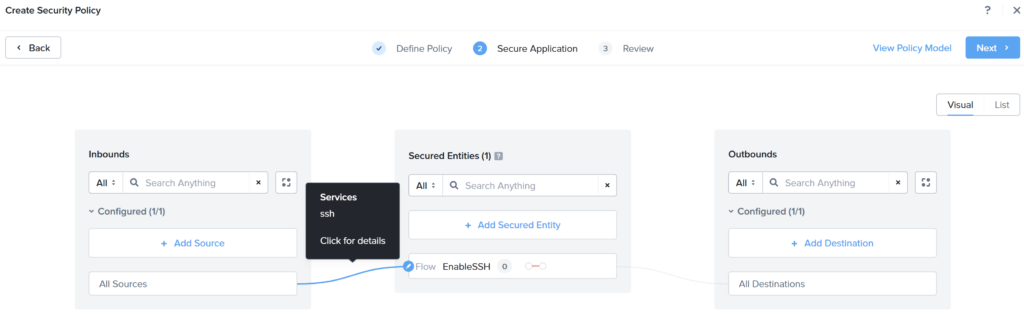
In the review screen I select apply (enforce), and now I can ping and SSH into the Linux test virtual machine. Pretty cool.
Monitor:
We can also monitor inbound and outbound traffic from a virtual machine and create Security Policies based on that discovered traffic. I have an apache webserver running on Linux in my environment without any categories (So NO (zero) Security Policies applied) and his network interface is in the Controller Managed VLAN.
Create the category, Flow:Monitor and assign this to the virtual machine. Now create the following Security Policy:
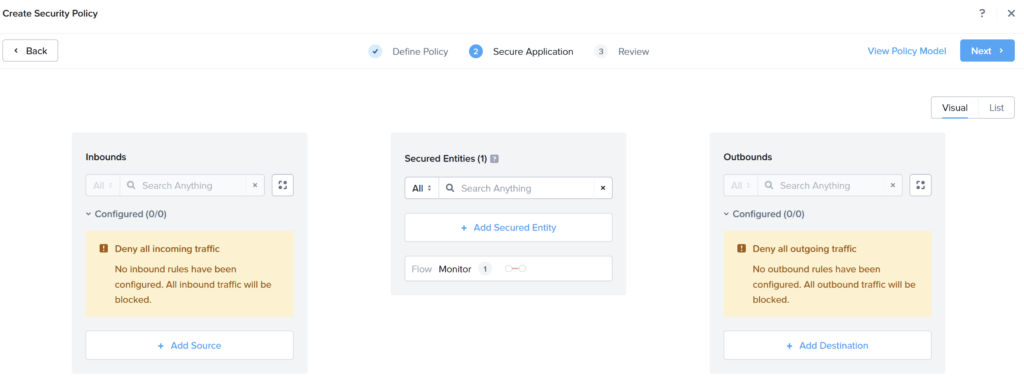
- Name: Monitor
- Inbounds: No (zero) sources
- Secured Entities: Category Flow:Monitor
- Outbounds: No (zero) destinations
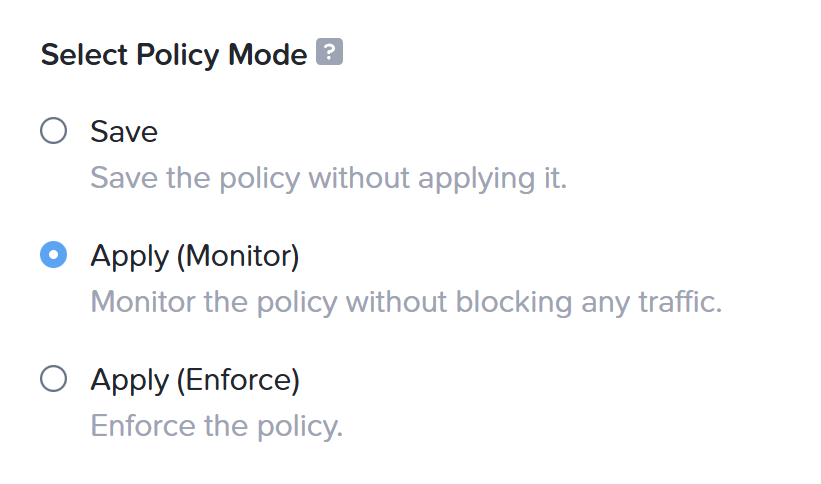
Save the security policy as: Apply (monitor)
NoW lets send some traffic to the virtual machine from my laptop:
- ping 10.0.99.11
- open url http://10.0.99.11
- ssh 10.0.99.11
When done open the Security Policy:
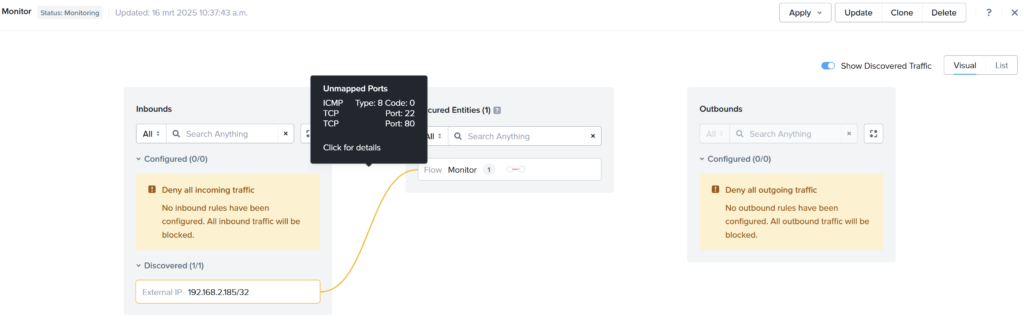
If you hover over the discovery traffic line you can see the unmapped ports. This is the traffic I generated from my laptop. To allow that specific traffic click on Update.
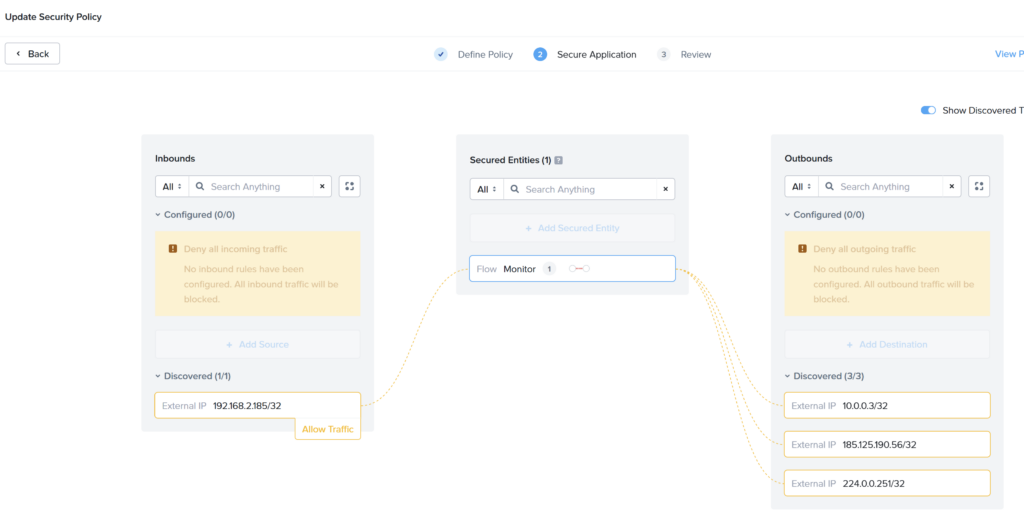
Select the inbound discovered source and click: Allow Traffic. In the next screen select all traffic you want to allow and save it.
Now you can tweak the Security Policy even more. In my case I want to allow ssh and ping only from my laptop and http port 80 from my complete LAN. Outbound I want to allow everything. The policy looks like this:
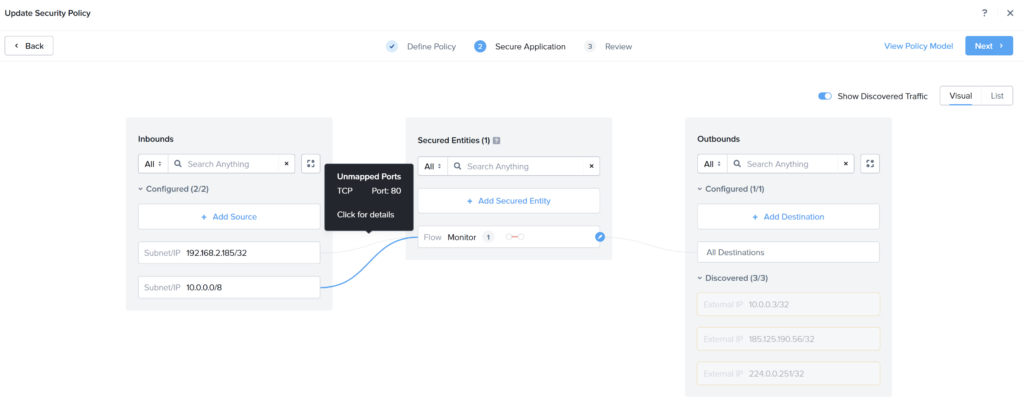
Save the policy with: Appy (enforce), and I’m done.
Stay tuned for part 2 😉
Discover more from Jeroen Tielen
Subscribe to get the latest posts sent to your email.
Thanks, very useful
Thnx Vinicius.