If you have a running cluster and need expansion to get more resources (storage, cpu, ram, etc) then you need to do a cluster expansion. Is this blogpost I will show you how to do this.
First you can use Prism Central Cluster Runway to see the needed hardware for the expansion, this is a great feature to see how the cluster usage if growing and when expansion is expected:
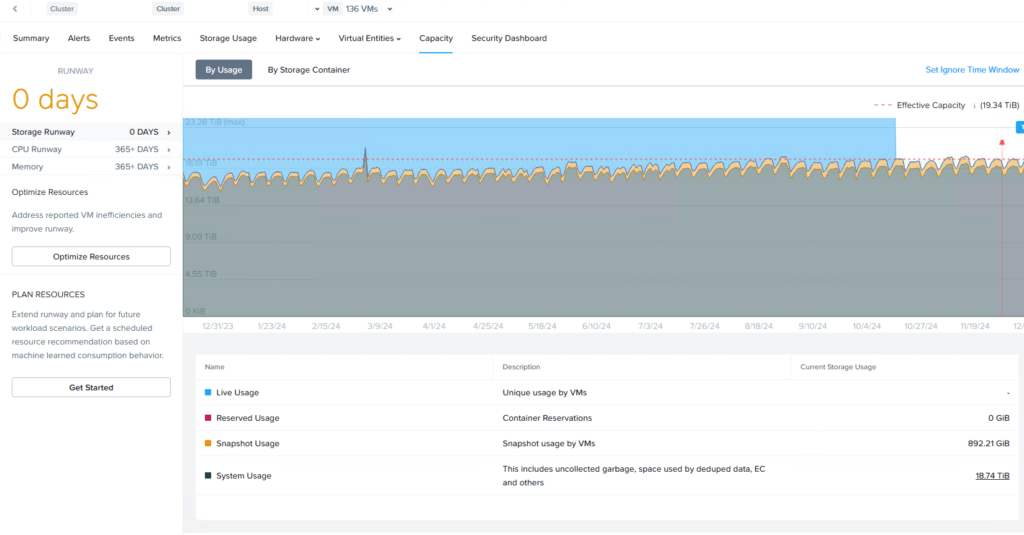
As you can see in the example the storage is already at the max capacity (to handle 1 node failure) and expansion for this cluster is really needed. In this case it is only about storage and not CPU or RAM. As you can see in the screenshot those components will have enough resources available for more than one year (365+ days).
To expand only storage is easy. Make sure your license is at a “core based” version (aka portfolio 2.0) and contact Nutanix sales or partner to get you some new NVME’s/SSD’s or HDD’s. Depending on which tier needs more capacity and based on the current hardware in the nodes (sales will help you with this). When the new disks are delivered insert them and you are good to go.
But when you want to expand with new nodes then it is different. This can be because:
- Old hardware needs to be replaced;
- Expand with the new nodes and later remove the old legacy nodes;
- Need more capacity to keep up with the grow of the company;
- Expand with the new nodes;
- Something else 😉
When you need to expand with new nodes you can run the “Plan Resources” in the cluster expansion. In here you can change some parameters or accept the given proposal. Always verify this with you Nutanix sales rep. In my case the proposed expansion is:
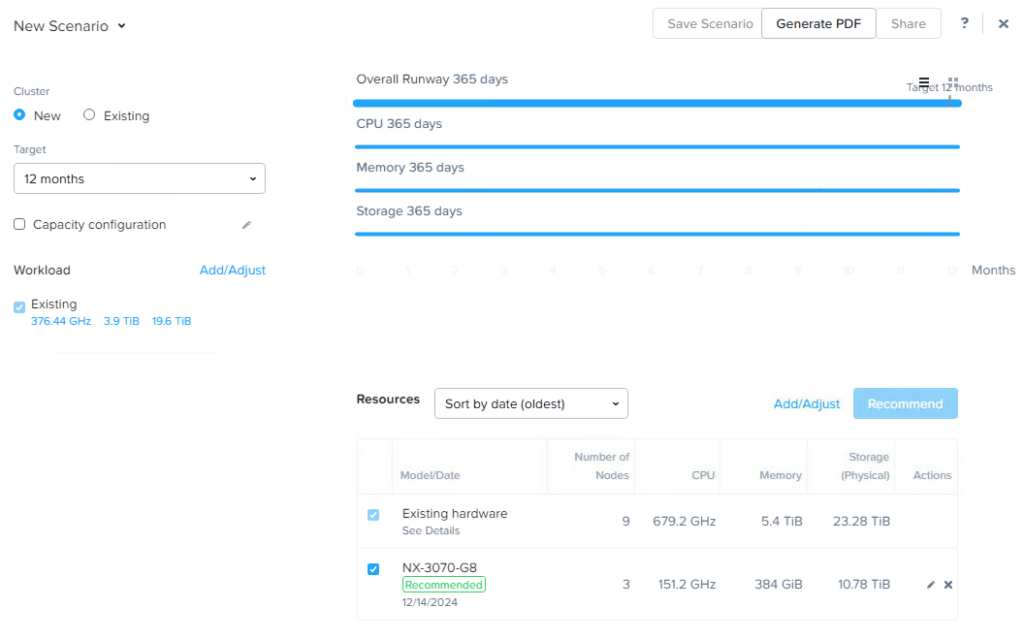
As you can see I need 3 more nodes to full fill my needs 😉 Lets order them 😛
While waiting for the new nodes to arrive we can plan the expansion.
- Make sure you have the ip’s available;
- 1 for IPMI per node;
- 1 for AHV and 1 for CVM in the same subnet and vlan as the current nodes;
- Make sure you have the correct VLANS available;
- Note the names for the new nodes (AHV and CVM);
- Make sure the switch ports (where the new nodes will be attached to) are configured exactly the same as the current switch ports.
- Make room in the rack to stack the new nodes.
When the nodes are delivered and are racked and stacked (I always manually add IPMI ip-addresses and change the default password for IPMI during racking and stacking) you have a couple of options:
- Run foundation to install the nodes directly with the correct names and AOS/AHV versions;
- Make sure you DONT select to create a cluster. This will only install the software with correct vlan’s, ip’s, names and versions;
- Then you can add them directly into the cluster;
- Power UP the nodes and wait till all is booted up and let the cluster self handle everything 😉 (This is the route we are going to follow).
So all my new nodes are racked and stacked and powered on. This will boot the pre-installed AHV and AOS from the factory. And we will continu from here.
First run LCM and update to the latest foundation, this because we are going to reinstall the new nodes and we want te make sure foundation is used with all latest fixes.
Make sure the cluster is operating without any issues. No nodes in maintenance for example and that everything is green 😉
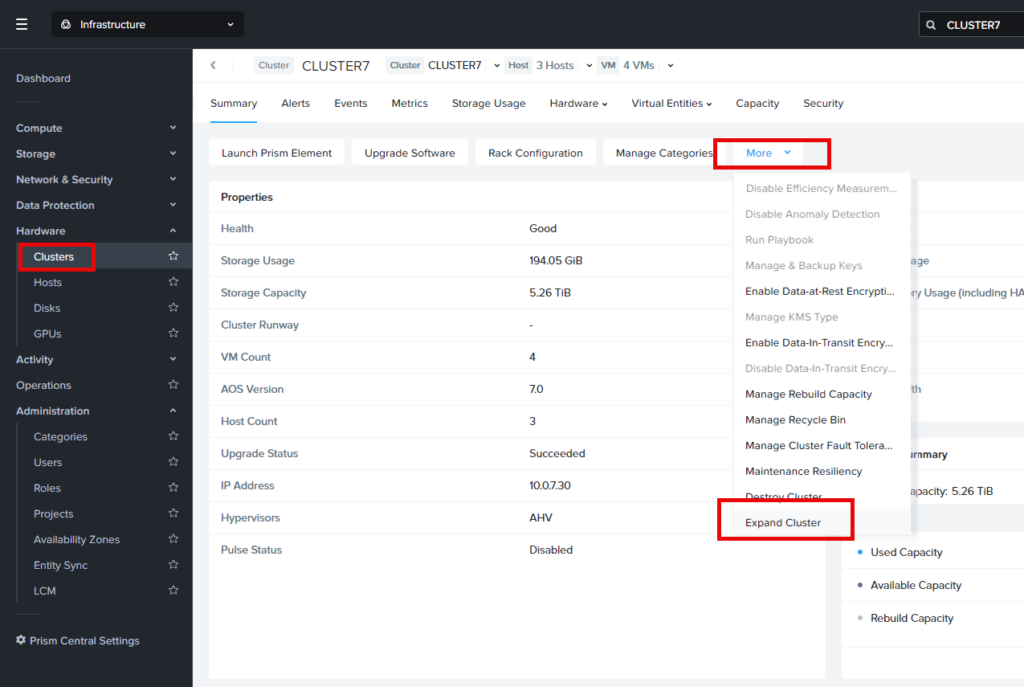
Let’s do the expansion from Prism Central, just because we can 😉 (Well we need to do something in Prism Element, but this will be fixed it later versions)
In Prism Central go to the cluster. click on more and select: Expand Cluster.
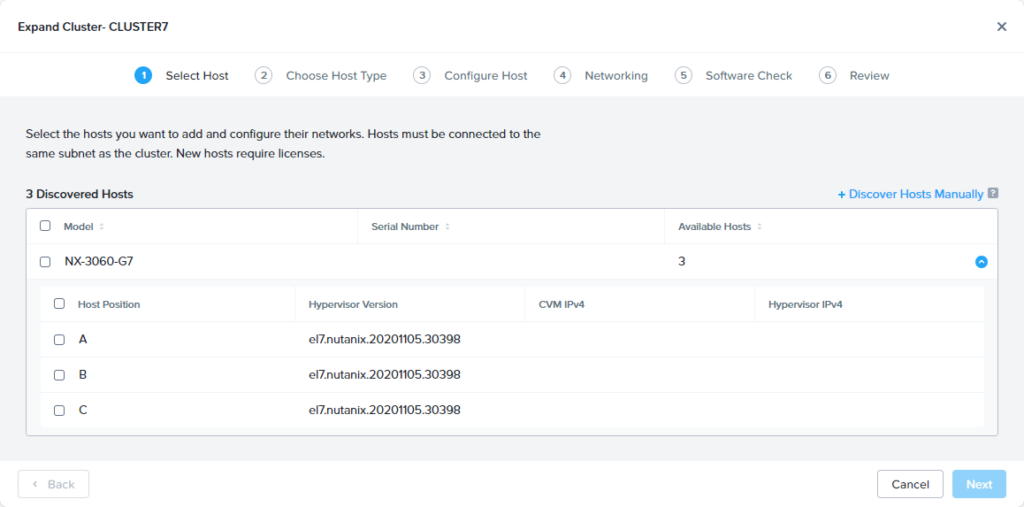
The cluster will try to discover the newly nodes. If no nodes are found make sure you have foundationed them, with the correct versions, ip’s, vlan. Then add the hosts manually. For me, all 3 new nodes are discovered so I select all of them and click: Next.
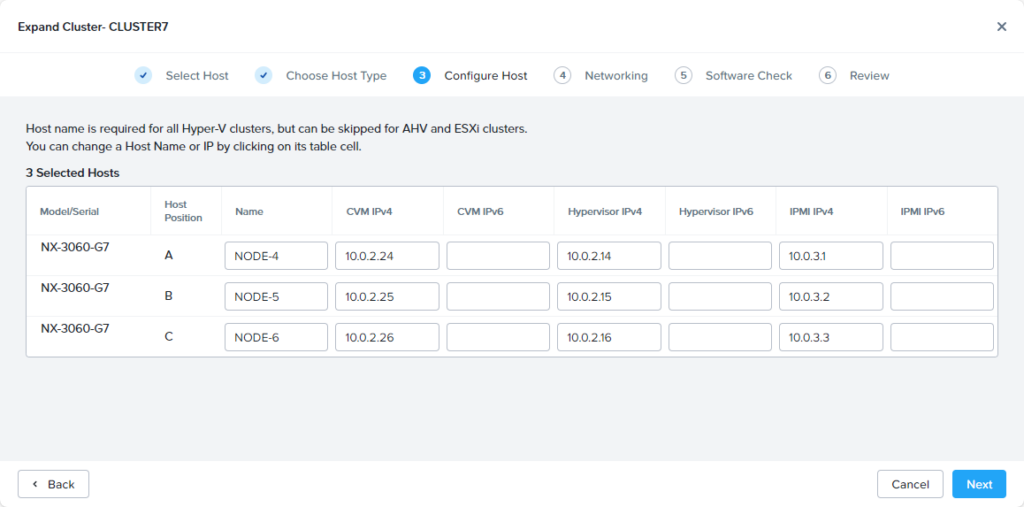
Fill in correct hostnames and IP-addresses, I leave ipv6 empty as this is not used at the moment (fancy a blogpost about this? Let me know in the comments)
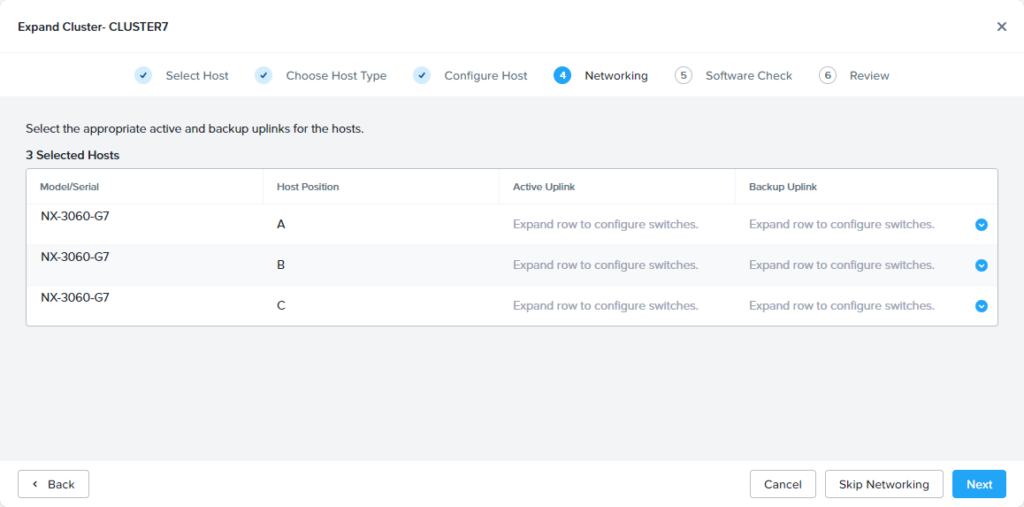
The network part I’m skipping for now. I will make correct changes to the virtual switch later. If you have multiple virtual switches it is best to make to correct settings here so the nodes will be directly using the correct uplinks.
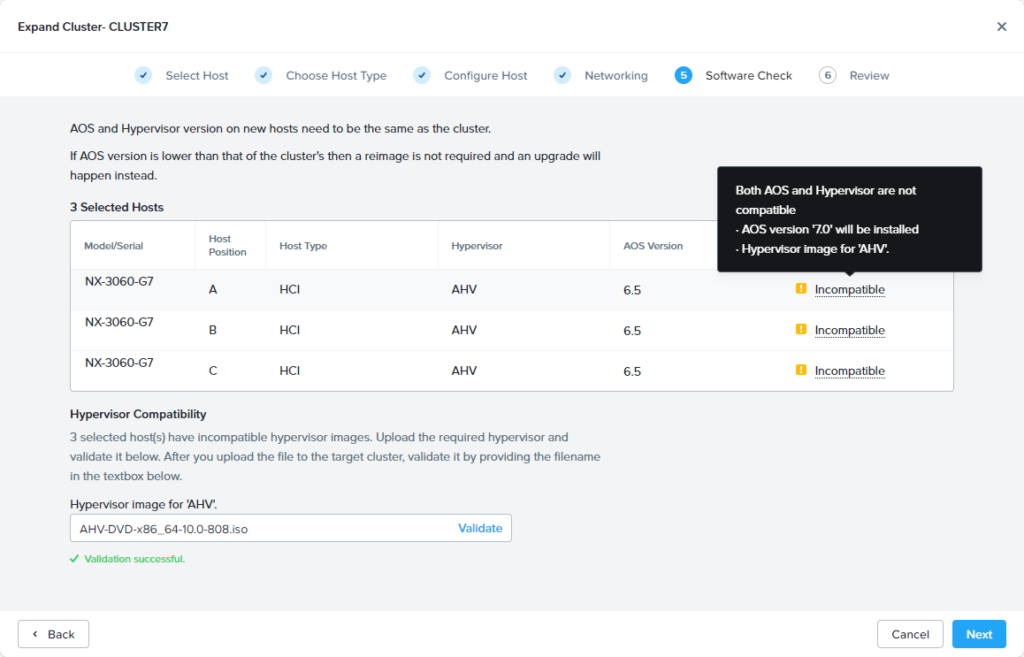
Here come’s the magic (with a little extra work ;)). As the new nodes are not running the same AOS and AHV versions as the production cluster the correct versions will be installed.
The small letters: There is no upload button in Prism Central (yet???), so do these exact same steps in Prism Element and then you can fill in the hypervisor image in Prism Central 😉
Now get something to drink and watch your cluster expand 🙂
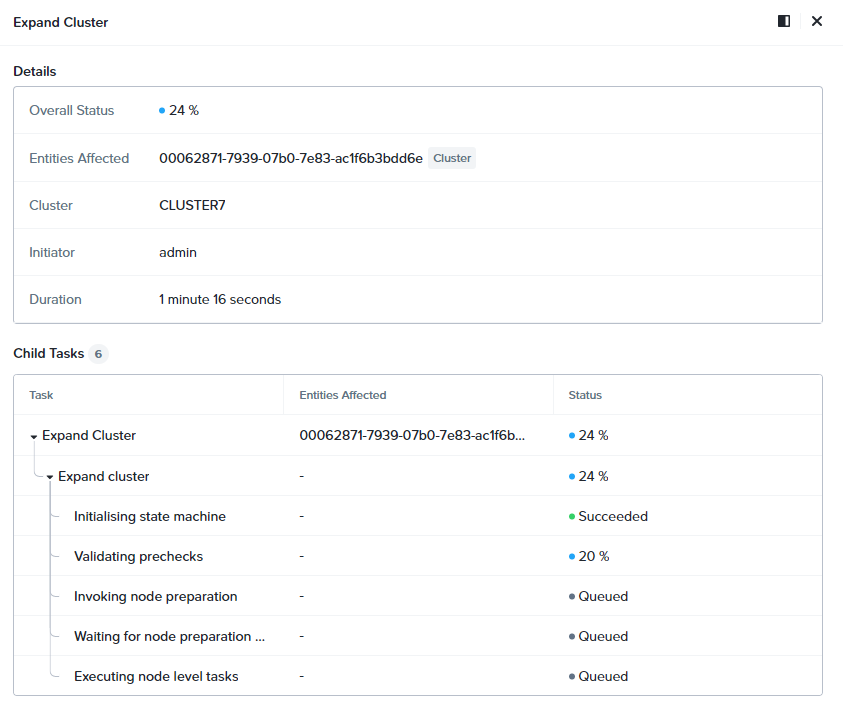
For me this took arround 1 hour to complete. Now when all is done we need to update the virtual switch to match the with the original nodes. Click: Nework & Security –> Subnets –> Network Config –> Virtual Switch –> Edit (Pencil)
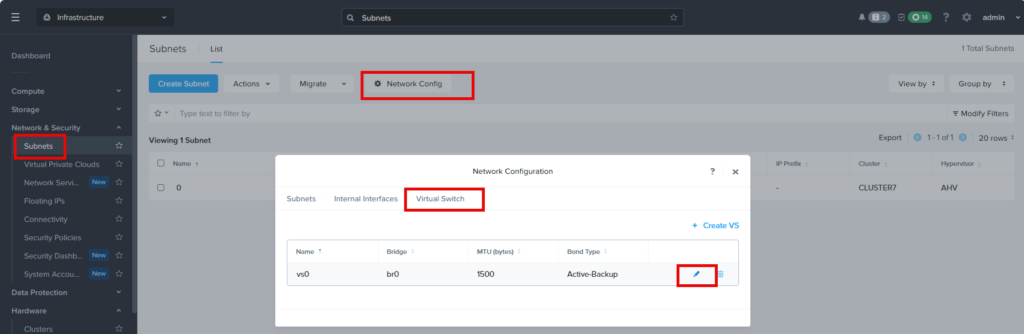
Make the changes to use the correct uplinks for vs0 and later update any other present virtual switch. If multiple virtual switches are present in the cluster is is best to make the correct mappings during cluster expansion.
Cluster expansion is ready and Acropolis Dynamic Scheduling (ADS) will kick in automatically to migrate virtual machines to the new nodes. If you don’t want to wait for this to happen automatically, then migrate some virtual machines manually.
Discover more from Jeroen Tielen
Subscribe to get the latest posts sent to your email.

Hello Jeroen. First of all, congratulations for the great work in the Nutanix community.
I have configured a 4-node Nutanix Community CE2.1 cluster within my VMware Workstation. It is working perfectly, including with Prism Central installed.
My problem is as follows:
I set up a 1-node cluster and it is working normally, but I am not able to expand the cluster to 3 or 4 nodes.
It is always failing for me. The error is as follows:
Failure in NPE prechecks. Errors: Precheck: test_cassandra_ssd_size_check failed. SSD tier on nodes [‘172.16.0.93’, ‘172.16.0.95’] is not sized to accomodate expected metadata growth on cluster. Refer to KB-8842 for more details.. Precheck: test_expansion_allowed failed. Cluster has 1 nodes. Cluster expansion from less than 2 nodes not supported. Please refer to KB-11568.
Curiosity:
Have you ever done this test to expand a Nutanix CE2.1 cluster in a nested lab?
Hi John,
Expanding a 1 or 2 nodes cluster is not possible. The architecture is completely different. And you cant expand a ce cluster either :(.