Post is updated with the latest Nutanix Community Edition 2.1 version.
In this blog post I will explain how to install a three node (there are pointers for the 1 node cluster ;)) Nutanix cluster nested in VMWare ESXi/vSphere. If you are running VMware Workstation you need to follow this blogpost: Link. On the Nutanix community forums Mikail (again thanks for finding this) found out that SATA disks are using the same serials on different nodes (Link to that specific thread). There are additional settings which are different then VMware workstation that I decided to create a separate post for this type of installations.
Before we continue there are some requirements:
- Make sure you have a list of IP-Addresses available on your own LAN which are not in use;
- For each node 2 ips (AHV and CVM);
- These addresses should be accessible from your management machine;
- 1 ip for the cluster virtual ip;
- 1 ip for each Prism Central virtual machine;
- 1 ip for Prism Central virtual ip;
- Have enough memory available on the VMware environment.
The requirements for Nutanix CE are: (Link)
- 20GB memory minimum (32GB if dedupe and compression are used);
- I recommend at least 32GB as 20GB will give you no space to run virtual machines;
- 4 CPU Cores minimum;
- 64GB Boot Disk minimum;
- 200GB Hot Tier Disk minimum;
- 500GB Cold Tier Disk minimum.
So if we want a 3 node Nutanix CE cluster we need 96GB ram for the virtual machines (the nodes). In this blog I will create a 3 node “cluster” and give pointers to create a 1 node cluster.
First make sure you have the latest Nutanix CE installer (ISO) downloaded. It can be found in this blog post van Angelo: (Link)
Make a sheet with the IP-Addresses you are going to use:
- Node 1:
- AHV 10.0.0.81
- CVM 10.0.0.82
- Node 2:
- AHV 10.0.0.83
- CVM 10.0.0.84
- Node 3:
- AHV 10.0.0.85
- CVM 10.0.0.86
- Cluster Virtual IP: 10.0.0.80
- Netmask 255.0.0.0
- Gateway: 10.0.0.254
Note: these are ip-addresses for my LAN. Again, use ip-addresses for your own LAN.
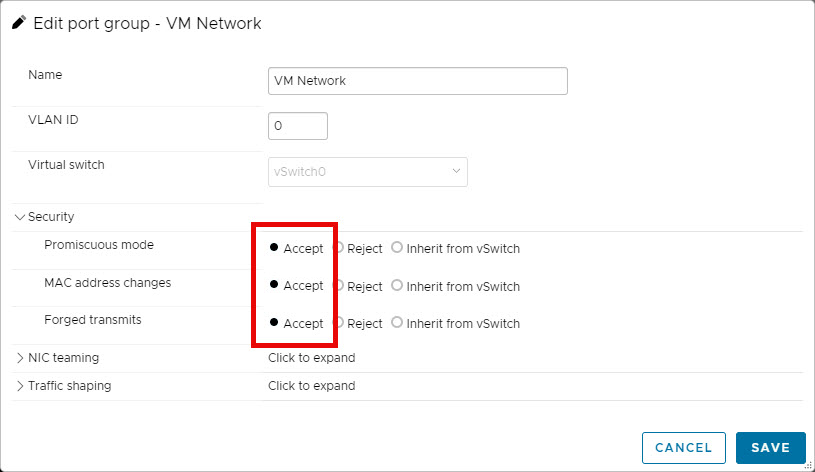
In ESXi or vCenter accept promiscuous mode, mac address changes and Forged transmits on the port group or virtual switch:
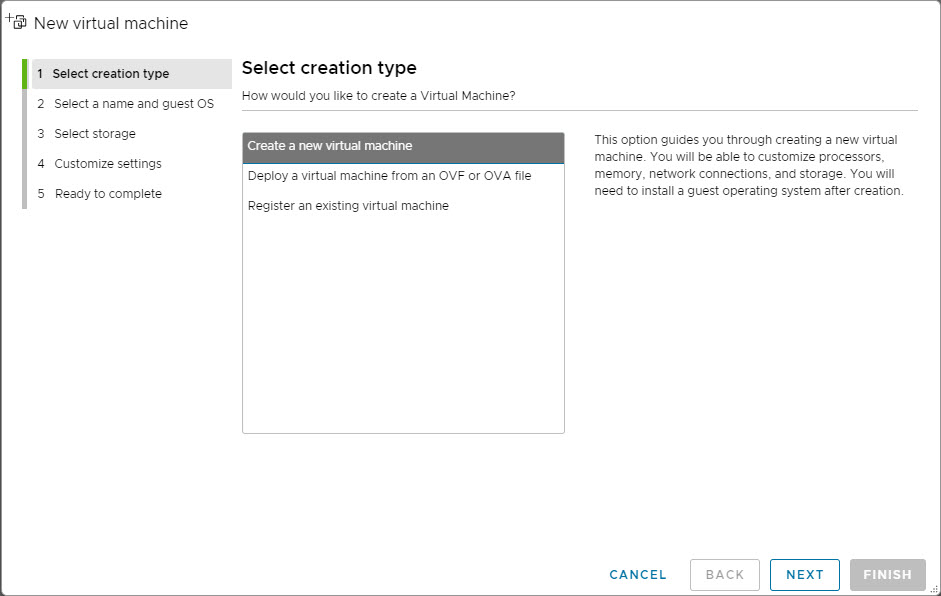
Create a virtual machine:
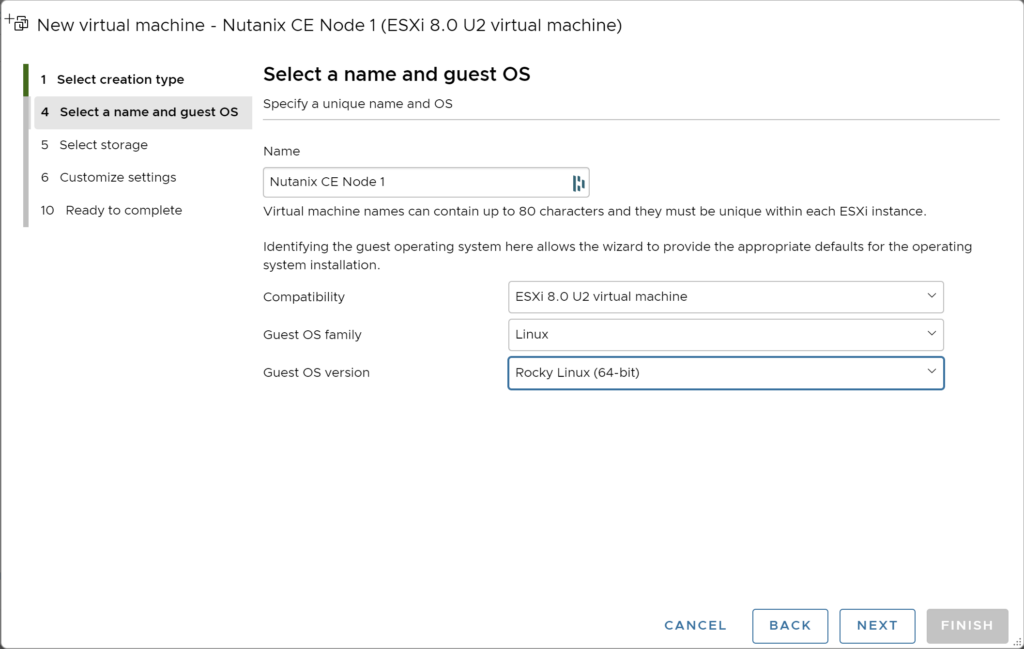
Give your virtual machine a name and select the guest os: Linux –> Rocky Linux (64-Bit):
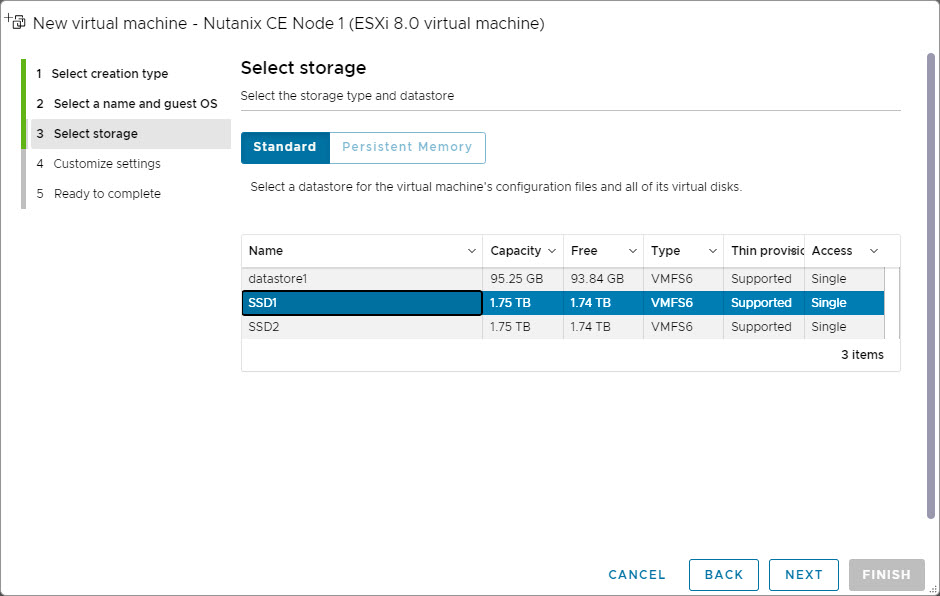
Select the datastore to store the virtual machine. Make sure it is fast storage 😉
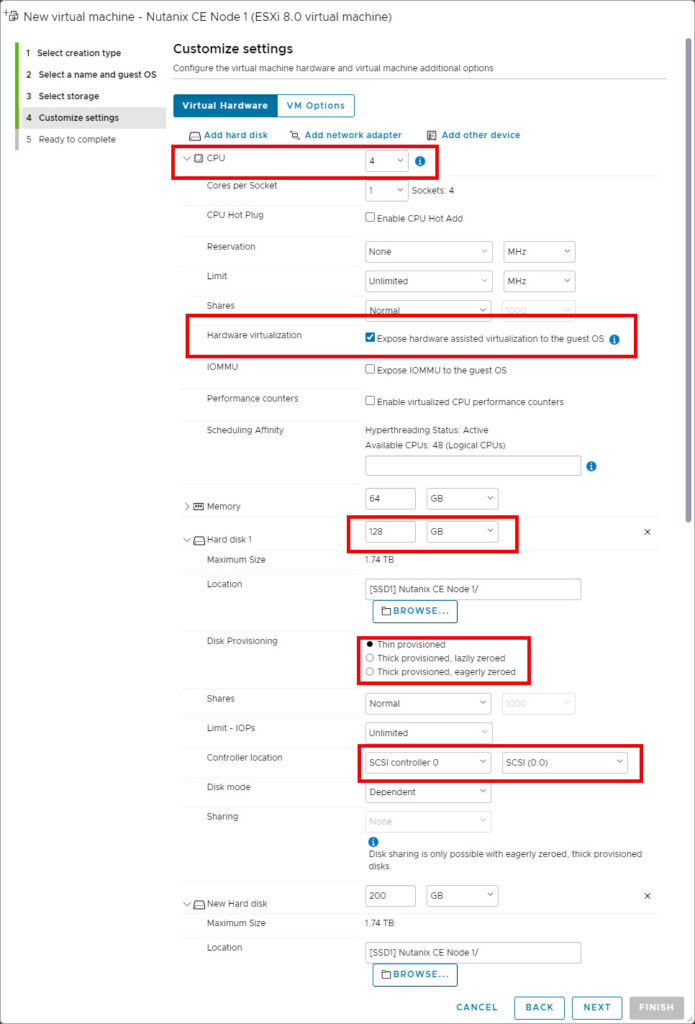
Change/Add the following things:
- CPU: 4; (this is the minimum, is you have enough resources better is to change this to 4 cores per socket and 2 sockets or more ;))
- Enable: Hardware virtualization;
- Memory: 64GB;
- Hard Disk 1 (This is the AHV Boot Disk);
- 128GB;
- Thin Provisioned (This is my own preference);
- Controller location: SCSI (0:0), Again don’t use SATA;
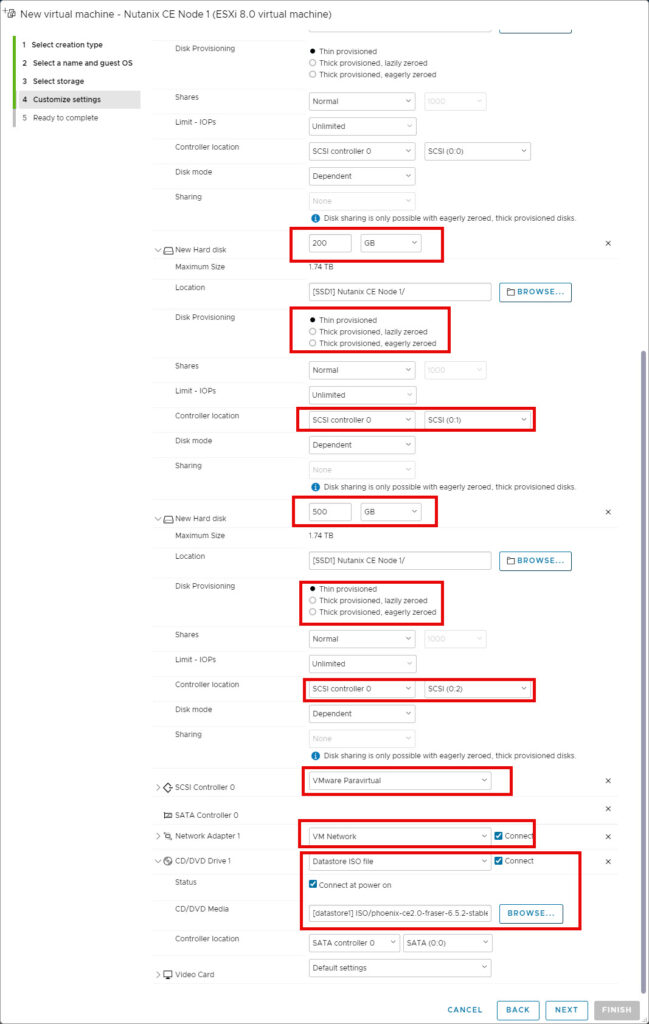
- Hard Disk 2 (This is the CVM Disk);
- 200GB;
- Thin Provisioned (This is my own preference);
- Controller location: SCSI (0:1), Again don’t use SATA;
- Hard Disk 3 (This is the Data Disk);
- 500GB;
- Thin Provisioned (This is my own preference);
- Controller location: SCSI (0:3), Again don’t use SATA;
- SCSI Controller: VMware Paravirtual;
- Network Adapter 1: Select the network (vlan/subnet) where the Cluster should be running;
- CD/DVD Drive 1: Select the CE installer iso file.
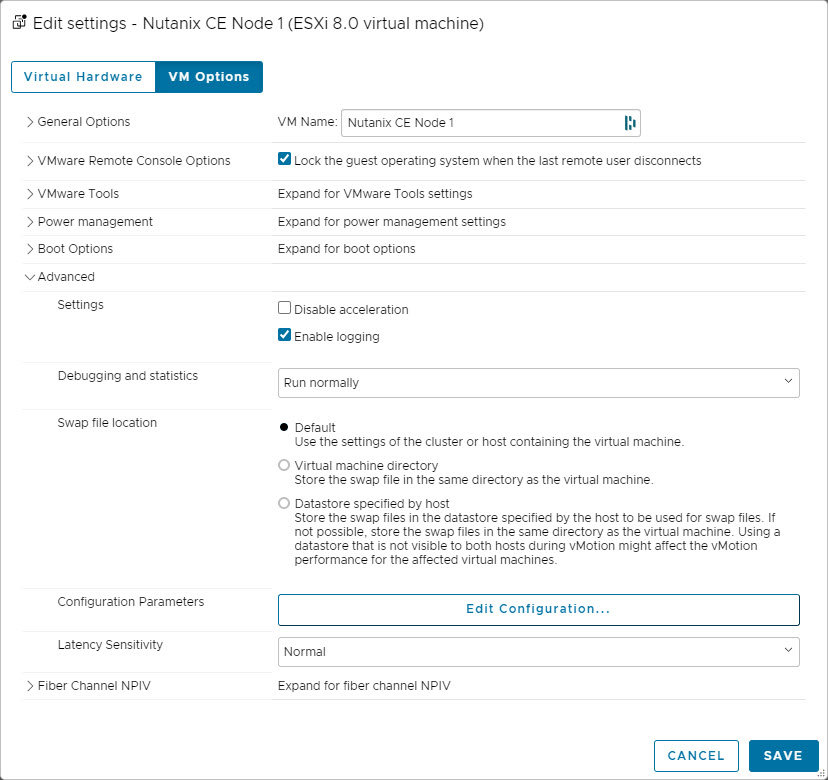
Create the VM. Edit the virtual machine and navigate to: VM options –> Advanced –> Edit Configuration:
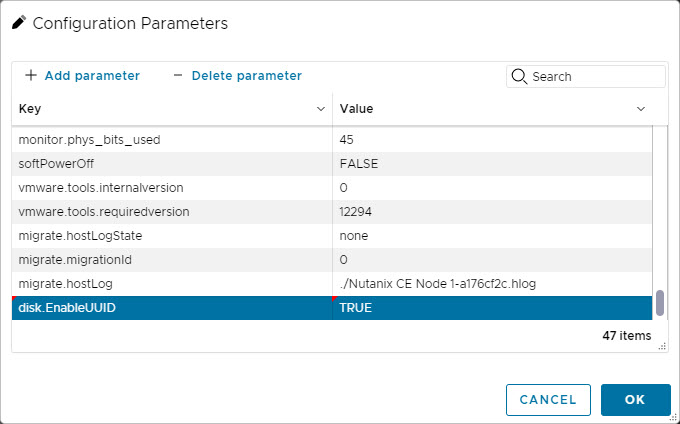
Add parameter: disk.EnableUUID with value: TRUE.
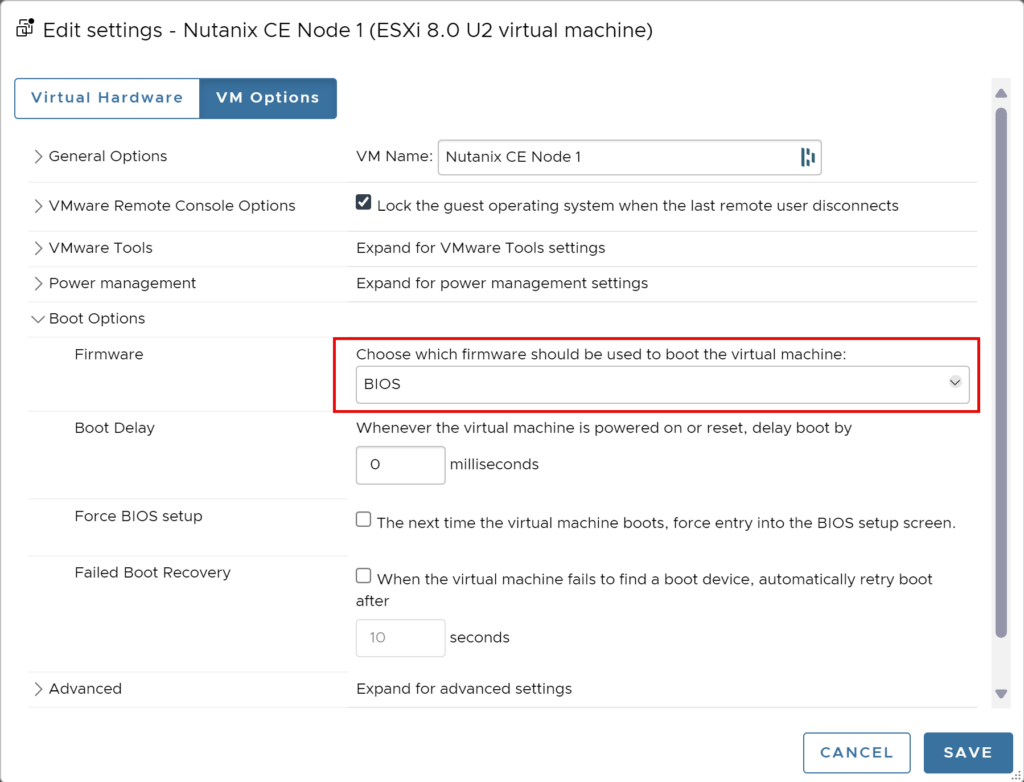
As the CE 2.1 installer ISO also supports to boot in UEFI you can leave UEFI turned on (disable secure boot though, thanks Jonathan for the pointer), but for best compatibility set it to legacy (BIOS). You can change the virtual machine from UEFI to BIOS: VM options –> Boot Options –> Firmware –> BIOS
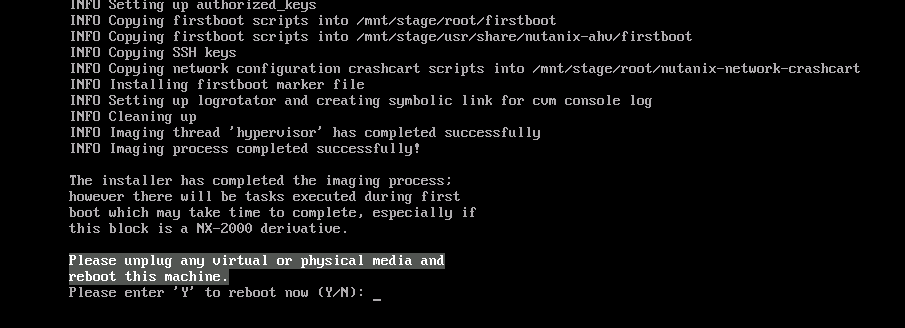
Save the configuration and startup the virtual machine. Wait until the CE installer wizard is shown. Make sure the disk serials are populated (if not populated, you forgot the disk.EnableUUID parameter). Select the correct disks with their purpose and provide the correct ip-addresses.

Follow the next steps and let the installer run. When the installer is ready reboot the virtual machine (dont forget to unmount the CE installer ISO).
Repeat the above steps 2 more times for the 2 others nodes (with their own ip-addresses). And then continue below.
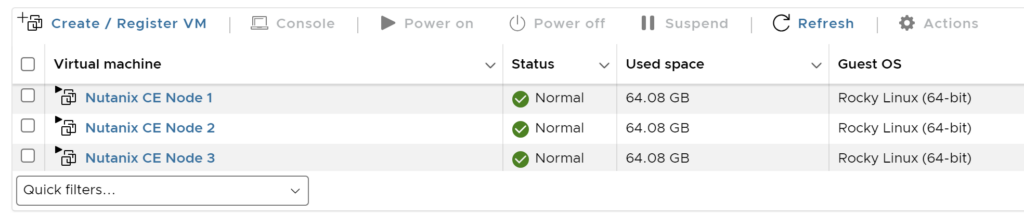
You should have now 3 nodes running:
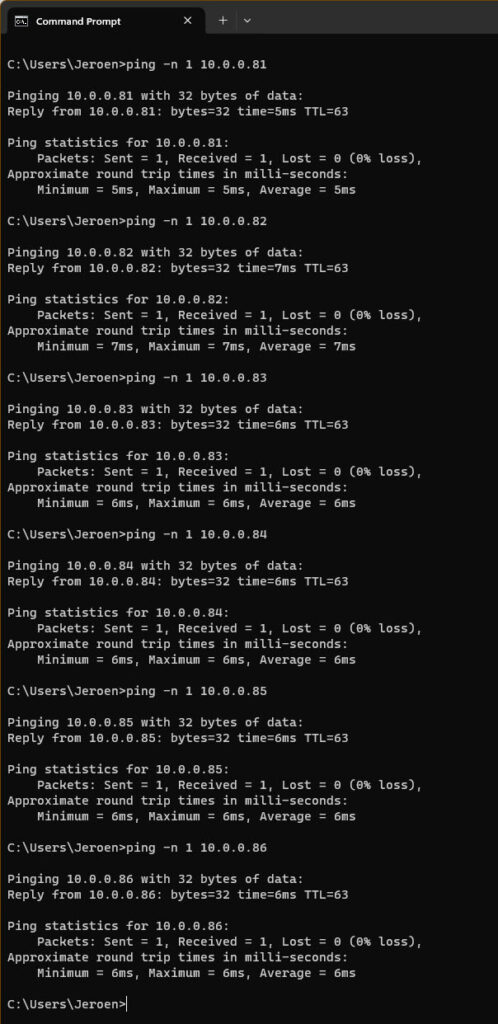
When all nodes are booted make sure you can ping all ip-addresses from your workstation and from each CVM to each other. If this is not working then make sure the port group/virtual switch is configured correctly as described above in this blog post. (maybe accept mac address changes as well)
Login, via ssh, to one of the CVM with the default credentials nutanix (username) nutanix/4u (password).

When you are in the cvm run: watch -d genesis status

If genesis is running (there are pids behind the service name) you can continue to create the cluster. (Press CTRL+C to quit watch)
For a three node cluster the command is (when genesis is running on all three nodes): cluster -s <cvm_ip_1>,<cvm_ip_2>,<cvm_ip_3> –dns_servers 1.1.1.1 create

For a single node cluster the command is: cluster -s <cvm_ip> –-redundancy_factor=1 –dns_servers 1.1.1.1 create
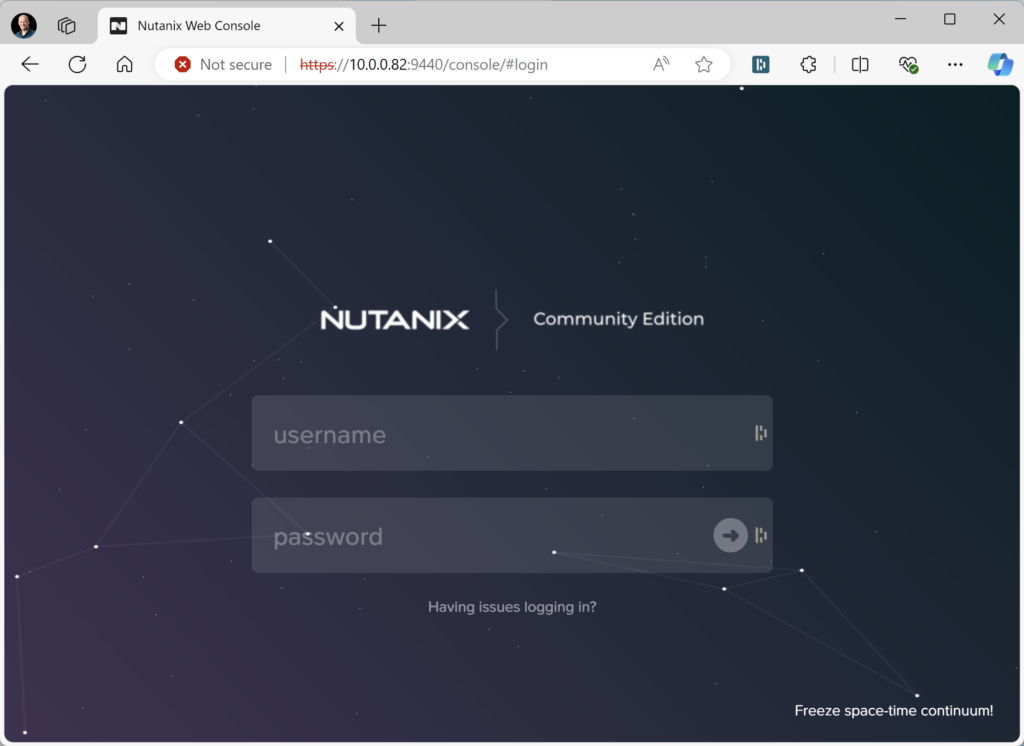
The cluster is accessible via https://<cvm_ip>:9440. Login with admin nutanix/4u
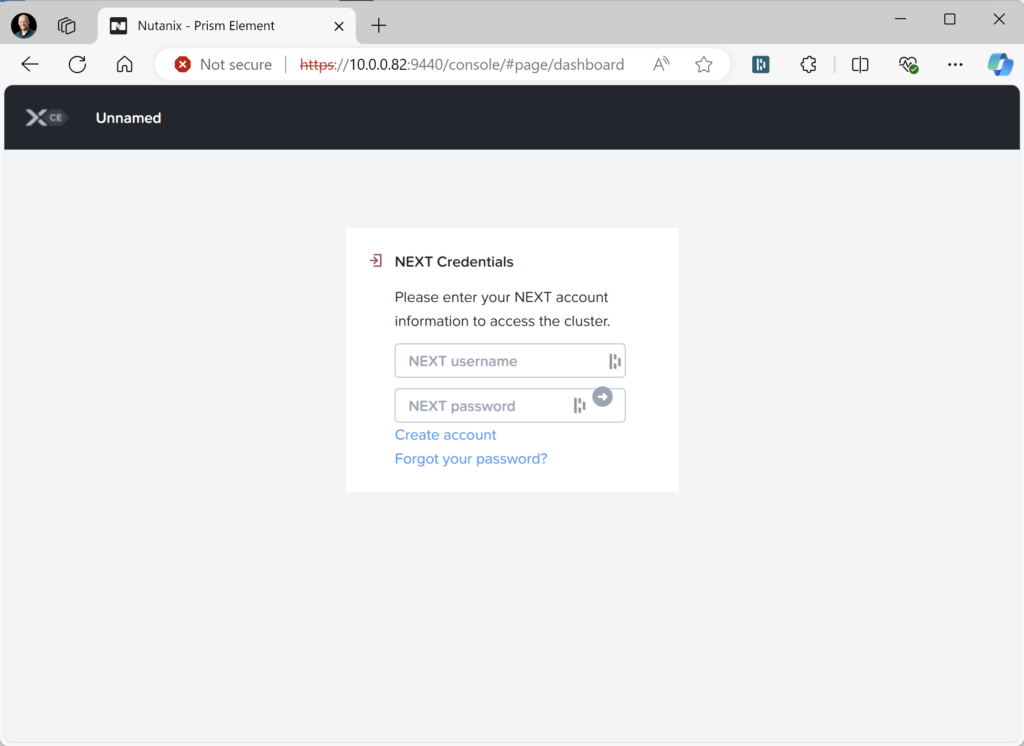
After login you need to login with your Nutanix Community account. Make sure you are registered. (Link to register your account)
And there you have it, a 3 node cluster nested running on VMware.
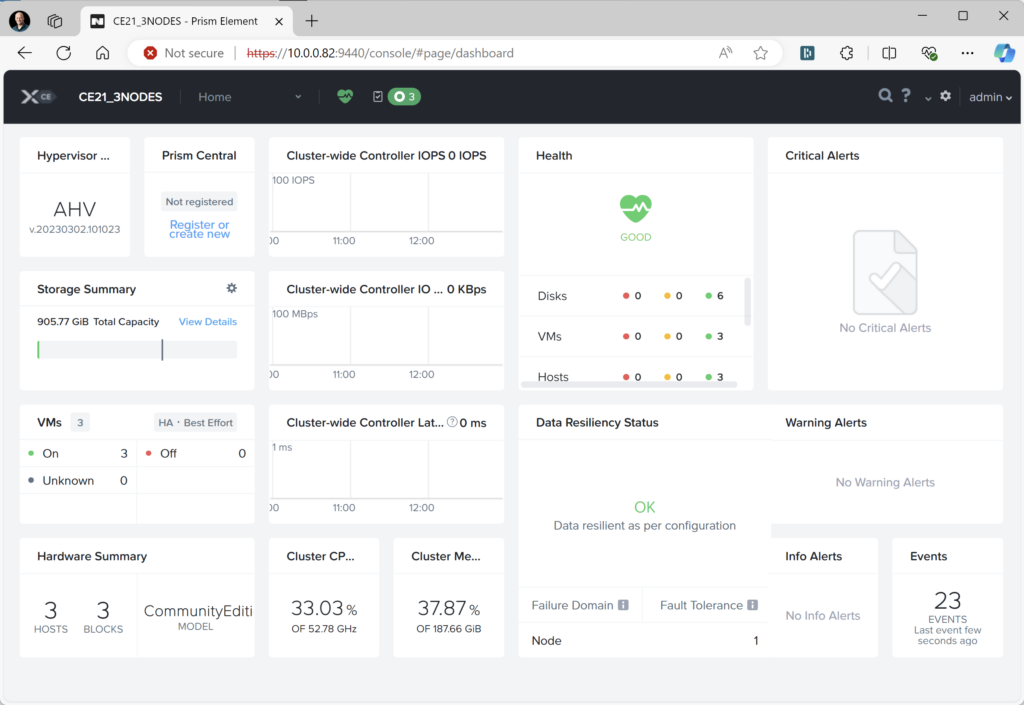
Now you are ready to configure the cluster to your needs (ntp, dns, containers, prism central, password, files, etc etc etc)

Wow! That worked like a charm. Followed your guide, installed on 7.0.3 and it started without a hitch 🙂
My experience is, if you can, add more vCPU and memory because at 32gb and 4vcpu pr node the system is pretty taxed at idle. Was idling around 50% CPU usage when logged into Prism.
Would it be possible to shut down the cluster, add more resources and reboot?
/Thomas.
YEs you can do that. But the CVM will keep using the configured memory. If you want more memory to the cvm you can do that via settings in prism element.
I have 2 dell R630 have upon reboot
I see:
root@NTNX-c92d6a96-A ~]# cluster status
-bash: cluster: command not found
[root@NTNX-c92d6a96-A ~]#
Also, since this is running CentOS 7, I see major openssl issue right out of the box? Also, why is are they not rolling rpms and using a tar archive? I mean rpm rolling is very basic.. tar is so 1980s or 90s.. to deploy files. I see only one out for Nutanix’s issue with CentOS 7, Rocky 8.. chop chop. time is running out..
Seems you have never played with nutanix and are only complaining.
1: cluster status is done in the cvm and not on the hypervisor.
2: you need to upgrade. This can be done in lcm in prism. Then you getting a newer centos as well.
Please take a training (www.nutanixuniversity.com) before you start complaining.
I re-performed everyone once, more for a single node… it worked, I suspect my mistake was the 1st two networking steps.
Thank you.
thanks for the blog, i’ve been stuck in the state below fore more than a night. all ahv are newly installed (and re-install a couple times)
my env is vsphere 7
ahv 8cpu (2 sockets), 64gb ram, 200,250,500 hdd
vswitch security configured to all ACCEPT
enable.DiskUUID = TRUE
cpu virtualization enabled
i didnt have problem to create a single node cluster, but the 3-node setup always stuck in the message below. no clue. hope you can give me some idea.
Waiting on 10.1.1.15 (Up) to start: Medusa DynamicRingChanger Pithos InsightsDB Athena Mercury Mantle Stargate InsightsDataTransfer Ergon GoErgon Cerebro Chronos Curator Prism Hera CIM AlertManager Arithmos Catalog Acropolis Uhura NutanixGuestTools MinervaCVM ClusterConfig APLOSEngine APLOS PlacementSolver Lazan Polaris Delphi Security Flow Anduril XTrim ClusterHealth
Waiting on 10.1.1.16 (Up) to start: DynamicRingChanger Pithos InsightsDB Athena Mercury Mantle Stargate InsightsDataTransfer Ergon GoErgon Cerebro Chronos Curator Prism Hera CIM AlertManager Arithmos Catalog Acropolis Uhura NutanixGuestTools MinervaCVM ClusterConfig APLOSEngine APLOS PlacementSolver Lazan Polaris Delphi Security Flow Anduril XTrim ClusterHealth
Waiting on 10.1.1.17 (Up, ZeusLeader) to start: Medusa DynamicRingChanger Pithos InsightsDB Athena Mercury Mantle Stargate InsightsDataTransfer Ergon GoErgon Cerebro Chronos Curator Prism Hera CIM AlertManager Arithmos Catalog Acropolis Uhura NutanixGuestTools MinervaCVM ClusterConfig APLOSEngine APLOS PlacementSolver Lazan Polaris Delphi Security Flow Anduril XTrim ClusterHealth
Well that message is that it is waiting for the services to start. Just wait. Grap a coffee and come back to see it is ready ;).
Hi Jeroen,
Thanks for the provided guide!
Please, consider to report that is also needed to enable MAC address changes in the VMware PG configuration, since in some cases the CVMs can’t ping from the outside network (if not only for some seconds after doing a ping to them from an AHV node).
It’s also reported here:
https://next.nutanix.com/ahv-virtualization-27/cvm-ip-address-not-reachable-nutanix-ce-42311
Best regards
Matteo Fringuelli
I shall update the blog 😉 Thanks for the mention.
Hi Joeren, great post and guide to setting up a nested CE environemnt!
The build works perfectly, however I constantely get alerts for “Storage tier skew on nodes” with the cause of “Disks in the tier are not the same size”.
All of my disks – for both the CVM Boot and the Data – have been placed the “SSD” storage tier which may be the cause this issue. is this expected behaviour from your experience? and do you know of any workaround??
I think this issue is also failing the pre-checks and stopping me from performing a cluster expansion!
Thanks
Hi Andrew, I’m not running my CE labs nested 😉 So I cant answer the question about my experience. But here is more information about that message: https://portal.nutanix.com/page/documents/kbs/details?targetId=kA00e000000bvPGCAY
Expanding a CE cluster is not recommended. Beter is to destroy the cluster and create it again with the 4 nodes (CE has a limit of 4 nodes maximum)).
Great post Jeroen. I have a similar setup and have used your blog to successfully install a 3 node Nutanix CE AHV cluster on my physical ESXi host. I have not been been able to install a 3 node Nutanix CE ESXi cluster using your blog though. Have you been able to successfully install a 3 node CE cluster using ESXi as the hypervisor instead of AHV?
Hi Frank. No never tried it ;). I dont like vmware 😂
Hi friends,
How are you?
I would like to help you.
I am trying to deploy Prism Central via Prism Element, but I am receiving the following message:
Error:
“encountered exception in cluster creation: uvm cluster creation is failed nutanix”
What could it be?
Hi, I installed Nutanix CE on esxi nested. It’s working, but the cpu of the my node is always at 50-60% of utlization even if I don’t have any vm running in my Nutanix environment. I tried to reinstall everything a few times but still get the same behavior. It’s a cluster of 3 nodes. Any idea how to correct this?
Yes if you have only 4 vCPU assigned to the CVM is will (off course) use a lot of cpu power 😉 In normal nodes the CVM uses as much cores as one socket. So there (depending on the memory usage) the cpu usage will be much less. You can correct this by adding more cpu to the cvm.
A few comments to this:
– I’ve never come across an install of CE where you wouldn’t need to allow “MAC address changes” on the port group used for the nested AHV hosts
– You do NOT NEED to change EFI boot for BIOS, but simply take out the “Secure boot” check just below (and even that would work if Nutanix could be bothered to build the installer ISO paying attention to the standards (EFI system partition, folder structure, digital signatures, signed boot loader, shim for unsigned kernels, etc.)
– Of course do I install VMware Tools, and that not only works without any issues but also massively improves the performance of the nested CE clusters
– If you have enough local or shared storage available, DO NOT thin provision the disks, because that will definitively result in having only half the storage performance
– If you still thin provision the disks, you defo will get “Storage tier skew on nodes” warnings
Hi Jonathan, thanks for the update.
1. In my lab the “MAC address changes” wasnt needed. But I will update the blog as this is more likely to be needed then it is not. Post updated.
2. I thought I updated the blogpost already for EUFI but I didn’t 😉 This was because I had an early release of CE 2.1 and that was only BIOS booting. post updated.
3. Installing third party software in AHV and AOS in not supported/allowed. But this is CE, so be my guest to do it 😉
4. CE is for lab to learn the product. Not to run production workloads, so performance is not a thing. As performance is terrible in nested anyway. But that is why I typed that it is my personal preference.
5. Upgrade to Nutanix commercial version 😉 Hahaha, sorry 😛
Sure, all good – I very appreciate your blog 🙂
One small thing more: If you do the cluster creation with “cluster -s ,, –dns_servers create” the command will automagically add 8.8.4.4 and 8.8.8.8 to your DNS servers list, while using “ncli cluster add-to-name-servers servers=” after cluster creation didn’t do that (at least in my case). My way after initial VM installation:
cluster -s ,, create
cluster start
ncli cluster edit-params new-name=
ncli cluster set-external-ip-address external-ip-address=
ncli cluster add-to-name-servers servers=
ncli cluster set-timezone timezone=
ncli cluster add-to-ntp-servers servers=,,
ncli cluster set-external-ip-address external-ip-address=
And, after mounting the VMware tools installer:
mkdir /media/iso; mount /dev/sr0 /media/iso; tar -xf /media/iso/VMwareTools*.tar.gz -C /root/; cd /root/vmware-tools-distrib; ./vmware-install.pl -d default
XXX 😉
Yes, if you skipp the dns servers during creation it will add the two google dns servers. But this is not always the case. That is why I always add them during creating. 😉
OMG. Thanks Jeroen,
I had no idea this could be done within vSphere. Thanks for documenting and sharing this information.
Hello. I followed your guide and successfully set up a 3-node cluster. However, when I accessed Prism, I noticed that only 2 CVMs are active. In the “Network” section, it seems the switch is not being recognized. What could be the issue?
In the network dashboard you only see the switch ports when you upgrade to aos 6.10 and have lldp enabled on the switchports. If you not upgrade you need to configure snmp on the switch and configure the snmp config, of the switch, in nutanix.
What do you mean with “only 2 cvm’s are active”??
can i deploy one node without configure ip then convert to template so i can deploy 3 nodes?
No that will not work as the disk serials are used to configure the cvm.
Thanks much for great tutorial step by step. But now, still not know how to load real os on VM. I create VMs but not sure where I can mount iso to my empty cdrom.
In Prism Element go to setting and then to images. Upload the iso there. Then you can mount it to install the os.
Hi Jeroen,
Can you help how to extend the data disk space ?
Regards,
Gopinath.D
Hi Gopinath,
Running CE on non Nutanix Certified hardware means that you need to reinstall the node when you want to change disk space or disks.
Sorry, but that is the method for CE.
Best regards, Jeroen.
Thanks, worked for me, especially helpful the note:
“As the CE 2.1 installer ISO also supports to boot in UEFI you can leave UEFI turned on (disable secure boot though, thanks Jonathan for the pointer), but for best compatibility set it to legacy (BIOS). You can change the virtual machine from UEFI” which UEFI, is was I elected to use.
Thanks for the feedback. 👍
I deployed successfully 3 nodes cluster and register into prism central, but when check storage disks, I see 6 disks (2 online and 4 offline). Not sure what can cause issue and how to bring other 4 disks online. I checked each node and verified settings disk.EnableUUID=TRUE.