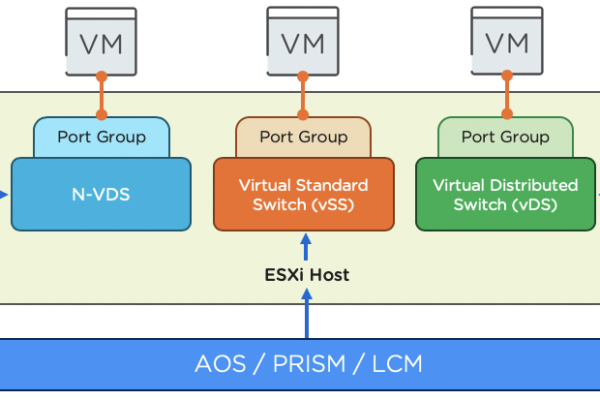
Blogpost updated on April 9th 2025. Trying to get some confusion out of the way for those administrators coming from VMware 😉
In this blog post I will show you how to create a Windows Server template and how to maintain it. Templates are virtual machines to be used to create new virtual machines. So, for example, if you need to install a new Windows Server it is easier to just deploy a virtual machine from the template rather then completely install Windows from scratch. The template can have the latest Windows updates and so, the newly created virtual machine, is already up to speed with the patches and can even contains all your applications needed to meet company policy.
How does Windows/Sysprep/VMware works:
First let me explain how Windows works. Each and every Windows machine has his unique Security Identifier (SID). When you clone a virtual machine (running Windows) the SID will be identical and so failures/problems can occur. Microsoft has this tool named sysprep. Sysprep is there already for decades and is used to make the specific machine ready to be cloned. Sysprep will make sure the next time Windows start that a new SID will be generated and the Out Of Box Experience (OOBE) will be shown. The OOBE is the first thing you will see after the first restart when installing Windows. (The screens asking for region, keyboard layout, wifi, computername, etc). You can automate this that the OOBE will be done unattended (and even run extra scripts etc). This unattended OOBE will be done via the unattend.xml. Microsoft has a nice article how to create the untattend.xml: https://learn.microsoft.com/en-us/windows-hardware/manufacture/desktop/update-windows-settings-and-scripts-create-your-own-answer-file-sxs?view=windows-11
So to summarize this in a workflow, starting from installing Windows
- First you install Windows by booting from the ISO;
- You can automate this with a autounattend.xml (read here: https://www.jeroentielen.nl/slipstream-virtio-drivers-into-windows-iso-to-use-on-nutanix-ahv/)
- After the first reboot of Windows the OOBE will be shown;
- Fill in all required things matching your needs;
- When Windows is installed run Windows update, install all your applications etc etc. Basically create your default Windows installation;
- When done installing you need to run sysprep to prepare Windows for cloning (prepare to make this a template);
- When the virtual machine is shutdown (after sysprep Windows will shut down);
- DON’T start the VM again, or you need to run sysprep again.
- Make the VM a template in Prism Central;
- When deploying a VM from the Template Windows will start the OOBE
- Again, the OOBE can be automated with an unattend.xml
Makes sense? 😉 Now for those VMware administrators this can be a bit complex. As they are used to skip running sysprep themself as VMware will do this for them. And the unattend.xml is generated in vCenter is well. In Prism Central this is a bit different. Nutanix will not do all those Windows magics for you and you need to do this manually. The unattend.xml can be generated though via this options in Prism Central:

But the possibilities are limited (yet???). If you need to use the unattend.xml from your VMware environment copy it from a machine where the customization is done (I’m not covering this part, it should be mounted in a floppy drive or a cd-rom drive when deploying a VM).
Creating the template:
I’m not describing how to install Windows but I would recommend to look at this blog post to create an ISO file with the VirtIO drivers included: https://www.jeroentielen.nl/slipstream-virtio-drivers-into-windows-iso-to-use-on-nutanix-ahv/
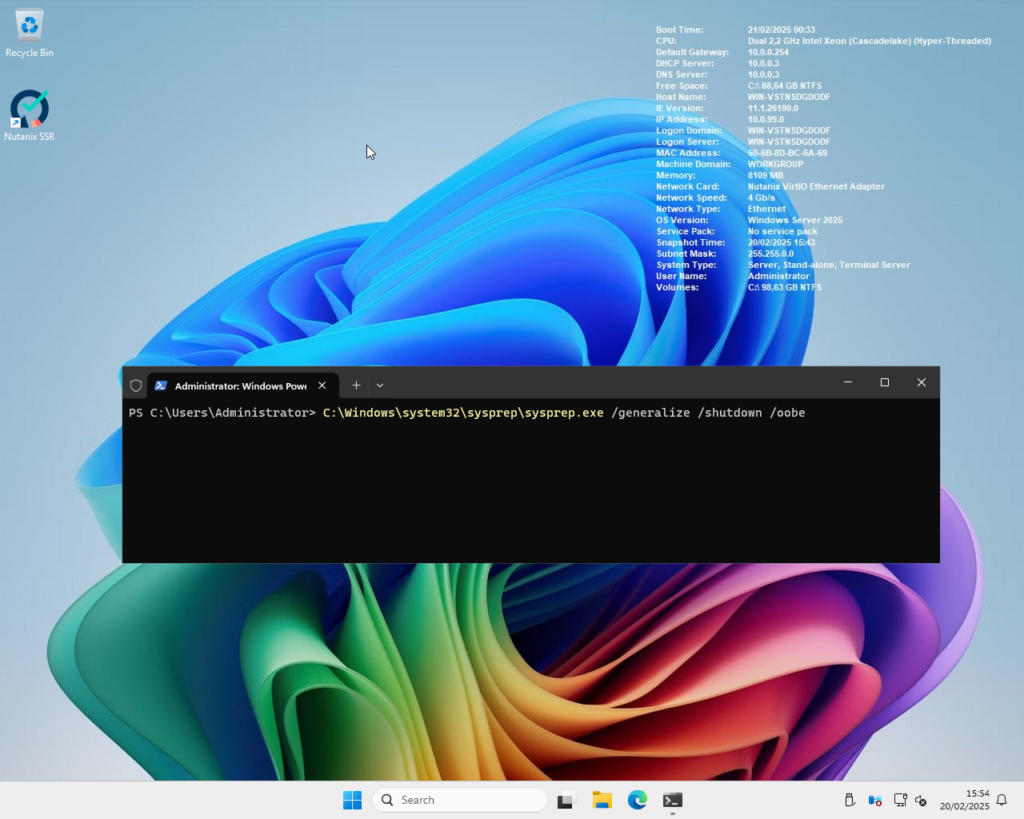
When Windows is completely installed the way you want it for all Windows virtual machines you need to run sysprep. Sysprep is a built-in tool in Windows to make the Windows installation ready to be cloned. Open an elevated prompt and run:
C:\Windows\system32\sysprep\sysprep.exe /generalize /shutdown /oobe
If this generates an error you probably need to remove the Windows Store apps. Review the log file it shows in the error. More info here: https://learn.microsoft.com/en-us/troubleshoot/windows-client/setup-upgrade-and-drivers/sysprep-fails-remove-or-update-store-apps
Here is my powershell script to remove the AppX packkages: (Run if you know what you are doing ;))
Import-Module Appx
Import-Module Dism
# This will show the installed packages:
Get-AppxPackage | Where PublisherId -eq 8wekyb3d8bbwe | Format-List -Property PackageFullName
# Remove the package with this command, the package shown in the sysprep log needs to be removed.
Remove-AppxPackage -package <packagefullname>Now try to run sysprep again. If the “Sysprep is working” pops-up then you are good to go. If your virtual machine is a domain joined machine the machine will leave the domain and is back in workgroup mode.
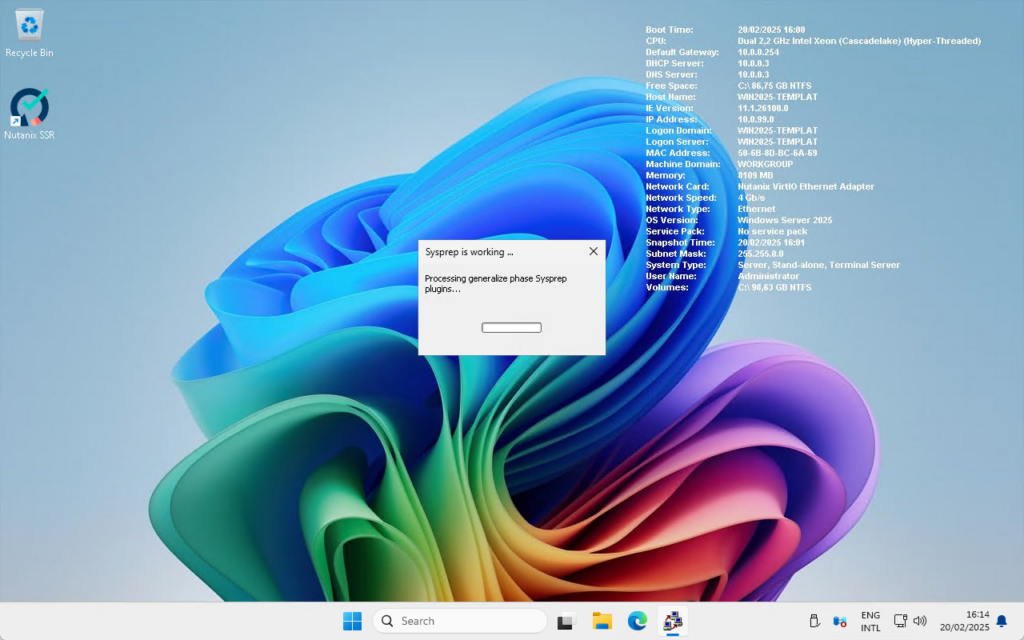
When sysprep is done the virtual machine will shutdown automatically. Do not start the virtual machine or you need to rerun sysprep 😉
In Prism Central select the template virtual machine and select: Create VM Template
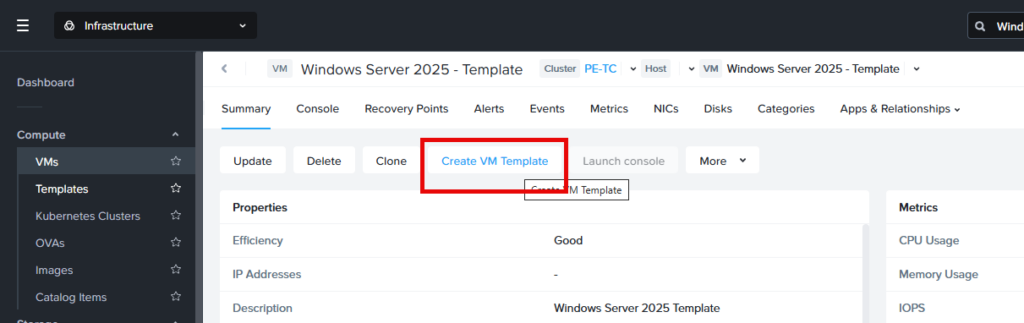
This will show the following wizard:
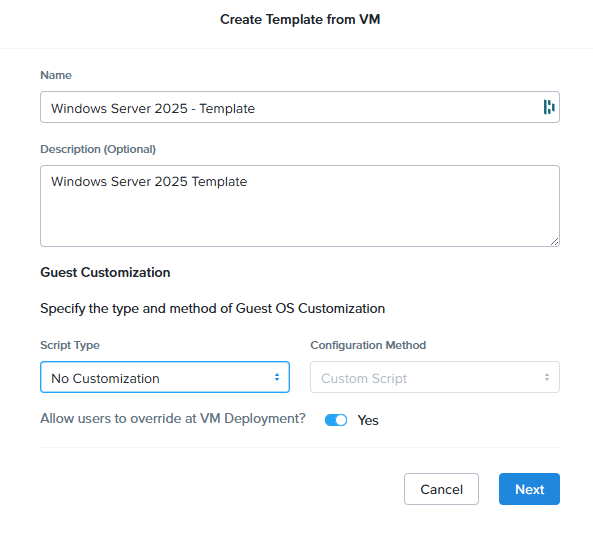
Give the template a name, description and make a choice about the customization. You can add your own unattend.xml script, create one or just leave it as is. The switch will allow the users (who are using this template in Prism Central) to override the customizations when deploying the template.
Using the template:
We can now use this template to create virtual machines. Select templates from the menu on the left, select the template and the click: Deploy VM. You can also click “Create VM from Template” in the VMs dashboard.
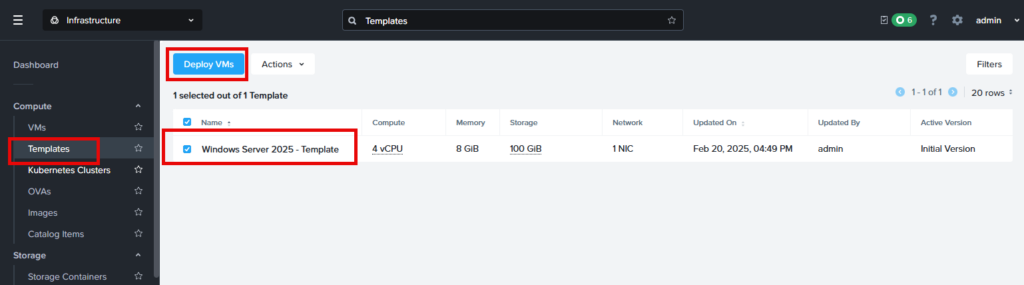
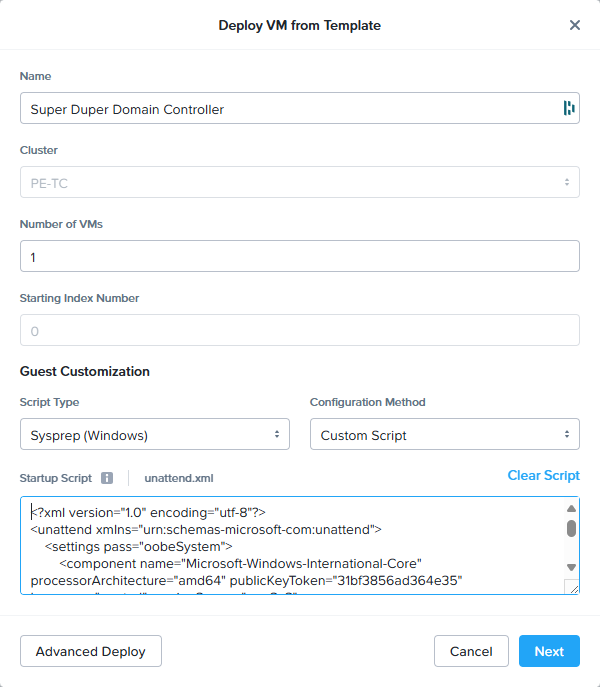
Fill in the information, add a customization script (if needed, and if possible) and click next –> deploy.
A new virtual machine is being created based on your template.
Updating the template:
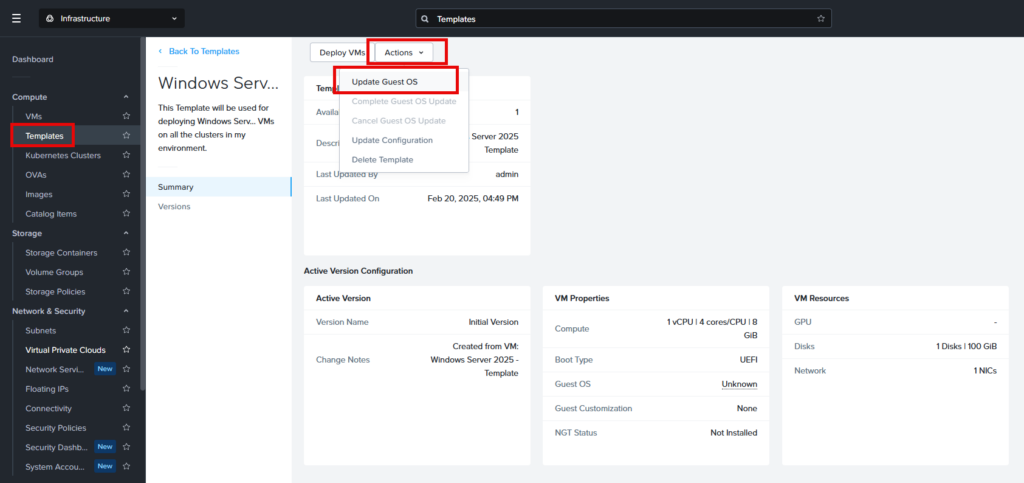
Now, when you need to update the template with patches or other things go to the templates dashboard in Prism Central and click on the template name.
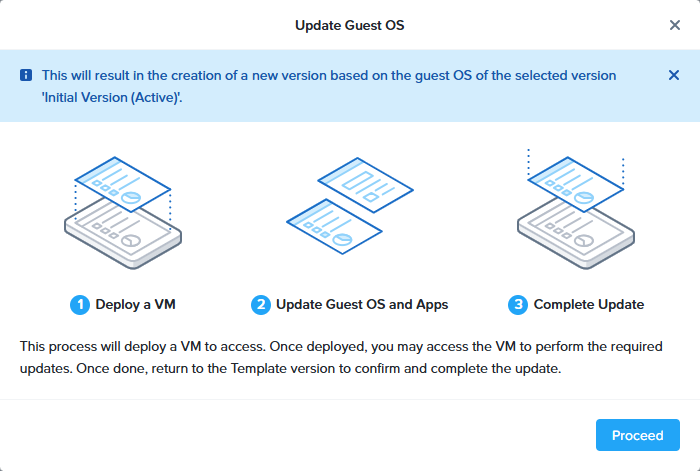
The following screen will appear. Select: Update Guest OS from
You need to choose the version your new version will be based on. In my case I only have 1 version so I will use that one.
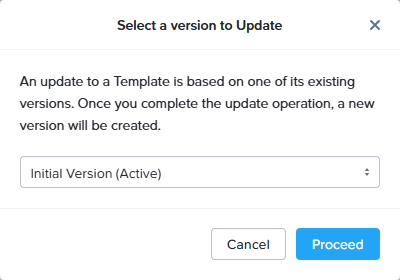
This screen shows, which will help you what to do next. Click on Proceed.
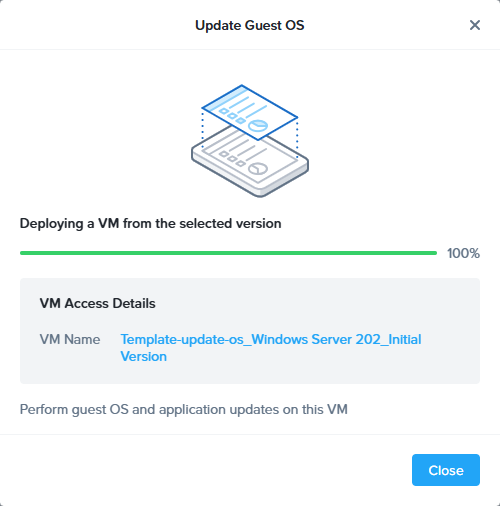
An new, temporary, virtual machine is deployed. You can use that one to updated the required software (or your monthly windows updates). Click on the Close button.
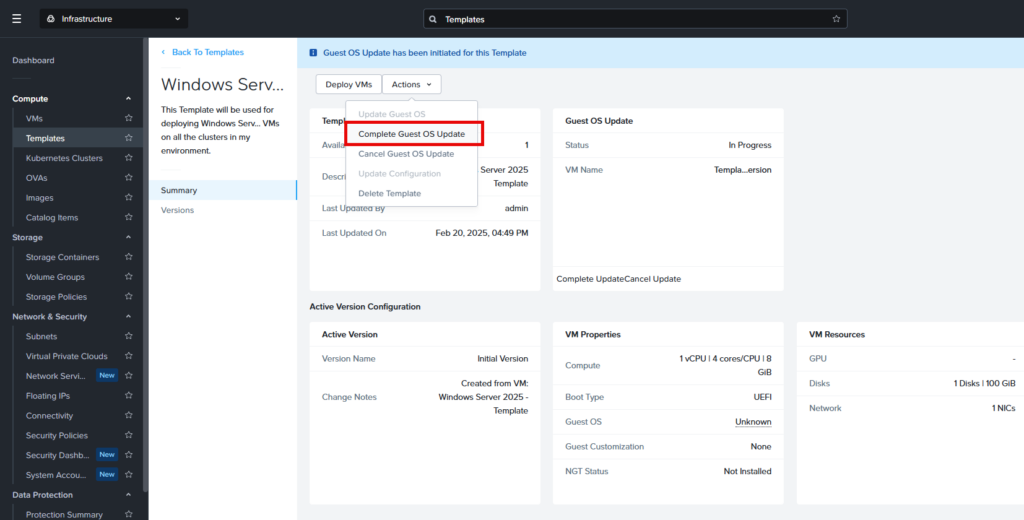
When you are done updating the software, Windows or other stuff rerun sysprep and let the Windows shutdown. (You can reboot the temporary virtual machine if needed for the updates. But always run sysprep as last step to shut it down) You will have a new option in the action menu named: Complete Guest OS update. Select this.
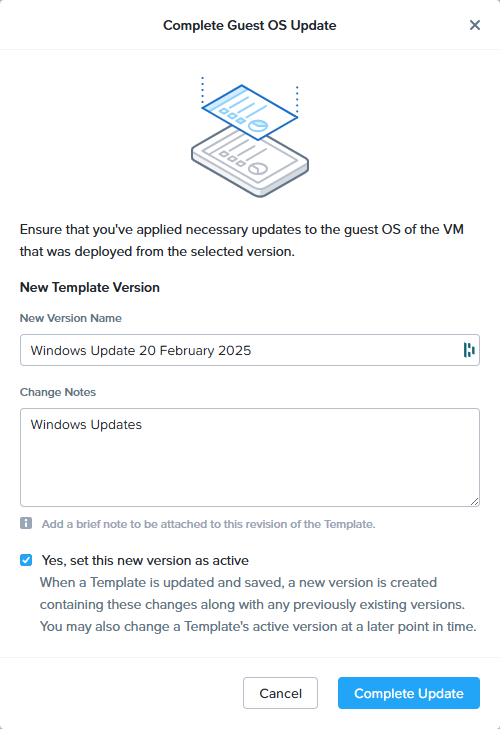
Give the new version and name and fill in the change notes. Select: Yes, set this new version as active. To make it directly available for deployment. Click on “Complete Update”
And there you have it, easy template creation and management in Prism Central.
Discover more from Jeroen Tielen
Subscribe to get the latest posts sent to your email.

Hi Jeroen,
Do you know if there are any automation options to update the VM templates with for example Windows Updates?
I’m working on this 😉 But aint got much spare time to finish.
I’m confused. Everytime I’ve had to use sysprep, I’ve done it with the /generalize option, to create a new SID. I notice you don’t do that, when creating the template. But isn’t that a necessary step when deploying a VM from this template? OR does Nutanix do that if I choose “Sysprep” when deploying a new VM?
Thanks! Helpful article.
Nutanix is not doing the sysprep for you. You have to do it yourself. The generalize option is only if you are going to use the template on different hardware. But this is not going to happen when running on nutanix. So you can skipp it.
OK. So after I’ve done sysprep on the VM, converted it to a template, and told it to deply a VM from template, I have to choose either Guided Script or Custom Script. I’ve never had to write a custom sysprep script, the VMware customization specs just named the newly deployed VM as I wanted, with an administrator account and password, and all the other specs. Is that all I need to enter? All the searching I’ve done returns entries for using a reference image, which is not what I am doing (near as I can make out, any – I am deploying from template, but the instructions don’t give nearly enough detail about what ‘s being asked. Not to me, anyway.
Thanks
You dont need to do the duided or custom script. But then the vm will run the oobe (out of box dxperience). This is just how windows works. If you want that automated you need to create your own sysprep script. There are thousends of guides on the internet how to do that. I’m not covering that on my blog as that is for the windows blogs on the internet. Yes, vmware will create the sysprep script for you. Nutanix doesnt do that for you (yet ;)). (Well the guided scriot will do this, but is not that advanced yet ;))
Hi Jeroen,
Are you really sure about the SID? I’m in doubt now…
“Even if you’re capturing an image that’s going to be deployed to a PC with similar hardware, you still have to generalize the Windows installation to remove unique PC-specific information from a Windows installation, which allows you to safely reuse your image.”
“When you generalize an image, Windows replaces the computer SID”
https://learn.microsoft.com/en-us/windows-hardware/manufacture/desktop/sysprep–generalize–a-windows-installation?view=windows-11
I think you can better use: sysprep.exe /oobe /generalize /shutdown /mode:vm
With the option /mode:vm , it will skip the hardware detection also.
You agree ?
Nice. I will test this later this week. And add aome more i formation in de the blogpost. 👍👍
Steven, I did the testing and indeed the generalize will generate a new SID. Don’t know when this changed is the decades 😉 haha. But thanks for the update. Blogpost is updated
hmmmmmm I get an error when running the final command
Remove-AppxPackage -Package
At line:1 char:29
+ Remove-AppxPackage -Package
+ ~
The ‘<' operator is reserved for future use.
+ CategoryInfo : ParserError: (:) [], ParentContainsErrorRecordException
+ FullyQualifiedErrorId : RedirectionNotSupported
The powershell module on my website was doing the typo’s. I changed it to the new plugin and now the powershell script is shown correctly.
that’s the weird thing i spotted the typos on this page but I still get the error its the Remove-AppxPackage -package it doesn’t like and I even got the code from the MS page but still get the same error!
right tried with PS7 and STILL get the same error!
PS C:\Program Files\PowerShell\7> Remove-AppxPackage -package
ParserError:
Line |
1 | Remove-AppxPackage -package
| ~
| The ‘<' operator is reserved for future use.
should read.
PS C:\Program Files\PowerShell\7> Remove-AppxPackage -package
ParserError:
Line |
1 | Remove-AppxPackage -package
| ~
| The ‘
*sigh* not pasting correctly hahahah
right me being thick the is just a place holder for the full name of the package as found in the sysprep log file. I’ll try a gain!
If you have a lot of appx packages to remove, you can easily handle that with a foreach loop after capturing the packages in a variable:
Import-Module Appx
Import-Module Dism
# This will show the installed packages:
$pkgs = Get-AppxPackage | Where PublisherId -eq 8wekyb3d8bbwe | Format-List -Property PackageFullName
# Remove the package with this command, the package shown in the sysprep log needs to be removed.
# Note $($$pkg.packagefullname) is there for encapsulation of the variable, as sometimes the entire object is returned prior to evaluation
foreach( $pkg in $pkgs) {
Remove-AppxPackage -package $($pkg.packagefullname)
}
I read the article along with all the comments, and I’m trying to understand a few things.
I’m a bit confused: if Nutanix does not perform Sysprep automatically and we have to run it inside the OS, then what is the purpose of the Sysprep option shown during VM deployment? Also, what exactly is the “Update Template” function used for?
In VMware, the process is straightforward: assign an IP to the VM, update the software, install the required applications, apply OS patches, and then convert the VM back into a template.
However, in Nutanix I noticed there is a concept of a “new version” of a template. How does that work? Do we update only the template, similar to VMware, or is there an additional step involved? I’m also concerned about whether Microsoft patches can be updated inside the template in some other way.
The sysprep option, during deployment, is to provide an unattended xml file. This will automate the windows deployment. That is how windows sysprep works.
The update template will generate a “temporary vm” where you can update windows or application in. When done it will create a new version in the template to be used for deployments. It works the same as vmware only better ;). As you will have multiple versions inside a template.
There is a new option that will do the sysprep for you now. More info here: https://www.jeroentielen.nl/nutanix-guest-customization-profiles/