
I had the opportunity the play with 2 Nutanix clusters on OVHcloud. In this blogpost I will explain how to set it up and how to do a migration from your on-premises environment to Nutanix on OVHcloud (Migrate to the cloud).
Index:
- Pricing;
- The Network/Default Setup;
- Cloud Migration;
- Disaster Recovery;
- X-Ray;
- LCM;
- Documentation and Videos;
- Redeploy;
- Conslusion.
Pricing:
OVHcloud is offering Nutanix clusters in their own datacenters. There are plenty of combinations possible within their offerings and prices aren’t bad either 😉 (I think they are very very good priced).
For example, If I order one of their entry level hardware configuration WITH a Nutanix Standard package bundle it will cost me: €6110,- per month (Three nodes, 192GB RAM each, dual intel Xeon Gold 6226R 2.9Ghz , 6x 3,84TB SSD each). And with a Bring Your Own License (BYOL) it will cost me: €3518,- per month. (prices as today and can change offcourse ;))
Do your own calculations here to see what all is possible. And here are the differences in Nutanix licenses (Start/Pro/Ultimate) used for the BYOL.
OVHcloud has two licensing prepackaged bundels named: Standard and Advanced. They are explained here: https://help.ovhcloud.com/csm/en-gb-nutanix-available-services?id=kb_article_view&sysparm_article=KB0032024
The Network/Default setup:
So I have 2 clusters running in 2 different datacenters. These are just deployed and nothing is changed afterwards.

A typical, multi cluster, multi datacenter, deployment within OVHcloud will look like this:
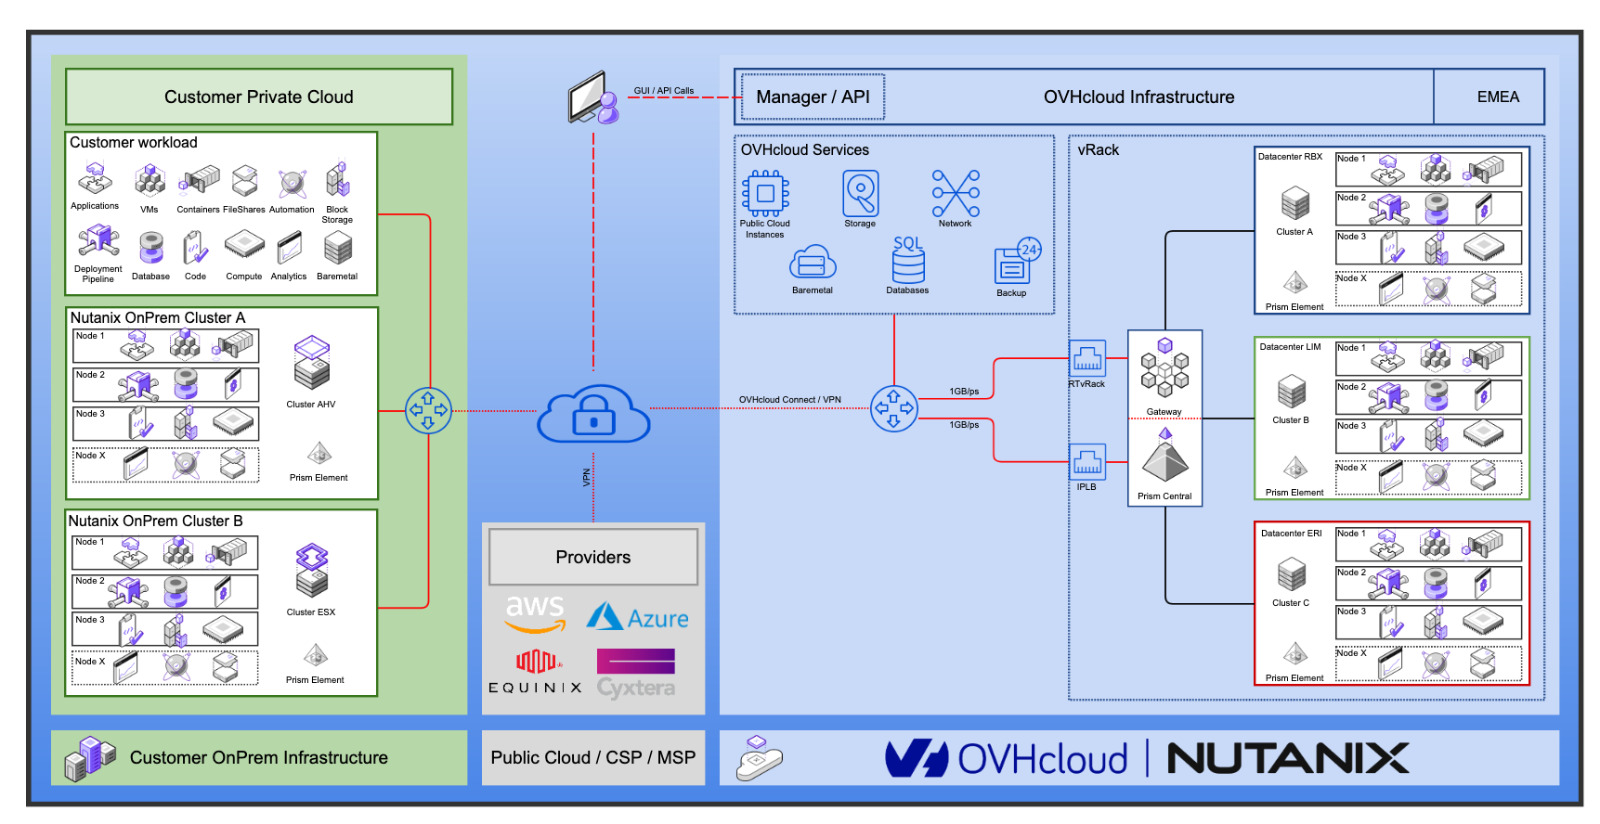
On the left (green) you have your own, on-premises, infrastructure. And on the right (light blue) the OVHcloud hosted private cloud, with the Nutanix clusters. Within the picture you see 3 Nutanix clusters in the same vRack (a vRack is a private network that spreads across all OVHcloud datacentres).
The “Gateway” is a virtual machine deployed on the cluster for providing internet access to the vRack. (Must be replaced)
The IPLB (IP Load Balancer) is used to load balance any services in the vRack to the internet. In the default configuration this is only for Prism Central. (Must be disabled when all is up and running)
But the default configuration gives me 2 vRacks (1 in each datacenter).
What I want is the following configuration:
- All Clusters in the same vRack and in the same Prism Central;
- Replace the default gateway (Removing or replacing the gateway is mandatory) with a router/firewall of your choice. I will go for a pfSense virtual machine;
- Create a Site to Site vpn from my on-premises environment to the vRack.
So I need to remove 1 cluster from his vRack and place it in the same as the other cluster. Before I can do this I need to change the ip-addresses of the cluster, as default all clusters are using the default ip-address setup.
Here is what the default ip-addresses look like:
- First node:
- AHV 172.16.0.1
- CVM 172.16.1.1
- Second node:
- AHV 172.16.0.2
- CVM 172.16.1.2
- Third node:
- AHV 172.16.0.3
- CVM 172.16.1.3
- Cluster VIP: 172.16.1.100
- Prism Central: 172.16.1.99
- Subnet: 255.255.252.0
For the first cluster this is all fine, but the second cluster needs to be redeployed to have the correct ip’s.
- First node:
- AHV 172.16.0.4
- CVM 172.16.1.4
- Second node:
- AHV 172.16.0.5
- CVM 172.16.1.5
- Third node:
- AHV 172.16.0.6
- CVM 172.16.1.6
- Cluster VIP: 172.16.1.101
- Prism Central: 172.16.1.98 (temporary as we are going to remove this);
- Subnet: 255.255.252.0
Redploy a Cluster:
Login to the OVHcloud dashboard and go to: Hosted Private Cloud –> Nutanix –> <The cluster to change> –> Redeploy cluster.
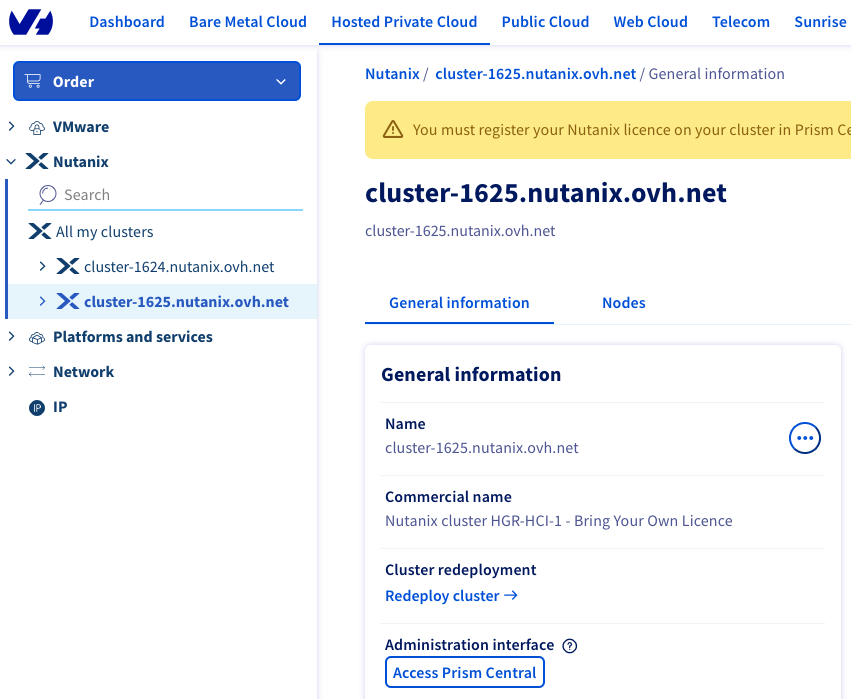
Select: “Customise the configuration” and click next.
Fill in all the correct IP-Addresses and select your AOS versions (at the moment 6.5 (LTS) or 6.6 (STS)) and hit redeploy. OVHcloud will always propose the lastest LTS and STS versions.
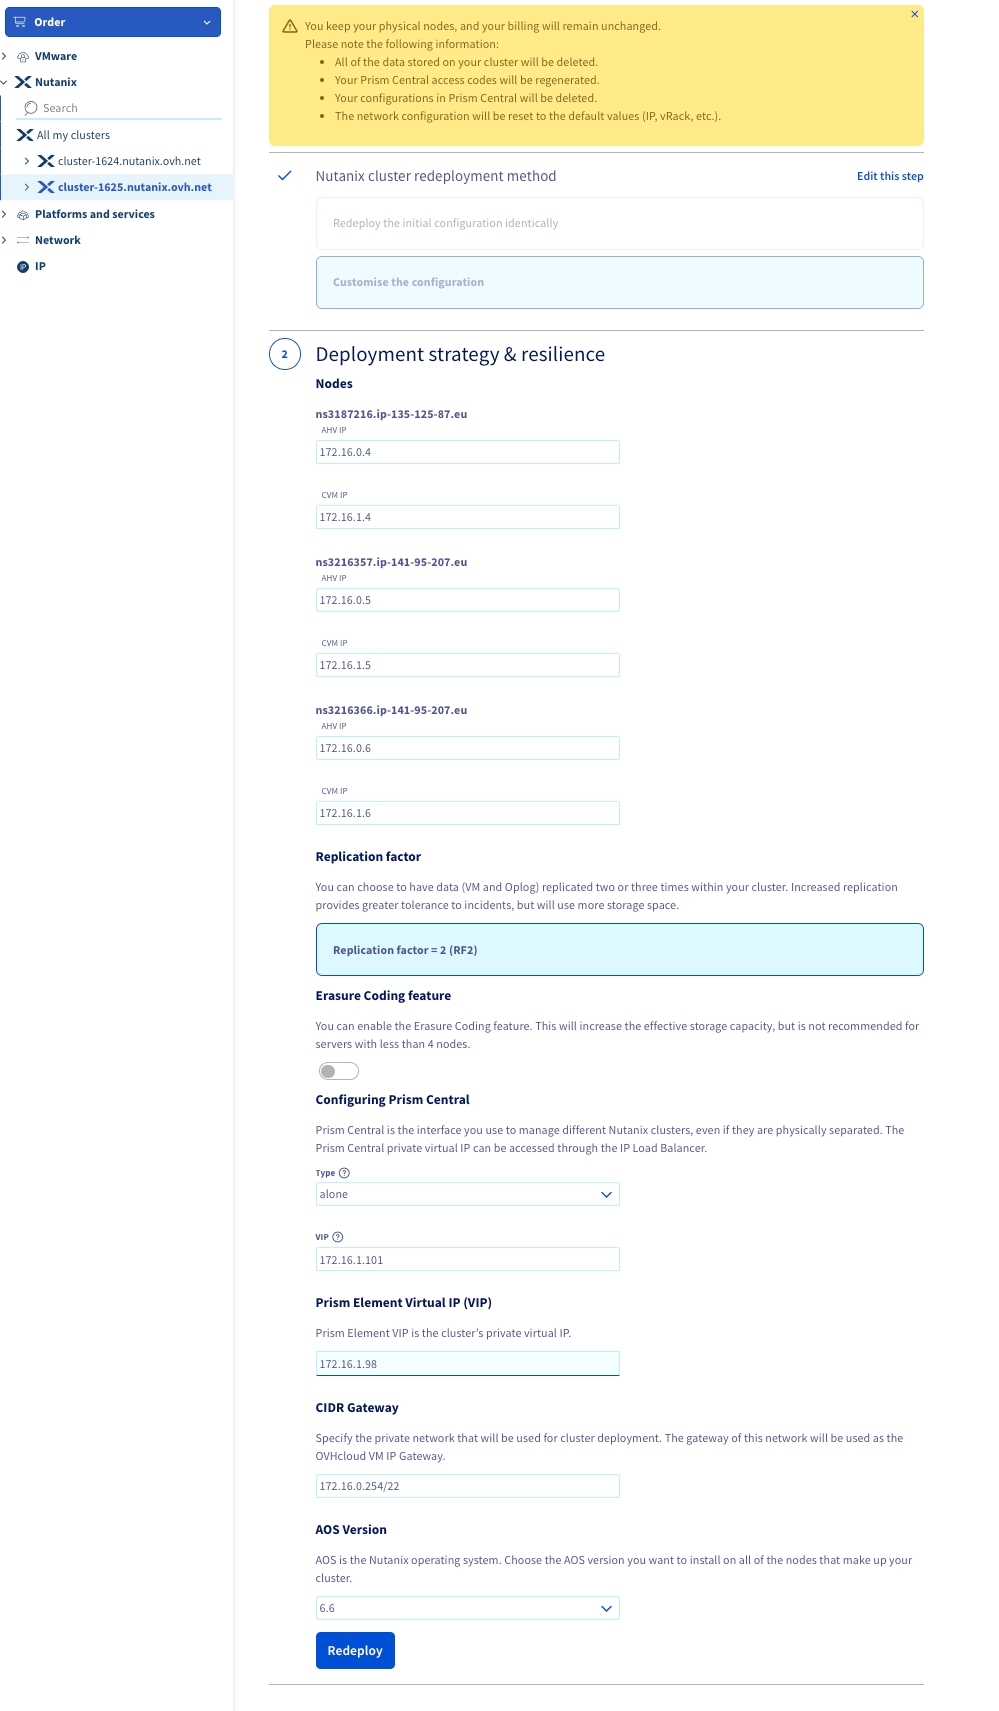
The redeployment took 1 hour and 26 minutes.
Move Cluster Into Other vRack:
Now we need to remove it from the vRack and add it to the vRack where the other cluster resides.
Open the cluster settings, scroll down, click on the Private network (vRack).
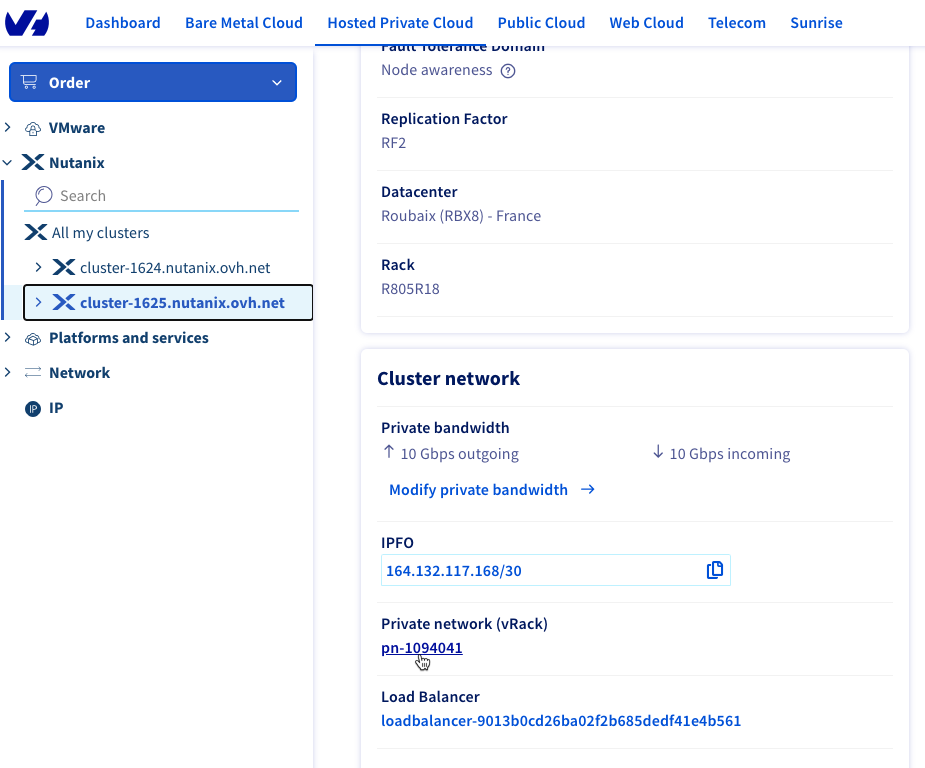
Your are being redirected to the vRack configuration page.
On the right side select all three nodes and click remove.
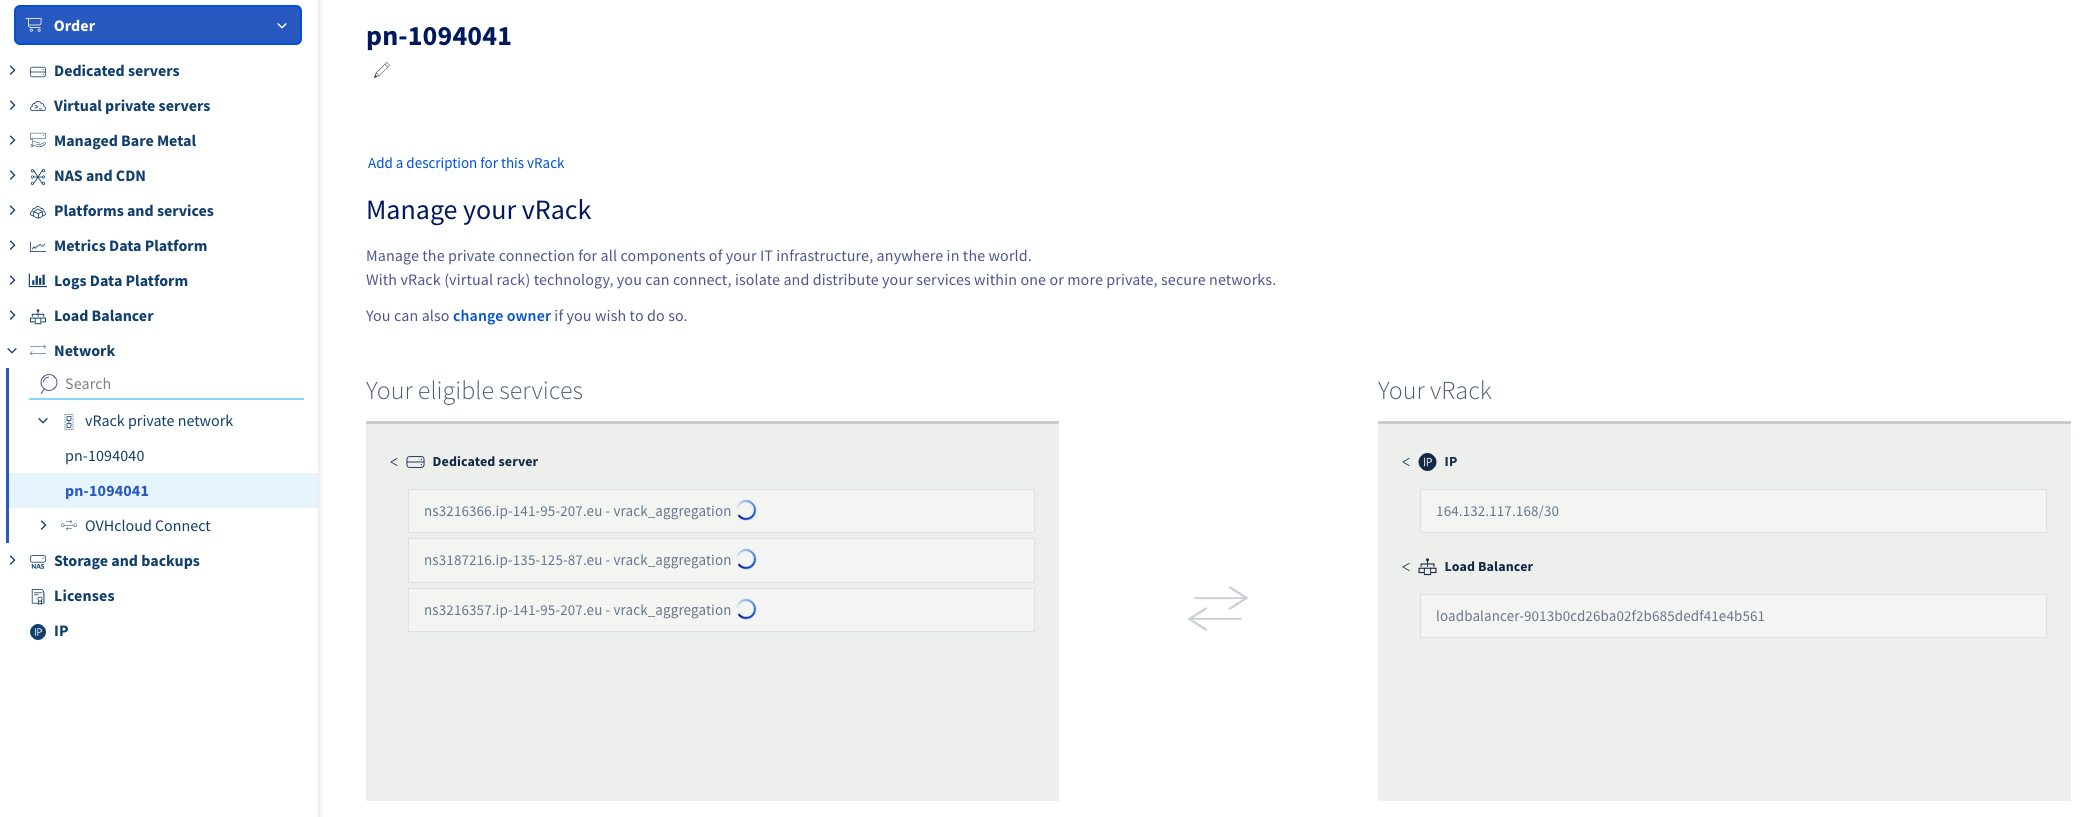
As you can see on the screenshot the ip and load balancer are staying in the vRack. (Keep this, as it is needed when the cluster needs to be redeployed). Now switch to the vRack where the other cluster resides.
Select all components on the left and click add.

The clusters are now in the same vRack and can see and talk to each other.
Bastion Virtual Machine:
Now the easiest method to continue is to create a bastion virtual machine where you can connect to from the ouside. Install a windows virtual machine on a cluster, give it an ip-address (172.16.1.253/22, gateway 172.16.0.254, in infra subnet) and enable RDP. I will skipp the parts of the installation as that is straight forward.
Note: In the OVHcloud Nutanix clusters you have 2 subnets by default. “base” and “infra”. Base is your “WAN” side (or internet) and Infra is your default internal network. You can add/delete subnets if you like to fullfill your own requirements.
When the machine is up and running, and the network can ping (for example) the cvm’s we need to make the RDP available from the outside. Now keep in mind RDP stands for “Ransomware Deployment Protocol” and this is only temporary to complete the deployment/configuration and only active from my public IP at the office.
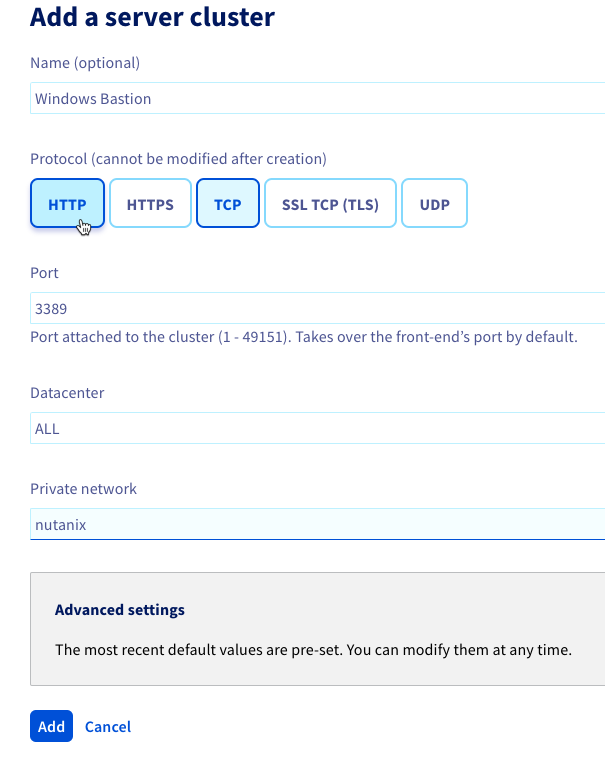
Go to the Load Balancer attached to the datacenter where the cluster is which is running the bastion virtual machine. Click: Server clusters –> Add a server cluster.
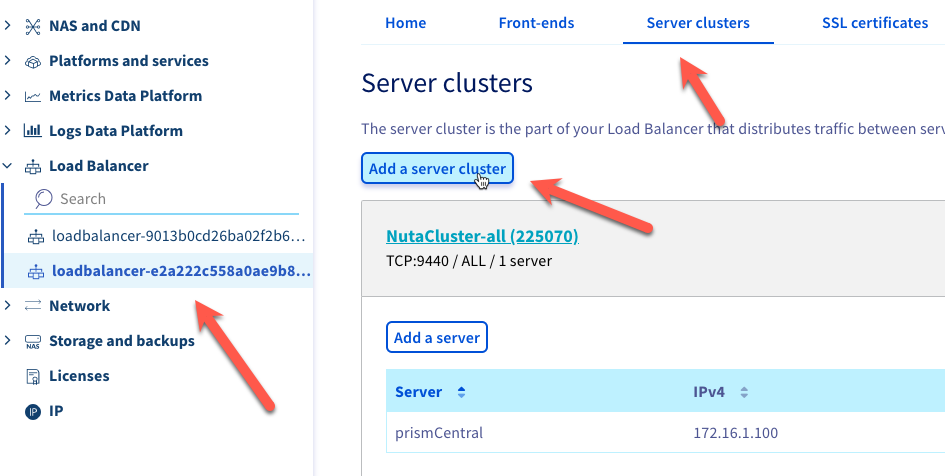
In here we configure the rdp service for the Windows Bastion.
 Now we need to add the Windows virtual machine into this group. Click: Add a server.
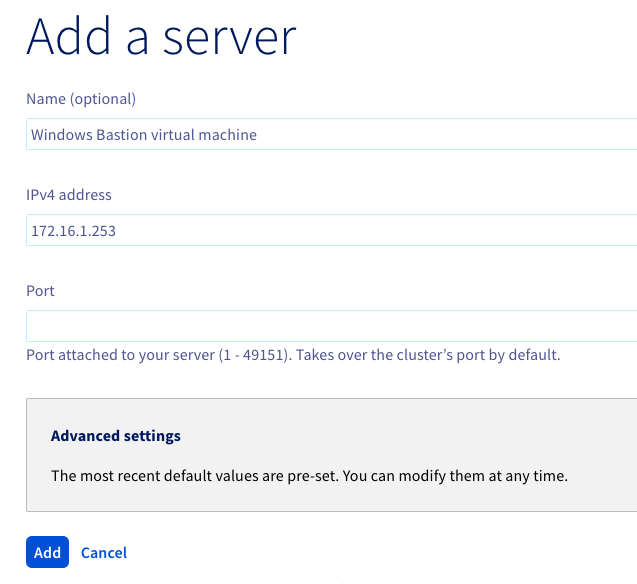
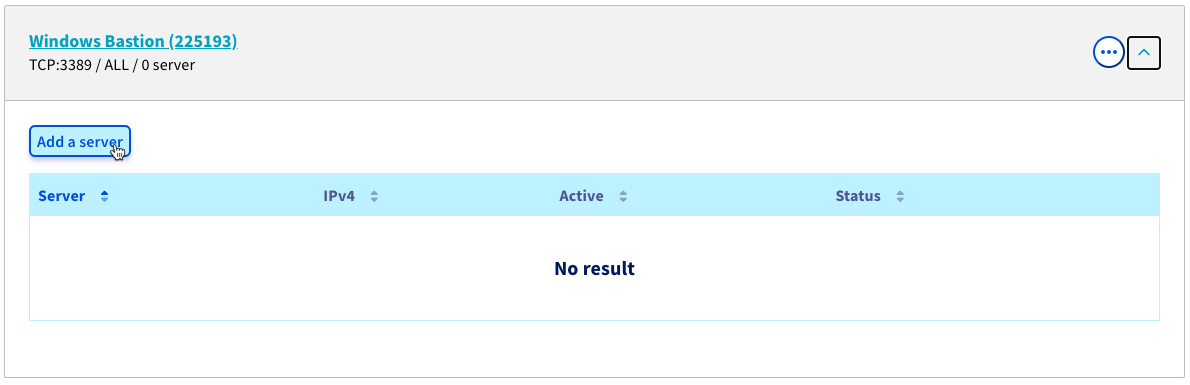 Fill in a name and the ip-address and click: add.
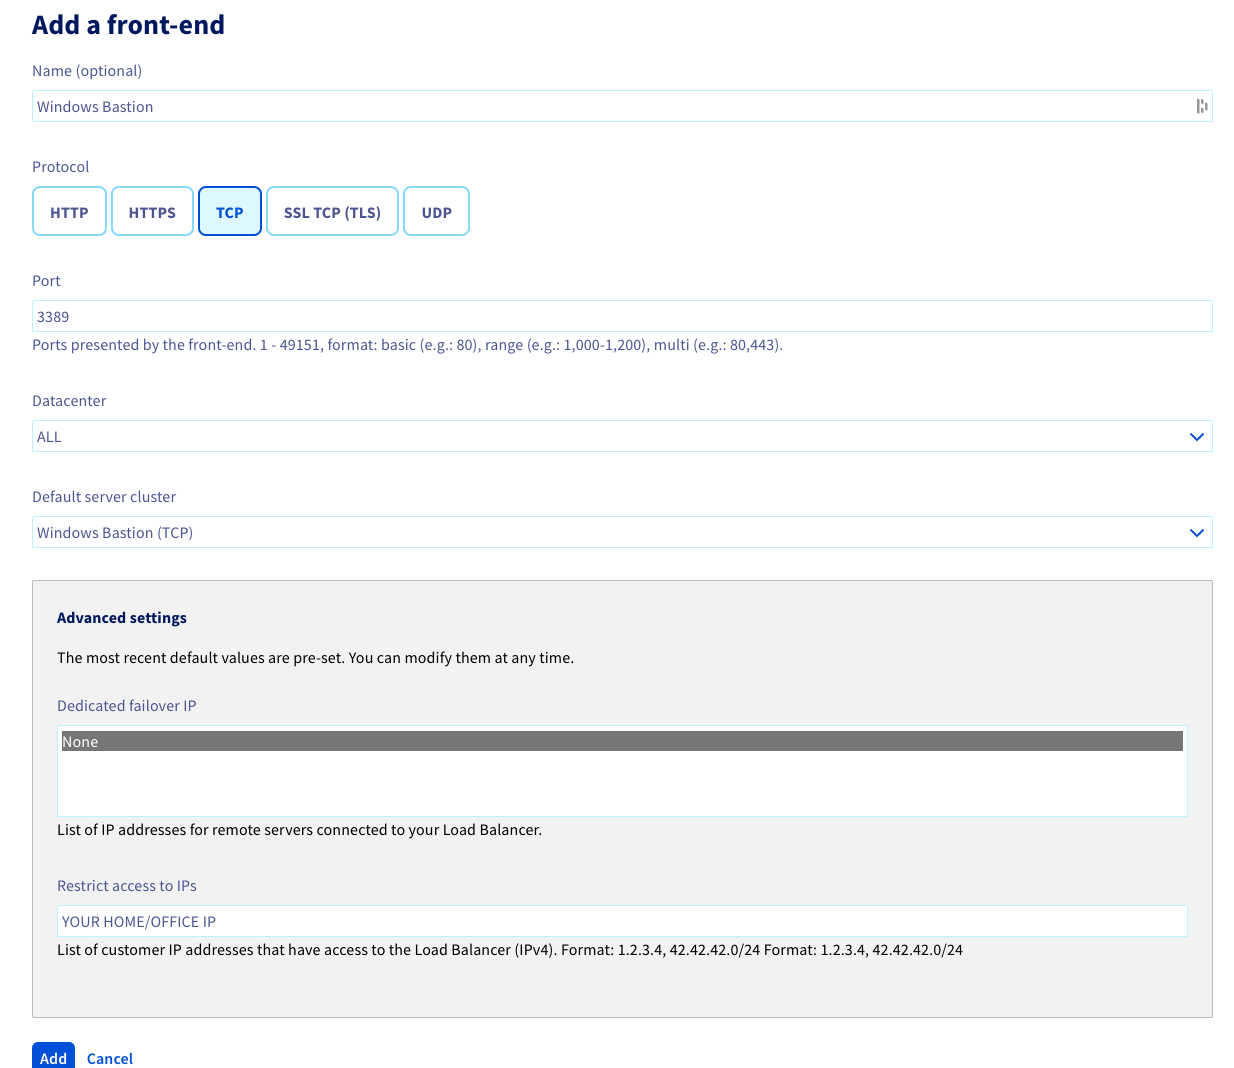
Click on Front-ends –> Add a front-end. 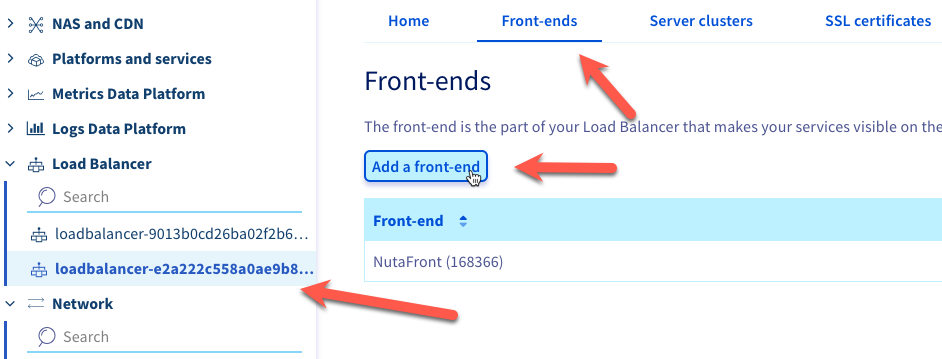 Now fill in the required fiels. DONT FORGET to add your office ip-address in the list of restricted access.
When all is configured click on “Apply configuration” to apply the new Load Balancer settings.
Now we can access the environment via RDP to the Windows bastion machine only from the given ip-address. REMEMBER: You should remove or disable this front-end when not in use.
One Prism Central:
Make sure you connect via the bastion machine to the environment.
In these steps we are placing both clusters in the same Prism Central.
- Remove the “vRack changed cluster” from his own Prism Central. How to do this can be found here: https://portal.nutanix.com/page/documents/kbs/details?targetId=kA00e000000XeZjCAK
- Delete the Prism Central virtual machine from that cluster (As it is not in use anymore): acli vm.delete <prism central vm name>
- Connect the cluster with the Prism Central hosted on the other cluster.
And there you have it. 2 clusters on different datacenters in the same Prism Central:
Default Passwords:
The OVHcloud Nutanix cluster only have the admin password changed. That password can be retrieved via a link send to you in an email. All others password are still default so changing them is mandatory. How to do this is explained here: https://portal.nutanix.com/page/documents/kbs/details?targetId=kA00e000000LKXcCAO
Replace OVHgateway with pfSense:
The OVHgateway is a linux virtual machine only needed to provide internet access to the cluster for deployment. OVHcloud insists that you replace is with some other type of router. They made a tutorial how to do this with pfSense: https://help.ovhcloud.com/csm/en-ca-nutanix-software-gateway-replacement?id=kb_article_view&sysparm_article=KB0032227
Site 2 Site VPN:
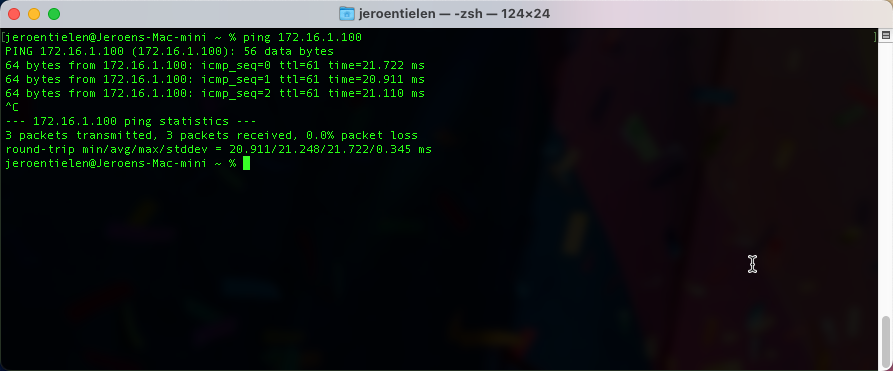
For my testing I want a site 2 site VPN from my on-premises environment to the pfSense router. So I can access the OVHcloud Nutanix clusters direct from my network. I’m not documenting this is this blog as it is different for everyone. Here a screenshot where I’m pinging the Prism Central from my mac at the office.
Cleanup:
Now we are almost done with the configuration. We only need to cleanup the front-ends in the IPLB’s so there is no external access anymore. In my case I just want to be able to access the environment from my office (via the site-2-site vpn).

In the screenshot I disabled the external connections. You can also delete them, but I want to be able to easily enable them again when needed.
Cloud Migration:
On my Nutanix clusters in the office there are some virtual machines I want to migrate to the OVHcloud Nutanix clusters. I’m going to do this via Data Protection in Prism Element.
Make a remote site on each cluster pointing to each other.

The OVHcloud Nutanix cluster pointing te my on-premises cluster.
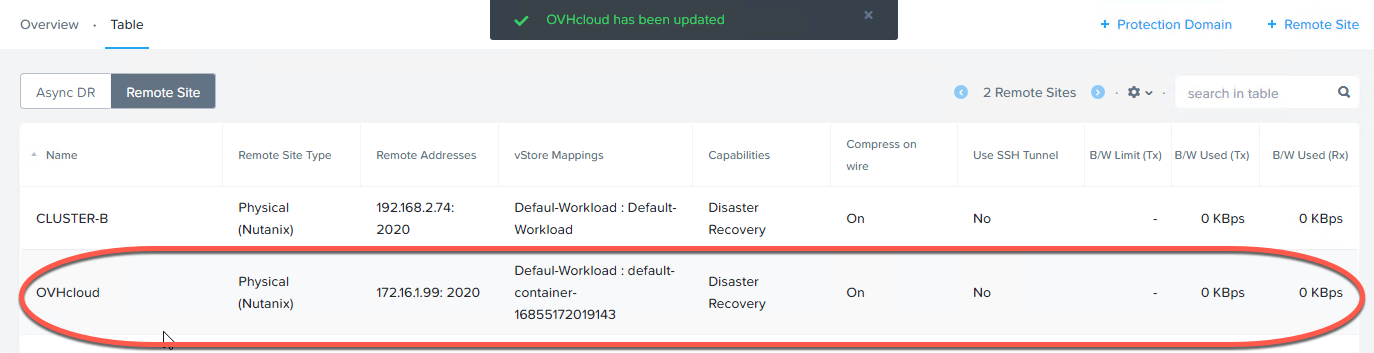 The on-premises cluster pointing to the OVHcloud Nutanix cluster.
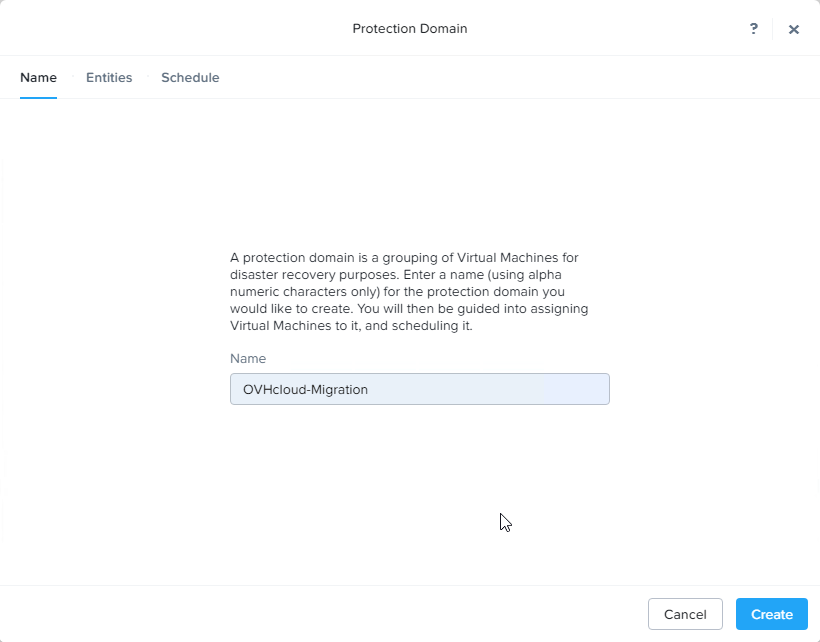
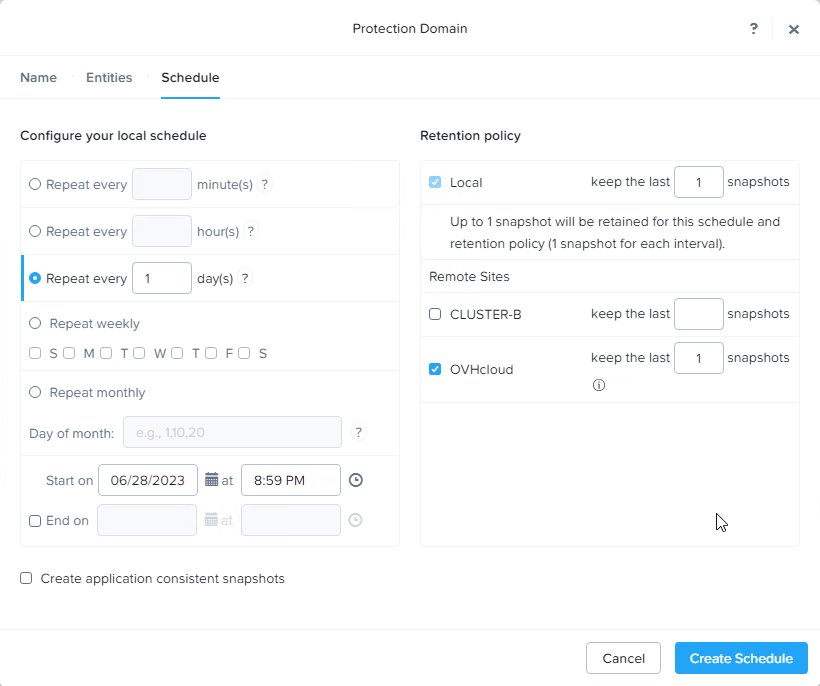
Create a Protection domain.
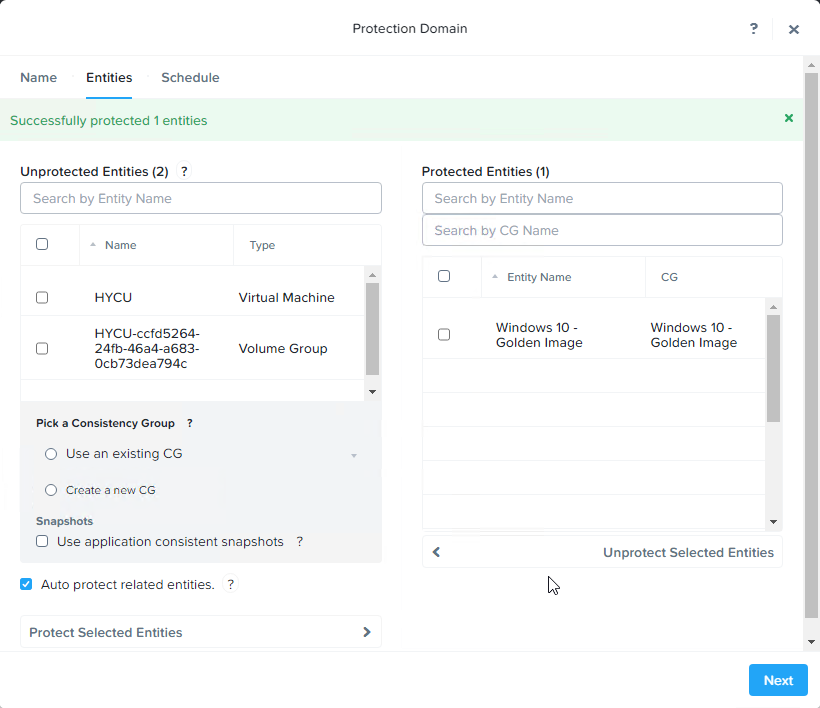
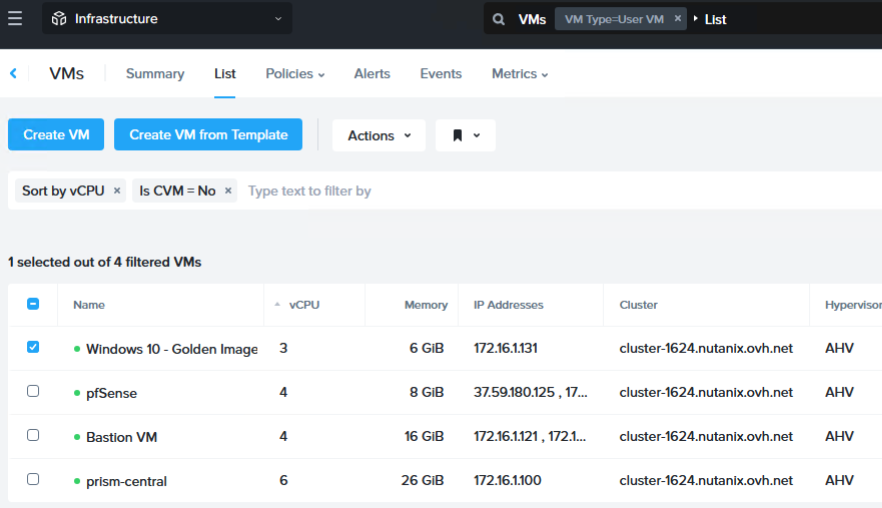
 Select the entities you want to migrate. In my case it is just the Windows 10 Template virtual machine.
Choose a schedule you want to use. 1 time each day will be enough. Dont forget to check the remote site.
When the protections domains are replicated to the other site we can migrate the workloads.
Select the Protection Domain and click migrate. A popup will be shown where you select the site to migrate to and click migrate.
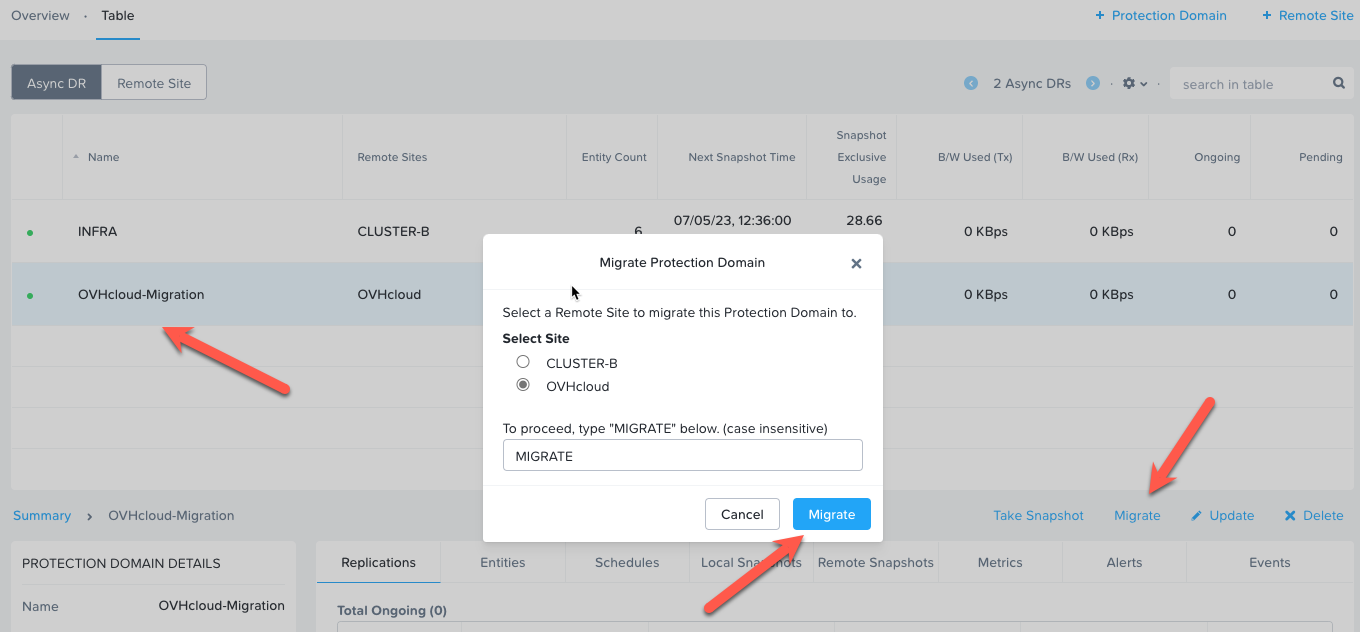
And there we go, we migrated the workload to Nutanix on OVHcloud.
When your source cluster is not a Nutanix environment you can use Nutanix Move to migrate the workloads to the destination cluster. More info here: https://help.ovhcloud.com/csm/en-nutanix-move-migration-tool?id=kb_article_view&sysparm_article=KB0045085
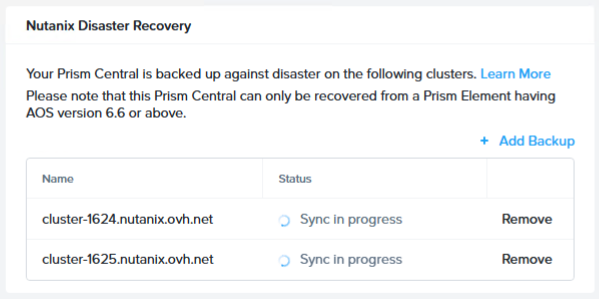
Disaster Recovery:
Since we have two clusters in different datacenters and with low latency we can configure Metro Availability and getting an RPO of 0 (Zero) I’m not describing how to do this as I already created a guide for that which can be found here: https://next.nutanix.com/community-blog-154/convert-your-cluster-to-ahv-and-configure-leap-for-disaster-recovery-40970
And all my virtual machines are protected with an RPO of 0. I can even do a live migration to the other cluster withour downtime. Lovely.
Don’t forget to protect Prism Central as well.
 X-Ray:
With X-Ray we can test a cluster to see its potential 😉 Keep in mind that the clusters I’m using are the entry level hardware versions, and so the results are the minimum you can expect. More info on X-Ray can be found here: https://www.nutanix.com/products/x-ray
Here are the results (Peak Performance Microbenchmark test):
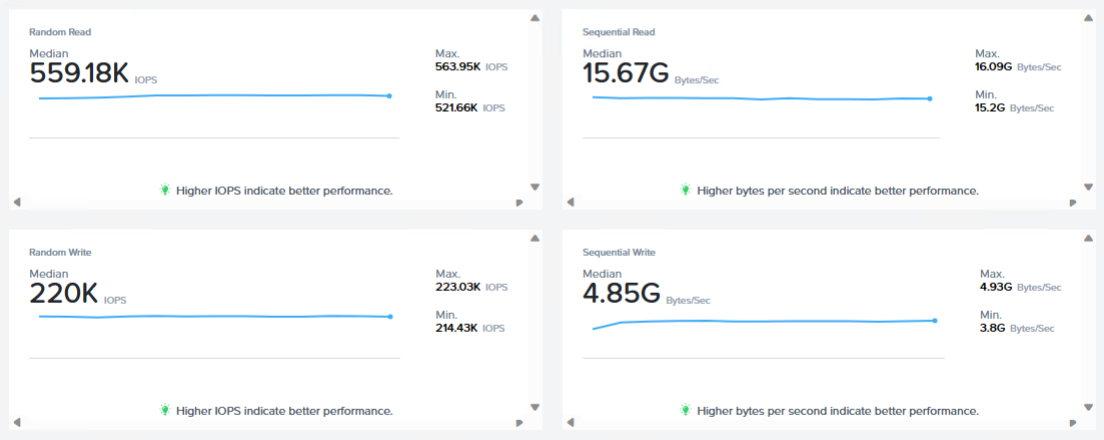
A lovely 559K read IOPS and 220K write IOPS. This is not bad. Awesome performance for the price. And when you order the clusters with some more storage the performance will go up.
Note: I’ve upgraded the CVM to 40GB ram instead of their default 32GB ram.
LCM:
You can run Life Cycle Management as you are used to do. So just run it and grab a cup of coffee while the magics happen. In my case there where not that much upgrades available:

The software upgrade went flawless.
For the firmware upgrades it is a bit different then the normal on-premises clusters. OVHcloud will inform you when there are firmware upgrades available which needs to be installed. When you receive such a notice here are the steps to prepare a node to receive the firmware upgrades: https://help.ovhcloud.com/csm/en-ca-nutanix-cluster-firmware-update?id=kb_article_view&sysparm_article=KB0057069
Documentation and Videos:
For Nutanix on OVHcloud they have a nice library full with documentation. It can be found here: https://help.ovhcloud.com/csm/worldeuro-documentation-hosted-private-cloud?id=kb_browse_cat&kb_id=62e4cfed55d574502d4c6e78b7421953&kb_category=7e50f429985469141e115d75fb840c3f
Nutanix also has made some nice youtube videos about the Nutanix on OVHcloud offer: https://www.youtube.com/playlist?list=PLAHgaS9IrJedrXBoEuQFTW0sfM1pxCjoE
Redeploy:
I already described howto redeploy a cluster in chapter: #Move Cluster Into Other vRack. But when you need to redeploy a cluster, which is moved out of his original vRack, you first have te place it back in his original vRack, then you can redeploy it to get a fresh cluster.
Note: Don’t forget to release you license before redeploying your cluster.
Conclusion:
I’ve played for a couple of weeks with Nutanix on OVHcloud. I even installed a complete Citrix VDI environment on it, because I can (not in this blogpost). I like the simplicity of the OVHcloud dashboard where you can do your configurations and even redeployments. The clusters are performing great, even with the entry level hardware. The price is a no brainer. Compare this with AWS or Azure cloud clusters and you will see the Nutanix on OVHcloud offer is so more cost effective an offers the best price performance ratio on the martket. OVHcloud can’t be ignored when planning cloud migrations.
Discover more from Jeroen Tielen
Subscribe to get the latest posts sent to your email.

One thought on “Running Nutanix on OVHcloud”