Update 23-01-2026: Cleanup process updated and some typo’s corrected.
Update 20-01-2026: Added a correct, working, update mechanism. 😉
In this blogpost I will describe how to connect Omnissa Horizon against a Nutanix AHV cluster and how to setup the golden image. We are going for an RDS setup because we can 😉
The steps involved are:
Terminal Server / SBC / RDS:
- Connect Omnissa Horizon against the Nutanix cluster (capacity provider);
- Create a Compute Profile;
- Create the Windows Server 2025 Golden Image;
- Create the “Farm”;
- Happy working 😉
VDI:
- Connect Omnissa Horizon against the Nutanix cluster (capacity provider);
- Create a Compute Profile;
- Create the Windows 11 Golden Image;
- Create the “Desktop Pool”
- Happy working 😉
Before we continue make sure Omnissa Horizon is running version 2512 and your Nutanix environment is running minimum:
- Prism Central (PC): Version 2024.3 or newer;
- Nutanix AOS: Version 7.0 or newer;
- Nutanix AHV: Version 10.0 or newer.
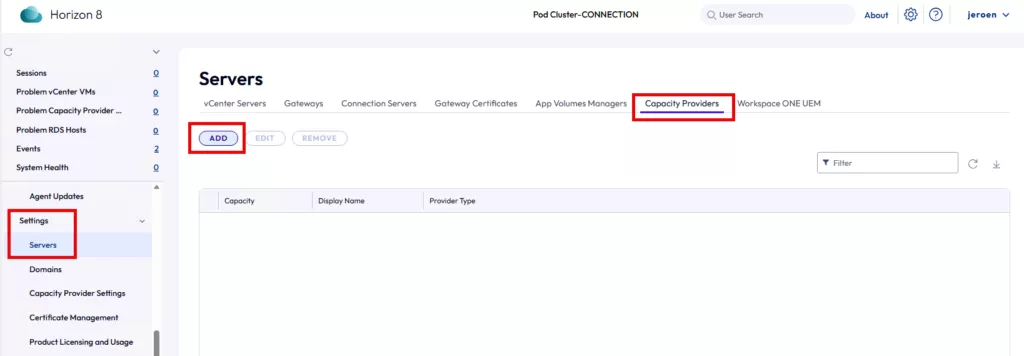
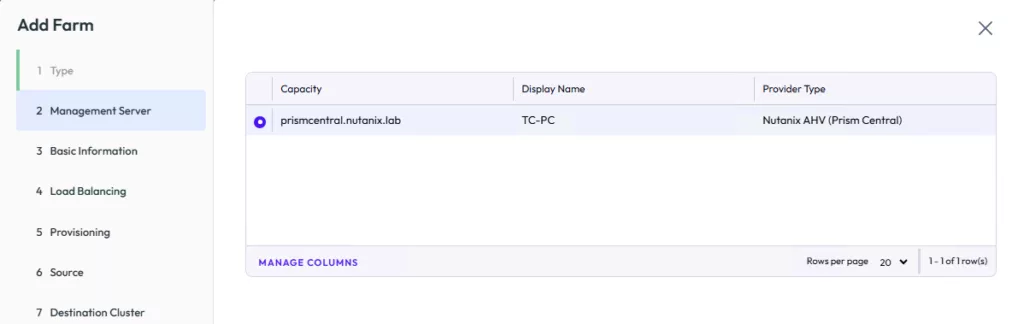
If all minimum versions are in place we can continue. First we start with connecting the Omnissa Environment against Prism Central (Yes Prism Central). Open the Omnissa webconsole and navigate to: Settings –> Servers –> Capacity Providers –> ADD.
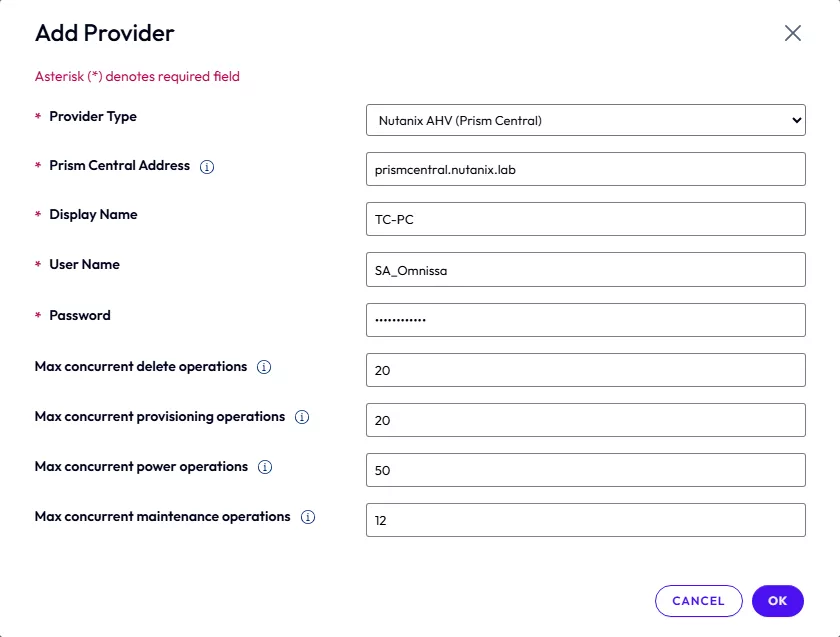
Fill in all information, (Yes I created a service account for Omnissa local on Prism Central. I don’t want to be dependent of active directory for this) and click OK.
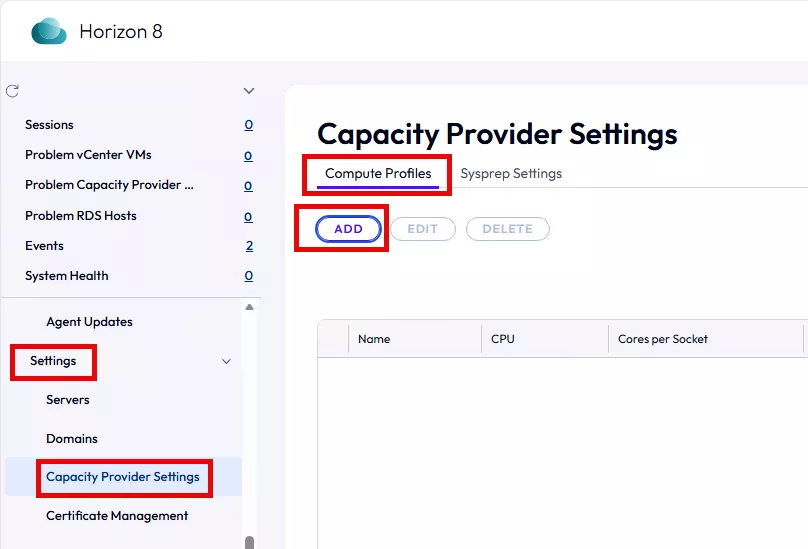
When the connection is successful we need to create a Compute Profile. This is the profile used for the created virtual machines. In my case my RDS Terminal Servers must have a profile of 6 vCPU, 16GB memory and a vTPM. Click on: Settings –> Capacity Provider Settings –> Computer Profiles –> ADD.
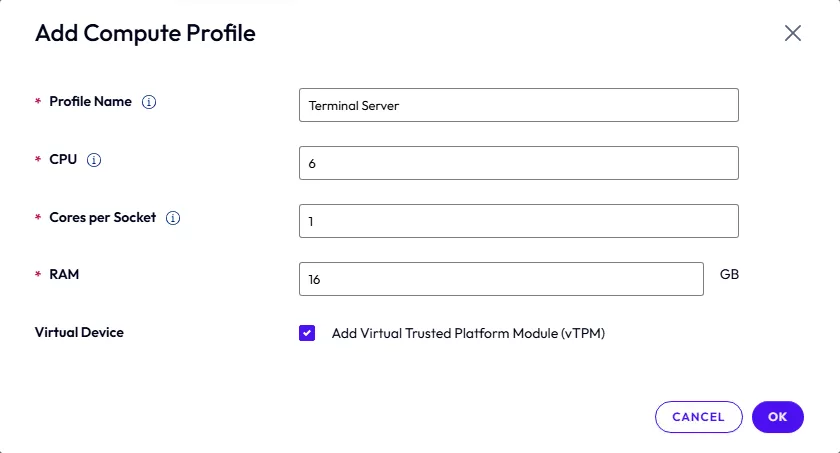
Add your required profile. For the 6vCPU requirements Omnissa will create 6 CPU’s with each 1 core. I dont like this and I normally do this the other way arround (1 CPU with 6 cores). But for Nutanix performance wise it doesn’t matter 😉 It is only my OCD 😉 Click OK.
Now we are done with the basic configuration. Lets create a Windows Server 2025 Terminal Server Golden Image (that is a mouth full). The easiest method is using my VirtIO Slipstream script to create a Windows installation ISO with the VirtIO drivers already present. This will help you with fast setup times. You can find the script here.
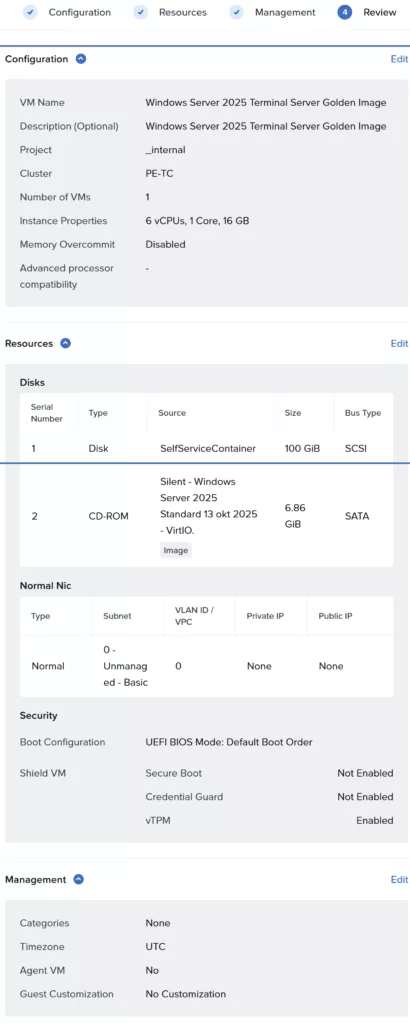
Create a virtual machine with the following specs:
- Name: W2K25GIv1 (Choose your own name, I added v1 add the end for versioning reasons)
- CPUs: 6
- Cores per CPU: 1
- Memory: 16GB
- Attach a SCSI Disk: 100GB (Or the size needed for you deployment). Make sure you place the disk in the correct storage container with the correct features enabled.
- Attach a SATA CD-ROM: And mount the Windows installer which is prepared with the VirtIO drivers
- Network: Your VLAN/Subnet where the Terminal Servers should reside. This can be a managed subnet or even an advanced (Flow microsegmentation) subnet.
- Boot Configuration: UEFI
- VM Security Settings: Enable vTPM
When Windows is installed, eject the cd-rom and make it domain member (Domain Member is not really needed but if you need to have GPO’s applied or other domain settings/software then add it). We don’t need the Nutanix Guest Tools so don’t install them. If not using the latest NGT 4.5 then it doesn’t work either. In a Terminal Server (or even VDI) we are not using functionality which the NGT provide. So don’t install it. Next install the Omnissa agent.
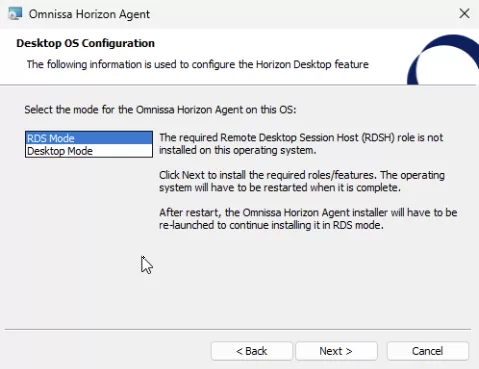
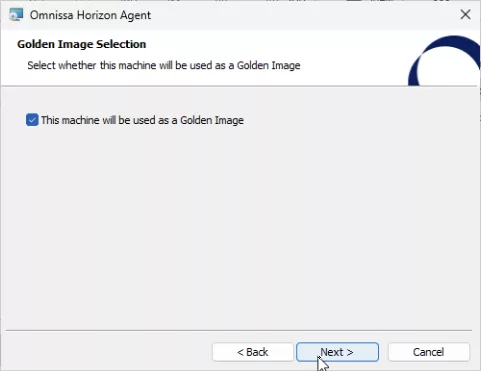
I want this deployment to use the terminal server as a multi user server so I need to select RDS mode. This will automatically install the RDS session Host role and reboots te server. Restart the Horizon agent setup again to continue. Select that this machine will be used as a Golden Image and click Next.
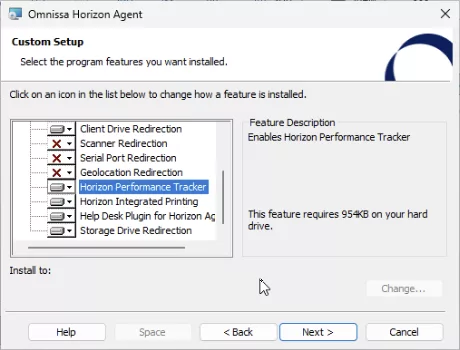
I had the best results with the “Instant Clone Agent” enabled. Scroll down and enable Horizon Performance Tracker. Click Next.
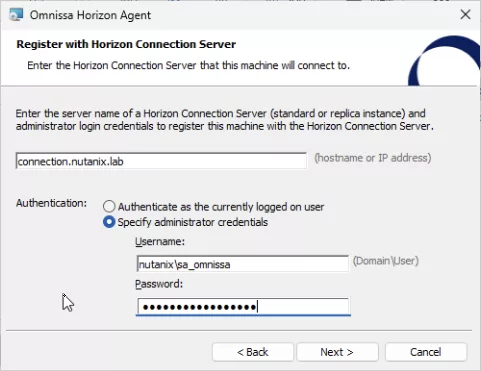
On the next screen enter the connection server FQDN or IP address. There is a typo in the installer as is says: “hostname or IP address” although hostname is working it should not be used. I hope Omnissa will change this to “FQDN or IP address”. Enter the administrator credentials (Omnissa admin) and click: Next.
Run Windows Update and install all your applications. For most default applications I always use Manuel Winkel his NeverRed script: https://www.deyda.net/index.php/en/neverred/ (Pretty easy). When all applications are installed and Windows update is done we are going to start the Omnissa Horizon Optimization Tool.
!!! WARNING !!! OSOT does not supported (yet) Windows Server 2025. Use the Citrix optimization tool (for example) for now.
The steps below are just for references. 😉 For when it will be supported.
Important: Run this when logged in with a local admin account. Don’t run this when logged in with a domain user/admin account or else you end up with cached credentials (and profile) from that user in the golden image. (Deleted all cached credentials/profiles from the domain accounts)
We are not using the Windows Audit mode to seal the Golden Image. This makes creating the updates way more difficult including automating this process. So we stick to the good old method 😉 This means we are skipping generalize in the Optimization Tool.
I’m not covering all the Optimization steps in this blogpost. As that is very well documented on other blogs already. We don’t have to use the “sdelete” as Nutanix works with extends and all disks always thin provisioned. 😉 But the method is:
- Analyze;
- Change settings in Common Options;
- Export the settings (to use when running optimization again)
- Optimize
- Change settings in Finalize;
- Finalize.
There are more steps to do before a golden image is sealed correctly. For example always run a full virusscan before shutting down, etc
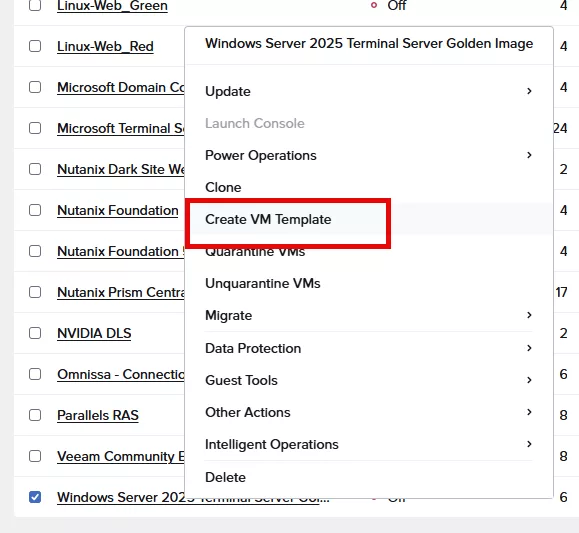
When done, shutdown the virtual machine. In Prism Central select the Golden Image virtual machine and remove the CD-Rom drive. Select the Golden Image Virtual Machine again and select Create VM Template from the action/context menu:
The next steps are next and finish. And the template is created. For more deep dive into the templates functionality of Prism Central read the following two blogposts:
- https://www.jeroentielen.nl/creating-and-maintaining-a-template-virtual-machine-in-nutanix/
- https://www.jeroentielen.nl/nutanix-guest-customization-profiles/
The official Prism Central templating, with their versioning, cannot be used for Omnissa to update the images. I hope they will change this in newer releases.
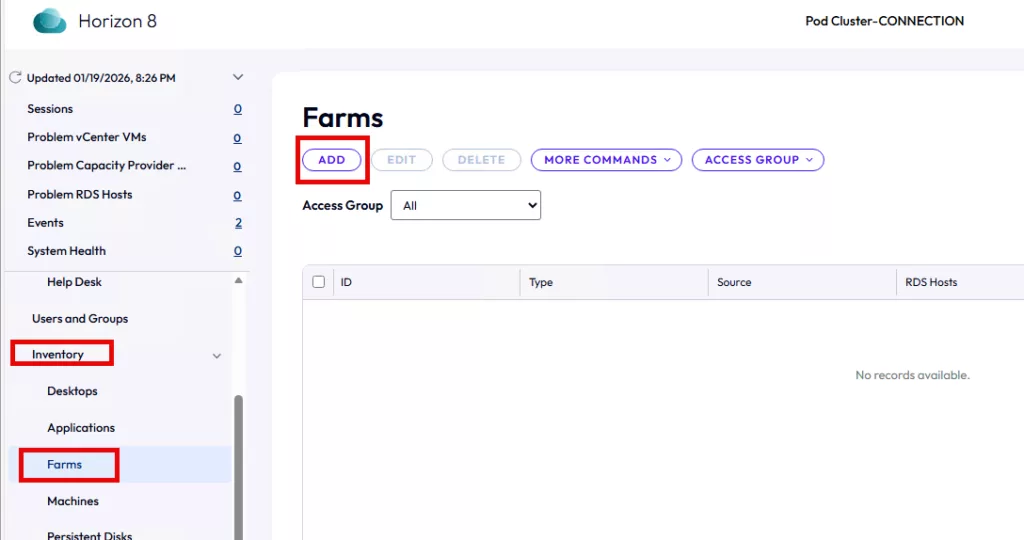
Now we need to create the “Farm” in Omnissa. Click Inventory –> Farms –> ADD
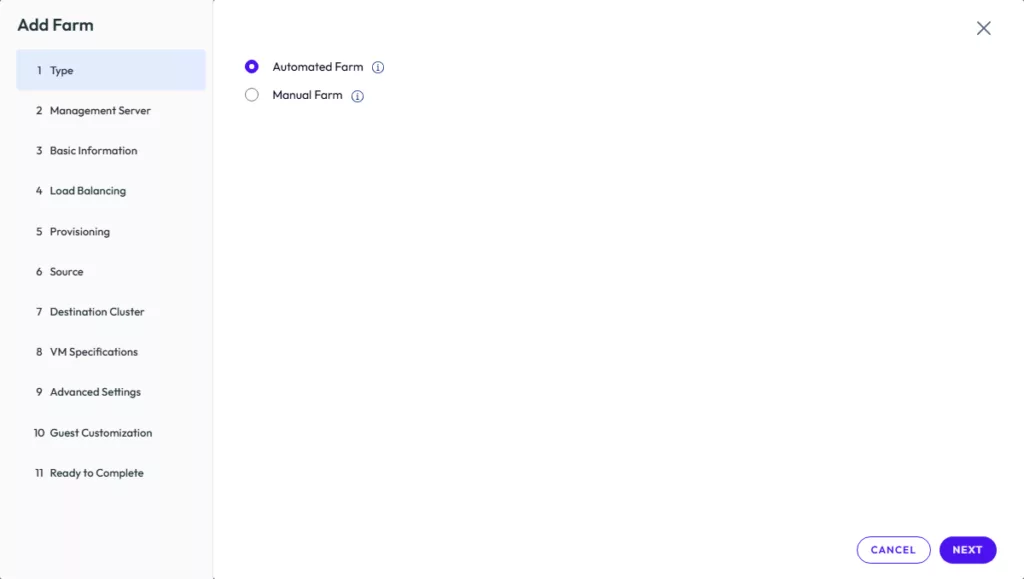
Select: Automated Farm (as we are using virtual machines) I’m skipping steps which are self explaining 😉
Select you Nutanix Prism Central provider.
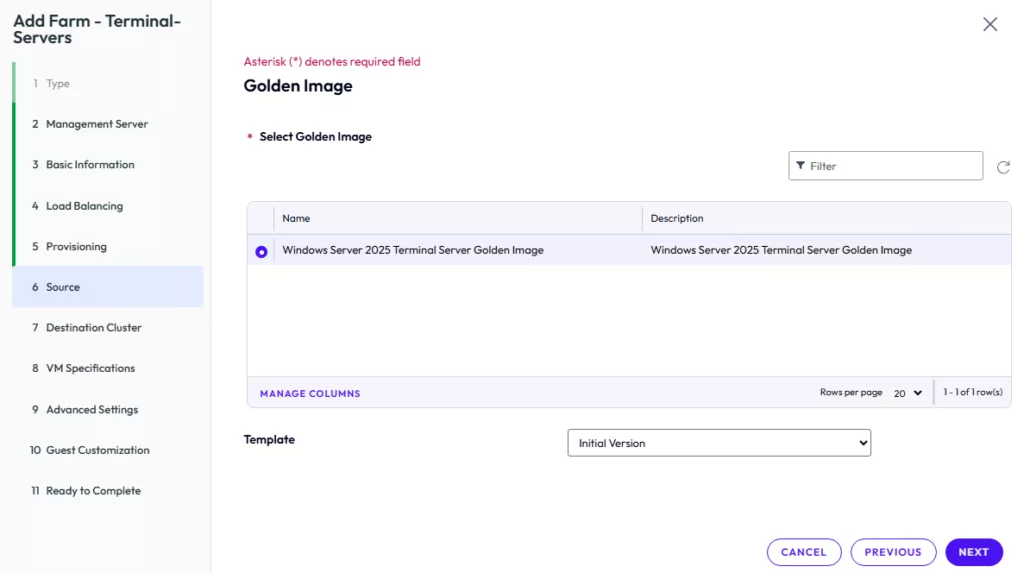
Select the template and make sure you also select the correct version inside the template.
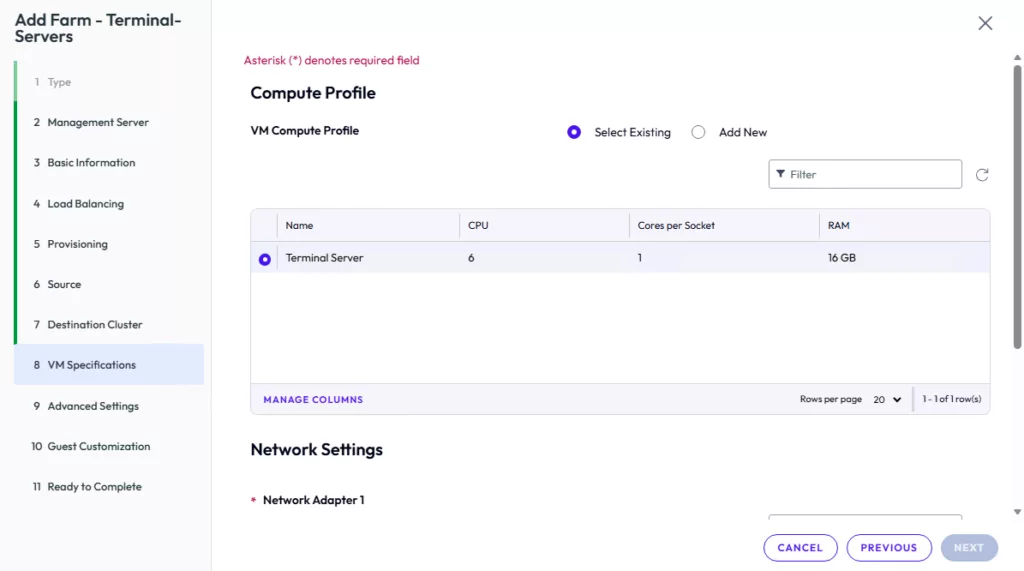
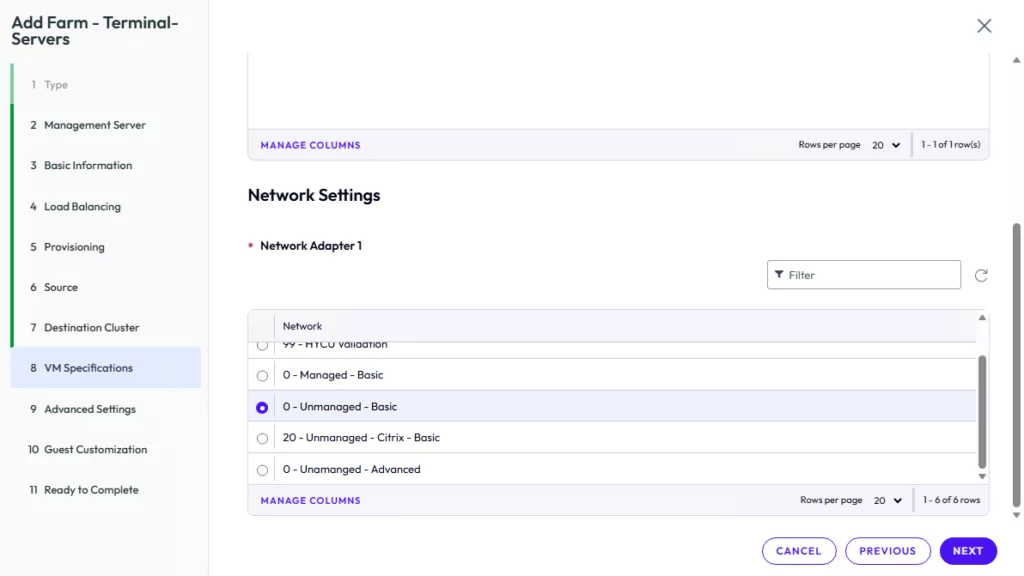
Now select the profile we created for the Terminal Servers. Scroll down and also select in which network the virtual machines must be placed.
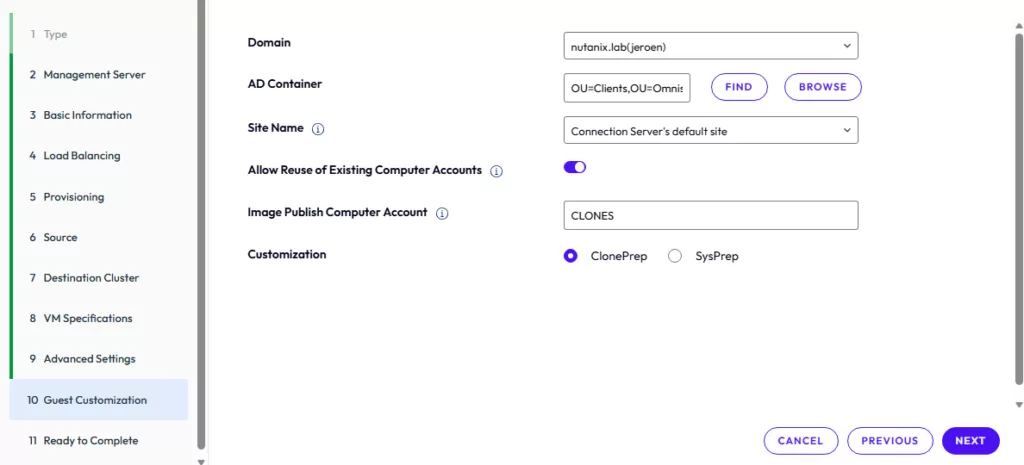
Select the correct OU to place the virtual machines in. Select “Allow Reuse of Existing Computer Accounts” and add a computer account name to use. For the customization we select ClonePrep.
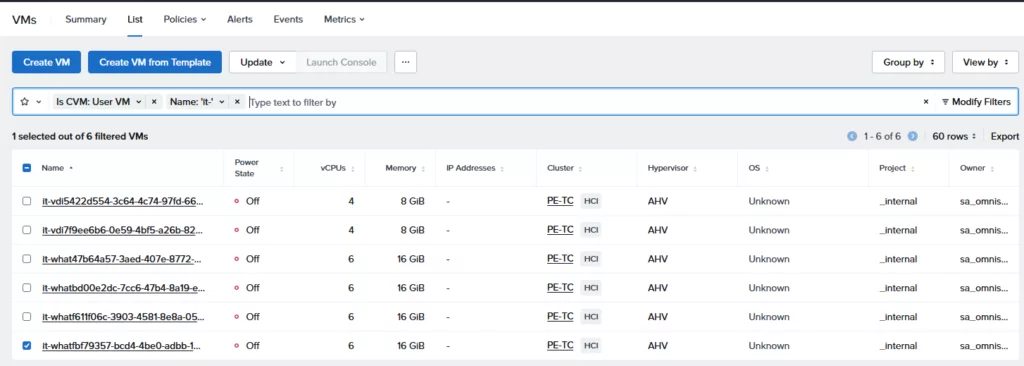
When done you will end up with the following machines (depending how much RDS servers are requested to be generated).
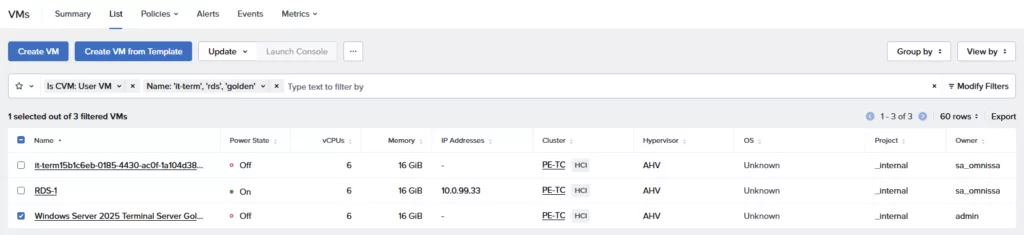
The it-termblablabla is the internal vm used for creating the actual machines. RDS-1 is my new terminal server. And, of course, the Golden Image is still there. Dont remove the Golden Image as this is needed for updating later.
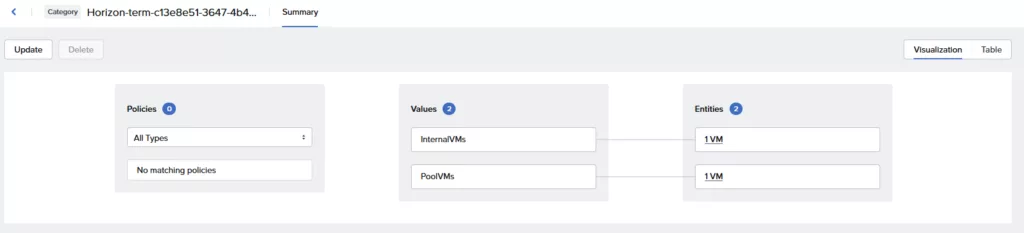
The machines are part of a category as well:
And that’s is. You can now publish desktops and applications as always within Omnissa Horizon.
Updating:
When you need to do your (monthly) updates in the Golden Image. There is a specific order to follow. Please follow this, I have spent to much time figuring this out and this is the working order (for me). I dont want to use the “auditing mode” from Windows and we cannot use the versioning feature in Templates from Nutanix Prism Central. So this is the method:
Terminal Server / SBC / RDS:
- Start the original Golden Image virtual machine;
- Remove the Omnissa Horizon agent;
- Rename the machine (Windows hostname);
- I’m using (For server 2025) the name W2K25GIv1 and when updating I will increase the version (v) number so: W2K25GIv2;
- Restart the machine;
- Reinstall the Omnissa Horizon agent;
- Check that it is used for a Golden Image;
- Restart the machine;
- Do the updates needed to do;
- Run the Optimization Tool (OSOT is not supported for Server 2025);
- Shutdown the machine;
- Create a NEW template with the version in it;
- For example: W2K25GIv2;
- Update the Farm and point to the new template;
- Make sure to “Reuse existing computer accounts”.
VDI:
- Start the original Golden Image virtual machine;
- Do the updates needed to do;
- Run the Optimization Tool;
- Shutdown the machine;
- Create a NEW template with the version in it;
- For example: W11GIv2;
- Update the Desktop Pool and point to the new template;
- Make sure to “Reuse existing computer accounts”.
Here is a link to the official Omnissa documentation: https://docs.omnissa.com/bundle/Desktops-and-Applications-in-HorizonV2512/page/Nutanix_UpdatingaGoldenImage.html
Cleanup:
Update 23-01-2026: It seems cleaning up is working correct. Reinstalled my lab completely and now cleaning up is working perfectly fine. Nice.
Each update will create a new “it-*” virtual machine. These internal virtual machines are used to clone the worker virtual machines from. They are not being remove after a successful upgrade and when not in use anymore by virtual machine. Keep in mind that manual cleaning is needed. 🙁 I hope Omnissa will also fix this in future released.