
!!! Always make sure you have a working backup when performing upgrades !!!
The last year we had lots of new version in the Nutanix HCI ecosystem. Community Edition (CE) is built on the production version but had some issues with the latest versions. In this blog post I will show you to where you can upgrade (and their pitfalls). All screenshots and upgrades performed in this blog post are being done in an Intel NUC (i7, 64GB ram) with the CVM on a 1TB NVME and AHV on a 1TB SSD.
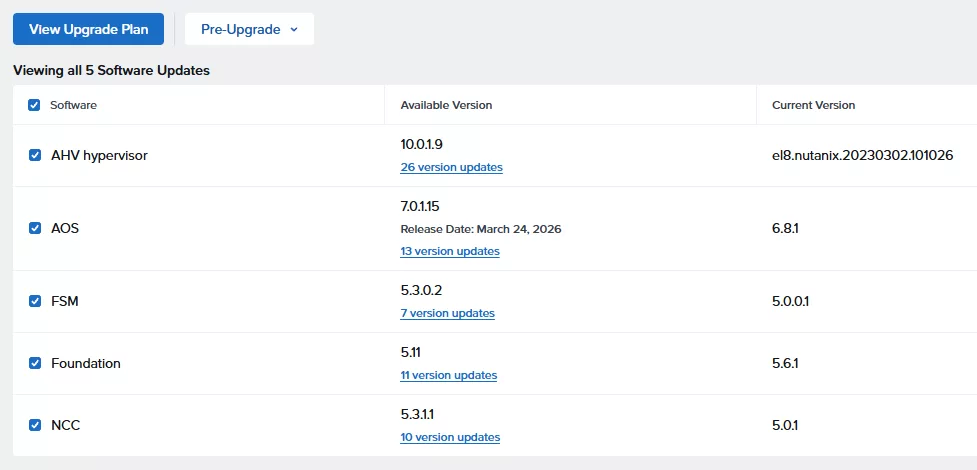
At the moment (August 2026) the latest CE version is 2.1 which hold AOS 6.8.1 and AHV 20230302.101026 when running LCM you can upgrade to:
- AOS 7.0.1.15
- AHV 10.0.1.9
This is still a “safe” upgrade path which you can do even if you have USB drives in your CE installation.
When you install to AHV 10.x or newer on consumer grade hardware (like a simple Intel NUC for example) you can’t run any virtual machines anymore. So when the installer upgraded AHV to 10.0.1.9 (for example) VM’s will not boot. To fix this run the script created by Kurt: https://github.com/ktelep/NTNX_Scripts/tree/main/CE/ahv10_commercial_workaround
curl -fsSL https://raw.githubusercontent.com/ktelep/NTNX_Scripts/main/CE/ahv10_commercial_workaround/fix_ahv10_comm.sh | bashWhen it is applied VM’s are working again.
Now we have a working Nutanix Community Edition on AOS 7.0.1.15 and AHV 10.0.1.9. (latest 7.0 and 10.0 releases at the time of writing)
To upgrade further, like AHV 10.3, there are USB limitations. In 10.3, and newer, the USB drivers are removed. So when you are running AHV (or CVM, DATA) from a USB drive you cant upgrade further. In that case you need to reinstall your cluster without any USB drives. An example on this you can find here: https://www.jeroentielen.nl/nutanix-community-edition-on-2-disks/
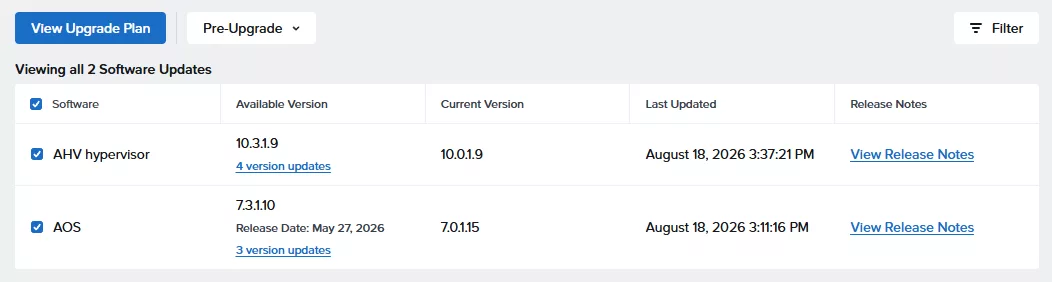
When there are no more USB drives in the cluster/node we can upgrade to AOS 7.3.1.10 and AHV 10.3.1.9 (latest 7.3 and 10.3 releases at the time of writing provided by LCM)
This AHV upgrade will be a long one. Follow it on the console to see the magic happening.
When the cluster is upgraded we run an LCM Inventory to see what versions are available to upgrade to:

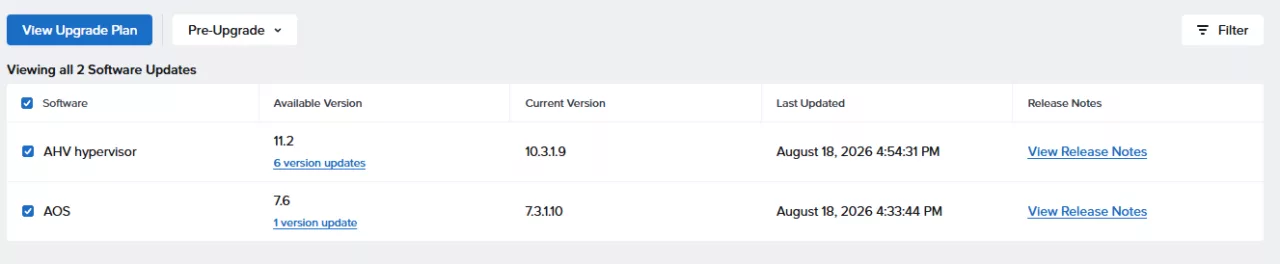
At the moment we cannot go any further via normal LCM. But if you are a customer/partner of Nutanix you have access to the download you can download the AOS 7.6 and AHV 11.2 LCM binaries. When you have downloaded them upload then in LCM (direct upload) and do a inventory again:
Don’t upgrade yet, there are things changed in the AHV 11 release. If we just YOLO it now it will not work. We need to truncate our disk serials to a max of 20 characters.
Run this line of code in the AHV console:
grep -o '"serial": "[^"]*"' /etc/nutanix/config/cvm_config.jsonThis will show you the disk serials in use. In my case my Intel NUC is safe and I can run the upgrade. But let me startup a nested Nutanix CE installation on VMware ESX and run that command:

As you can see my disks have long serials (don’t count them, they are 32 characters each) and when we upgrade the cluster will not work anymore (yes the fixes can be done later as well, but better do it now). So first stop all running virtual machines on the cluster (including Prism Central). Then open ssh session to the CVM and stop your cluster and shutdown CVM.
cluster stop (i agree)
sudo shutdown -h nowWhen CVM is not runing open SSH session to AHV and run the following commands:
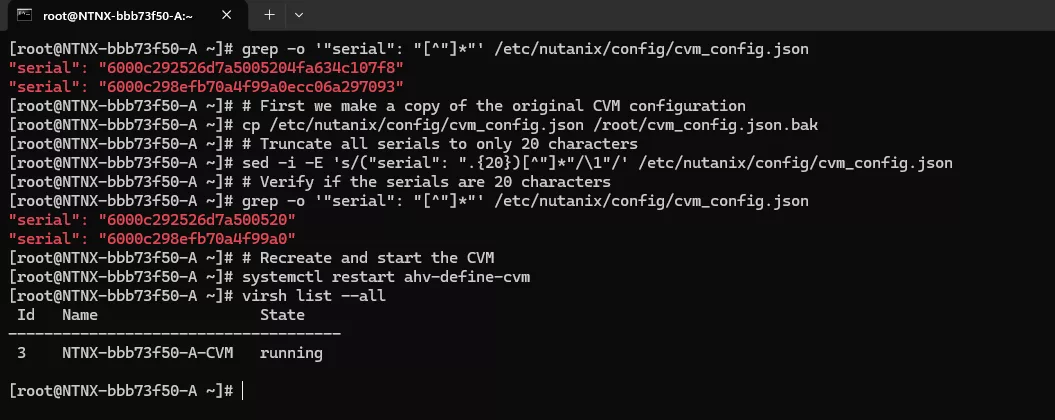
# First we make a copy of the original CVM configuration
cp /etc/nutanix/config/cvm_config.json /root/cvm_config.json.bak

# Truncate all serials to only 20 characters
sed -i -E 's/("serial": ".{20})[^"]*"/\1"/' /etc/nutanix/config/cvm_config.json

# Verify if the serials are 20 characters
grep -o '"serial": "[^"]*"' /etc/nutanix/config/cvm_config.json

# Recreate and start the CVM
systemctl restart ahv-define-cvmIt looks like this:
When CVM is booted, SSH into the CM and wait for zookeeper to start (genesis status) and the give the following command:
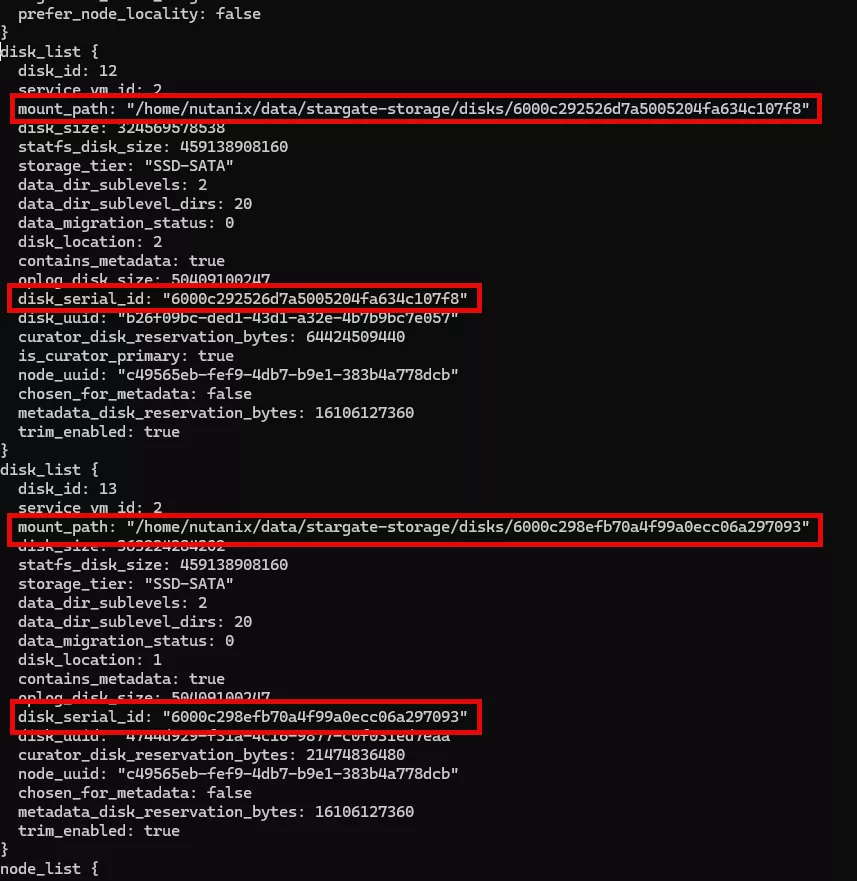
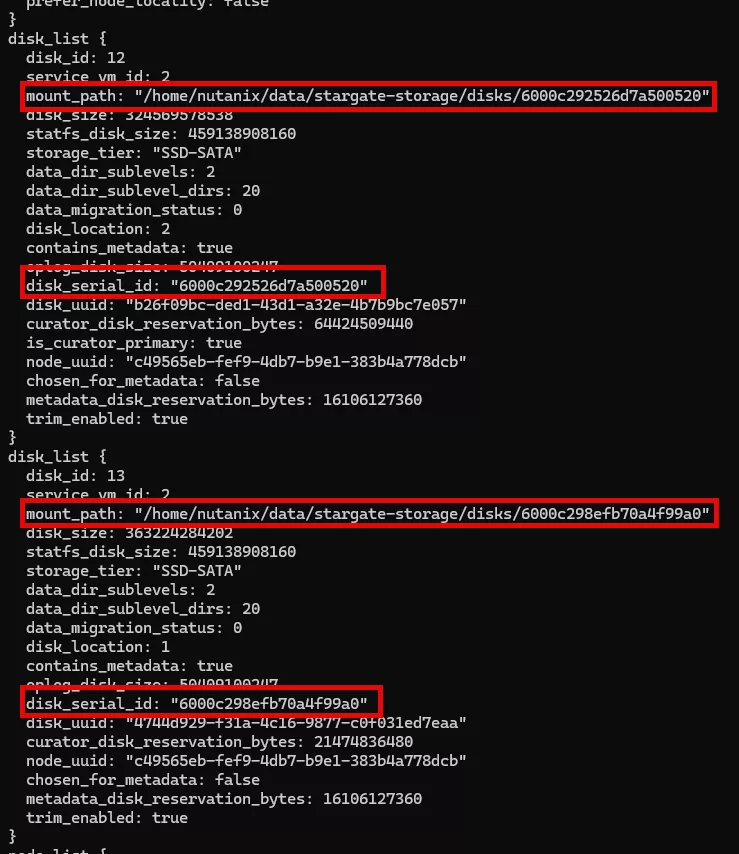
edit-zeus --editor=vimWhen you are in the zeus editor search for the disks and edit their disk_serial_id and mount_path to 20 characters (remove the last bit). Make sure they match the serials in the cvm_config.json
Before:
After:
Save the file with “escape -> “:wq” –> enter
Verify the config in zeus with:
zeus_config_printer | grep -nE "disk_serial_id|mount_path|offline_disk_mount_paths"If the config looks correct you can reboot the CVM and then start the cluster:
# Restart the CVM
sudo reboot

# When CVM is back up and Zookeeper is running (genesis status) start the cluster:
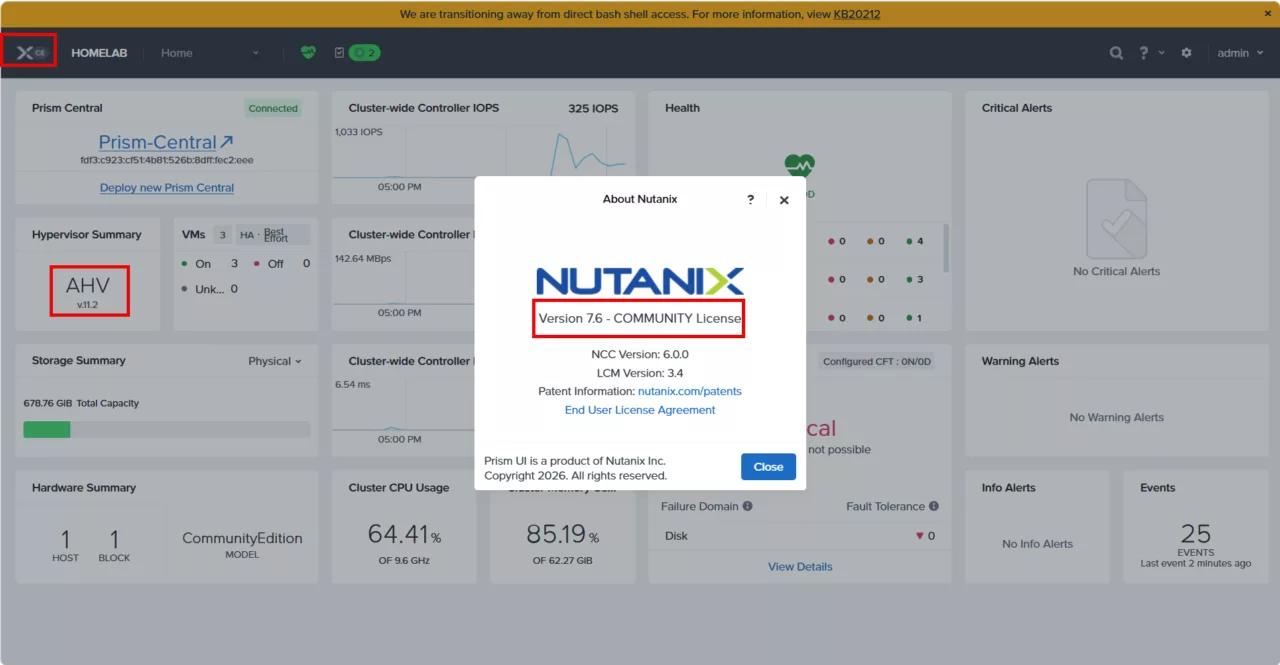
cluster startWhen the cluster is up and running again upload the AHV 11.2 and AOS 7.6 binaries do an inventory and upgrade. Eventually you cluster looks like this:
And YES you can also install Prism Central 7.6. Make sure you install at least the SMALL version as that will allow you to enable the Ultimate trial.
Discover more from Jeroen Tielen
Subscribe to get the latest posts sent to your email.

Hi Jeroen, thanks for the excellent article as always.
My CE 2.1 lab is running AHV v10.0.0.1, AOS 7.0.0.5
Is this upgrade applicable to my lab ?
Thanks
Ike
It depends. Are you using an USB drive?
No, I’m not using USB drive.
CE 2.1 is nested on ESXi 8.x on an HP DL360 G9
Then you are good to go. Have fun upgrading 😉 (Please make sure you have a backup, just in case)
Nice, thanks.
Will do.
Hi
I was playing around with my Minisforum MS-A2. And it looks like the 9955HX CPU will not work on AHV 11 and above.
//Björn
Why not? Have you read my latest posts? 😉
Hi
So it looks like the libvirt in the latest release will not recognize the 9955HX CPU.
Older releases like AHV 10 did a fallback to Rome. And then you start to get som interesting errors when working with the network components
//Björn
I got a ms-a2 with that cpu. When I got some spare time I will try to run the upgrade on that box.
Hi there Jeroen,
In my nested CE environment, I was able to upgrade AOS to v7.6. But I’ve not been able to get AHV up to v11.2 (still at v10.0.1.9)
I get this: Failed again Operation Failed. Reason: LCM operation update failed on leader, ip: [172.16.0.131] due to Upgrade failed: Unable to run upgrade plugin reimage_success_check: exit status 1 Plugin stdout: Plugin stderr: Missing BMC device in ipmi class IPMI subsystem not enabled, nothing to do Reimaging failed, no further details.
Obviously this is nested on ESXi and as such there is no IPMI
Have you come across this? Your expertise would be appreciated as always
Thanks
Ike